Használati útmutató Asus Marshmallow MD100
Asus nincs kategorizálva Marshmallow MD100
Olvassa el alább 📖 a magyar nyelvű használati útmutatót Asus Marshmallow MD100 (2 oldal) a nincs kategorizálva kategóriában. Ezt az útmutatót 8 ember találta hasznosnak és 7 felhasználó értékelte átlagosan 4.5 csillagra
Oldal 1/2
MD100 Mouse
Mouse Model Name: MD100
Dongle Model Name: RG56
ENGLISH
Your package includes:
a. MD100 Mouse
b. Nano USB 2.4GHz receiver (stored inside the mouse)
c. 1 x AA battery
d. Quick Start Guide and Warranty Policy
Dimensions
Mouse: 107mm (L) x 60mm (W) x 27.8mm (H)
Dongle: 18.9mm (L) x 12mm (W) x 4.5mm (H)
Strap: 70mm (L) x 11mm (W) x 0.7mm (H)
Weight
Mouse: 56g (without battery)
Dongle: 1.6g
Rating
Mouse: 2.4GHz mode: 1.5V/50mA
Bluetooth 5.0 mode: 1.5V/50mA
Dongle: 5V/100mA
Hardware Version
Mouse: GFSK / Bluetooth: V1.0
Dongle: GFSK: V1.0
Software Version
Mouse: GFSK / Bluetooth: V1.0
Dongle: GFSK: V1.0
System Requirements
Windows 10 or Above / macOS 12 / Chrome OS
Operating Temperature
0 ~ 40°C
Operating Humidity
20 ~ 85%
Storage Tempterature
-40 ~ 60°C
Storage Humidity
20 ~ 95%
UKCA RF Output table
(The Radio Equipment Regulations 2017)
Frequency Band
Mouse: 2.4GHz mode: 2403-2479 MHz
Bluetooth mode: 2402-2480 MHz
Dongle: 2403-2479 MHz
Maximum output power(EIRP)
Mouse: 2.4GHz mode: 4 dBm
Bluetooth mode: 0 dbm
Dongle: 0 dbm
CE RED RF Output table (Directive 2014/53/EU)
Frequency Band
Mouse: 2.4GHz mode: 2403-2479 MHz
Bluetooth mode: 2402-2480 MHz
Dongle: 2403-2479 MHz
Maximum output power(EIRP)
Mouse: 2.4GHz mode: 4 dBm
Bluetooth mode: 0 dbm
Dongle: 0 dbm
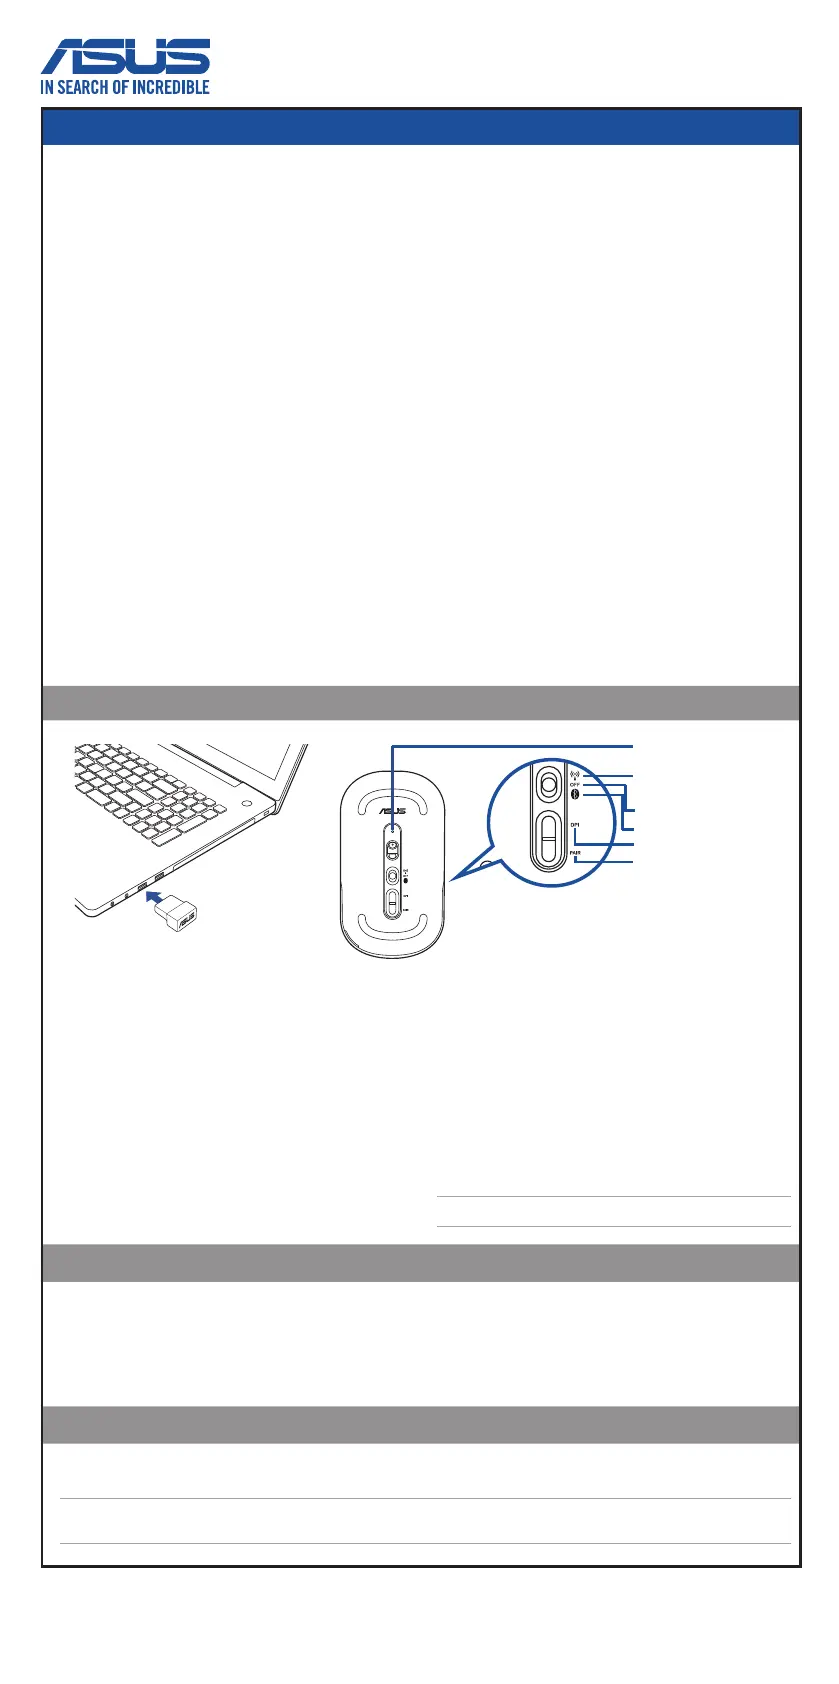
Connecting to PC
Connection Channel / DPI /
Low battery Indicator
2.4GHz
Bluetooth
Power OFF
DPI Button
Pair Button
Via 2.4GHz:
1. Slide the power switch to 2.4GHz Mode.
2. Insert the Nano USB receiver into an available USB port on
your PC.
3. When successfully paired to your PC, the Connection channel
indicator will light up green and then turn o.
Via Bluetooth:
1. Slide the switch to Bluetooth Mode.
2. Press the pair button for over 3 seconds to activate the
Bluetooth pairing mode. (The indicator will ash blue rapidly)
3. On Windows, right-click the Bluetooth icon on the right of
the task bar (or double-click the Bluetooth icon in the Control
Panel), then click Add a device > ASUSMD100 Mouse >
Finish.
4. When successfully connected, the indicator will stop ashing
and remain in blue light for several seconds before it fade
o. Once the mouse is set up on your PC, it will automatically
connect to your PC the next time you turn to Bluetooth mode.
NOTE: The mouse supports Bluetooth 5.0.
Adjusting DPI
To change the DPI, press the DPI switch button.
Refer to the following for DPI indications:
800 dpi: DPI indicator will ash once.
1000 dpi: DPI indicator will ash twice.
1600 dpi: DPI indicator will ash three times.
Low battery indicator
Please replace the battery when the indicator ashes red, indicating that the mouse is running low on
power. (with less than 20%)
CAUTION: RISK OF EXPLOSION IF BATTERY IS REPLACED BY AN INCORRECT TYPE. DISPOSE OF USED BATTERIES ACCORDING TO THE
INSTRUCTIONS.
Termékspecifikációk
| Márka: | Asus |
| Kategória: | nincs kategorizálva |
| Modell: | Marshmallow MD100 |
Szüksége van segítségre?
Ha segítségre van szüksége Asus Marshmallow MD100, tegyen fel kérdést alább, és más felhasználók válaszolnak Önnek
Útmutatók nincs kategorizálva Asus

2 Április 2025
2 Április 2025
1 Április 2025
30 Március 2025
27 Március 2025
12 Január 2025
12 Január 2025
12 Január 2025
2 Január 2025
19 December 2024
Útmutatók nincs kategorizálva
Legújabb útmutatók nincs kategorizálva
10 Április 2025
10 Április 2025
10 Április 2025
9 Április 2025
9 Április 2025
9 Április 2025
9 Április 2025
9 Április 2025
9 Április 2025
9 Április 2025