Használati útmutató Metra 91-3300P
Metra
nincs kategorizálva
91-3300P
Olvassa el alább 📖 a magyar nyelvű használati útmutatót Metra 91-3300P (3 oldal) a nincs kategorizálva kategóriában. Ezt az útmutatót 10 ember találta hasznosnak és 5.5 felhasználó értékelte átlagosan 5.0 csillagra
Oldal 1/3

IMPORTANT
Installation Kit
120 91-3300P
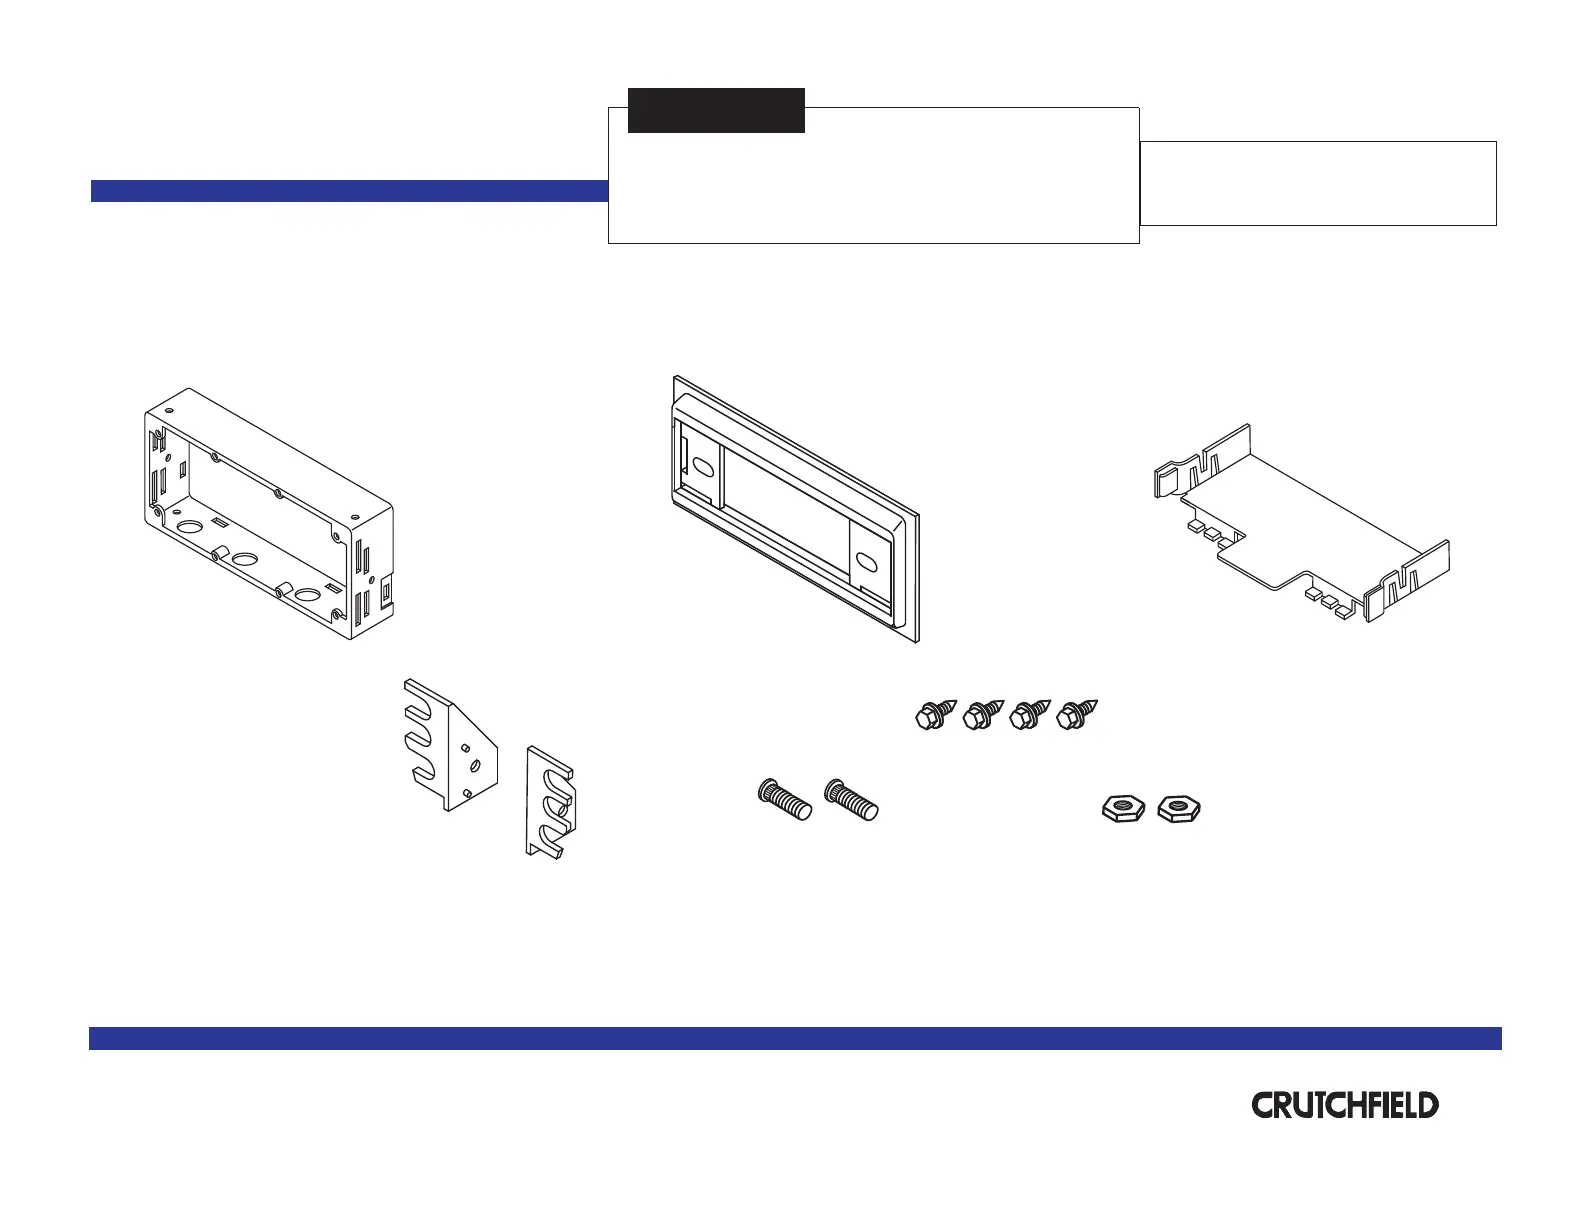
Before starting, compare items on your invoice with items
received. Carefully check through packaging material.
If an item is missing, please call:
Crutchfield
Parts Supplied:
Kit Frame
Support Tray
Chevrolet
Revision 10/29/03
Kit assembly instructions are on the following pages.
(2) Studs
Page 1 of 3
®
Copyright 2003 Crutchfield Corporation
*120913300P*
Trimplate
(2) 3/8” Nuts
Mounting Brackets
(4) 1/4” Hex Screws
at 1-888-955-6000

FIGURE 2
Shaft Supports
Installation Kit
Tools Required
120 91-3300P
Chevrolet
1. Press posts on trimplate into holes on kit frame to
snap parts together and secure with hex screws
(Figure 1).
2. Use a utility knife to cut out shaft supports in
trimplate to create a DIN opening (Figure 2).
3. Push clips on into slots on rear of kit support tray
frame to secure (Figure 1).
4. Secure side to kit frame with mounting brackets
studs nutsand supplied (Figure 1).
5. Remove DIN sleeve from receiver and slide into
opening in trimplate. Secure sleeve to trimplate by
bending the securing tabs (Figure 3).
6. Slide receiver into sleeve/kit assembly.
DIN Receiver Assembly
Utility
Knife
2
®
Copyright 2003 Crutchfield Corporation
FIGURE 3
Securing Tabs
DIN Sleeve
Bend tabs after sleeve
is inside assembly.
▲
Small Flat Blade
Screwdriver
FIGURE 1 Trimplate
Kit Frame
Support Tray
Mounting Bracket
Mounting Bracket
Stud Nut
1/4” & 3/8”
Sockets
Hex Screws

Installation Kit
120 91-3300P
Chevrolet
Spacers
(supplied with
your order)
1. Press posts on trimplate into holes on kit frame to
snap parts together and secure with hex screws
(Figure 1).
2. Push clips on into slots on rear of kit framesupport tray
to secure (Figure 1).
3. Secure side to kit assembly with mounting brackets
studs nutsand supplied (Figure 1).
4. Choose the proper spacers (supplied with your order) to
allow receiver nosepiece to extend 1/8” to 1/4” beyond
face of trimplate (Figure 2).
5. Insert receiver shafts (with spacers in place) through
openings in trimplate. Secure receiver and faceplate
with shaftnuts supplied with receiver.
6. Attach control knobs.
1/8” -1/4”
▲
▲
Spacer
Shaft Receiver Assembly
3
FIGURE 2
Shaftnuts
®
Copyright 2003 Crutchfield Corporation
FIGURE 1
Trimplate
Kit Frame
Support Tray
Mounting Bracket
Mounting Bracket
Faceplate
Control Knobs
Tools Required
▲
Deep Socket
(size depends upon receiver)
Stud
Nut
1/4” & 3/8”
Sockets
Hex Screws
Termékspecifikációk
Márka: | Metra |
Kategória: | nincs kategorizálva |
Modell: | 91-3300P |
Szüksége van segítségre?
Ha segítségre van szüksége Metra 91-3300P, tegyen fel kérdést alább, és más felhasználók válaszolnak Önnek
Útmutatók nincs kategorizálva Metra
3 Április 2025
3 Április 2025
3 Április 2025
14 Január 2025
14 Január 2025
2 Január 2025
2 Január 2025
12 December 2024
26 Szeptember 2024
26 Szeptember 2024
Útmutatók nincs kategorizálva
- nincs kategorizálva Deltaco Gaming
- nincs kategorizálva SkyRC
- nincs kategorizálva Axkid
- nincs kategorizálva Woonexpress
- nincs kategorizálva Modbap Modular
- nincs kategorizálva Samson
- nincs kategorizálva Elba
- nincs kategorizálva Velux
- nincs kategorizálva NWS
- nincs kategorizálva Olympus
- nincs kategorizálva Heckler & Koch
- nincs kategorizálva IFootage
- nincs kategorizálva AZZA
- nincs kategorizálva LiftMaster
- nincs kategorizálva Toolcraft
Legújabb útmutatók nincs kategorizálva
10 Április 2025
10 Április 2025
10 Április 2025
9 Április 2025
9 Április 2025
9 Április 2025
9 Április 2025
9 Április 2025
9 Április 2025
9 Április 2025