Használati útmutató MJX T53

Olvassa el alább 📖 a magyar nyelvű használati útmutatót MJX T53 (7 oldal) a Játékok kategóriában. Ezt az útmutatót 3 ember találta hasznosnak és 2 felhasználó értékelte átlagosan 4.5 csillagra

Oldal 1/7
Ages 14+
Introduction
Safety Guidelines
Thank you for purchasing this product, please read this maunal carefully before use and
retain it for future reference.
1.Coaxical-rolor design,built-in gyro and unique function of digital speed setting and
operation of the helicopter.It is the best choice for beginner.
2.By using of latest infrared auto connection technology, up to two helicopters can be
3.Full charged battery can support the helicopter flys about 9 mins.
4.Tripple circuit protections make the flight more safer and improve the service life of the
helicopter.
5.The helicopter has Videography and Photography function.
1. Please read this instruction manual carefully before playing and operate the product
according to the manual.
2. Keep the small accessories away from the kids to avoid accident.
3. Keep batteries away from fire or high temperature environment.
4. When flying the helicopter, keep it 1 ~ 2 meters away from user or others to avoid
injury due to collision.
5. Not to decompose or modify the product which may cause malfunction or accident.
6. Fly the helicopter within your eye vision for easy and safety control.
7. Need adult supervision when this helicopter is being played by children.
8. Only batteries of the same or equivalent type as recommended are to be used.
9. Insert batteries with correct polarity.
10. Non rechargeable batteries are not to be charged.
11. Do not mix old and new batteries.
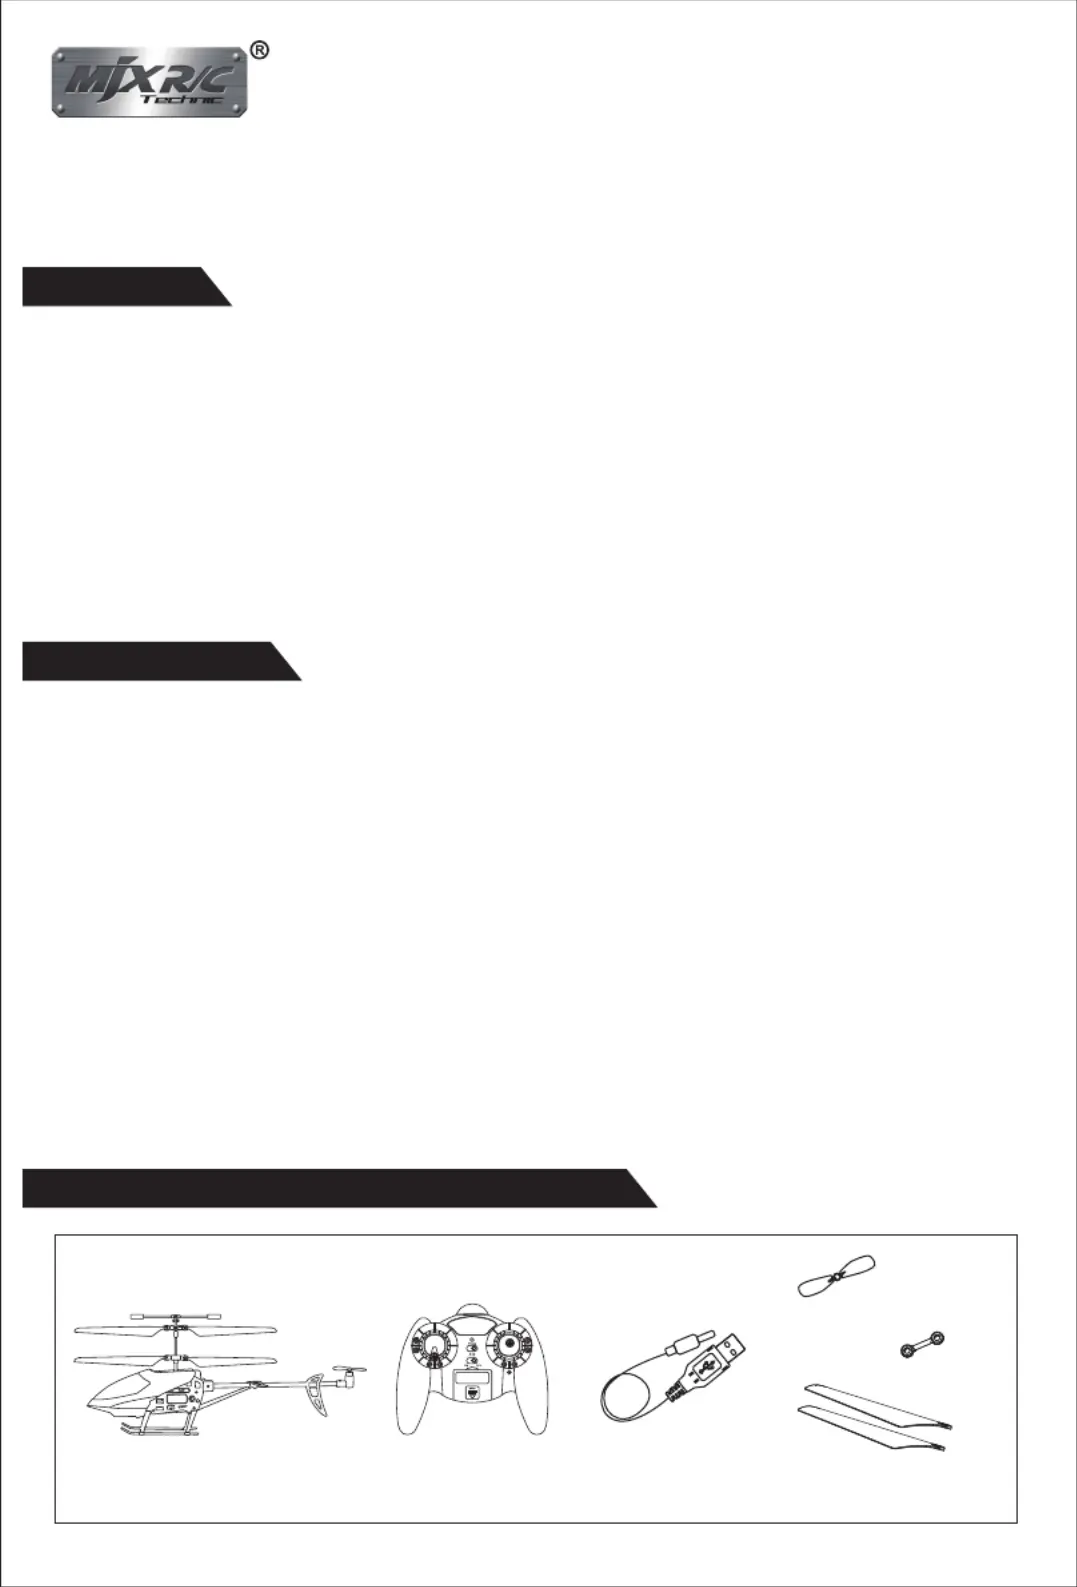
Product / Spare Parts Included in This Packaging
3-CHANNEL DIGITAL PROPORTIONAL R/C COAXIAL HELICOPTER MODEL
T-SERIES
Remote Control
Tail rotor
rotor blade
connect buckle
USB Charger
Helicopter
ITEM NO.T53/T653
Sketch - major Parts and Function Switches
Battery Installation
1. Unscrew counter clockwise to open the battery compartment cover.( Pic. 1 )
2. Install 4 X AA batteries into the battery compartment according to the given polarity. ( Pic. 2 )
3. Screw clockwise to close the battery compartment. (Pic. 3 )
Pic. 3
1
How to remove and insert batteries.
Pic. 1 Pic. 2
Fuselage Length: 250mm
Overall height: 115mm
Main Rotor Diameter: 200mm
Gross Weight: about 48g
Motor: Coreless Motor
Gear Ratio: 1:11
Battery: 3.7V 300mAh
Charging Time: about 60mins
Main Rotor
Connect buckle
Landing gear
Searchlight
Tail Rotor
Stabilizer bar
1
2
Charging
compartment
right control stick
Power switch
Throttle control stick
Gyro trim
camera button
Light indicator
Channel selector
Charge the helicopter
Flight Environment
Preparation for Flight
B. Use the USB charger to charge the helicopter
Connect the USB charger to the USB interface of the computer,
ensure that the helicopter is in a OFF power status, then, plug the
output jack of the USB cable into the charging socket of the
helicopter.(pic 5)
1. Indoor , stay away from unstable airflow generated by air conditioners or fans and without
table lamps or other dangerous objects.
2. Wide open space : Recommended minimum 3M ( wide ) x 5M ( length ) x 2.5M ( height )
3. Since this product is using of the infrared remote control technology, operating under
strong sun light or other any other light may cause lost of control.
Must set the remote control at the OFF position before operating.
1. Turn on the helicopter by push the power switch and the searchlight will keep flashing
rapidly.After a few seconds, the searchlight will turn to slowly blinking,indicating that the
helicopter is ready to connect with the remote control.
2. Firstly, select the "A","1" or "2" channel;turn on the remote control and the power light of the
remote control will blink slowly; push the throttle control stick up to the top, then push it to the
bottom, the power light of the remote control will keep rapidly blinking, meaning that the
remote control is sending out connectional signal.Once signal connection is done, the power
light of the remote control will turn to constant "ON" without blinking.
3. Slowly push up the throttle stick and the helicopter takes off.
2
1.There are two ways available to charge the helicopter.
A. Use the remote control to charge to helicopter
● Open the cover of the charging compartment on the remote control
and take out the charging cable.
● Ensure the helicopter is in a “OFF” power status.
Plug the output jack of the charging cable into the charging socket
of the helicopter. Then, charging is beginning. (pic 4)
2. The light of the remote control/USB charger is off when charging
is proceeding and will turn on automatically when charging is
done. Fully charge takes approximately 60 minutes.
Hints
Select channel 1 and channel 2 and operate maximum 2 helicopters simultaneously.
Not to use the same channel by 2 helicopters at the same time.
Set the connection one by one. Otherwise, it may not be connected.
Once turn off the power. The connection procedure must be repeated to operate the
helicopter.
It is advised to select channel A if there's only 1 helicopter is playing.
Pic. 5
Pic. 4

Termékspecifikációk

Márka: MJX
Kategória: Játékok
Modell: T53

Szüksége van segítségre?

Ha segítségre van szüksége MJX T53, tegyen fel kérdést alább, és más felhasználók válaszolnak Önnek