Használati útmutató NAV-TV NTV-KIT483
Olvassa el alább 📖 a magyar nyelvű használati útmutatót NAV-TV NTV-KIT483 (4 oldal) a Dashcam kategóriában. Ezt az útmutatót 3 ember találta hasznosnak és 2 felhasználó értékelte átlagosan 4.5 csillagra
Oldal 1/4

BHM
09/28/15
NTV-DOC 154
rB4
Agreement End user agrees to use this product in compliance with all State and Federal laws. NAV-TV Corp. would not be held liable for misuse of its product. :
If you do not agree, please discontinue use immediately and return product to place of purchase. This product is intended for off-road use and passenger
entertainment only.
1 | P a g e
3950 NW 120th Ave, Coral Springs, FL 33 TEL 561-955-9770 FAX 561-955-9760 065
www.nav-tv.com info@nav-tv.com
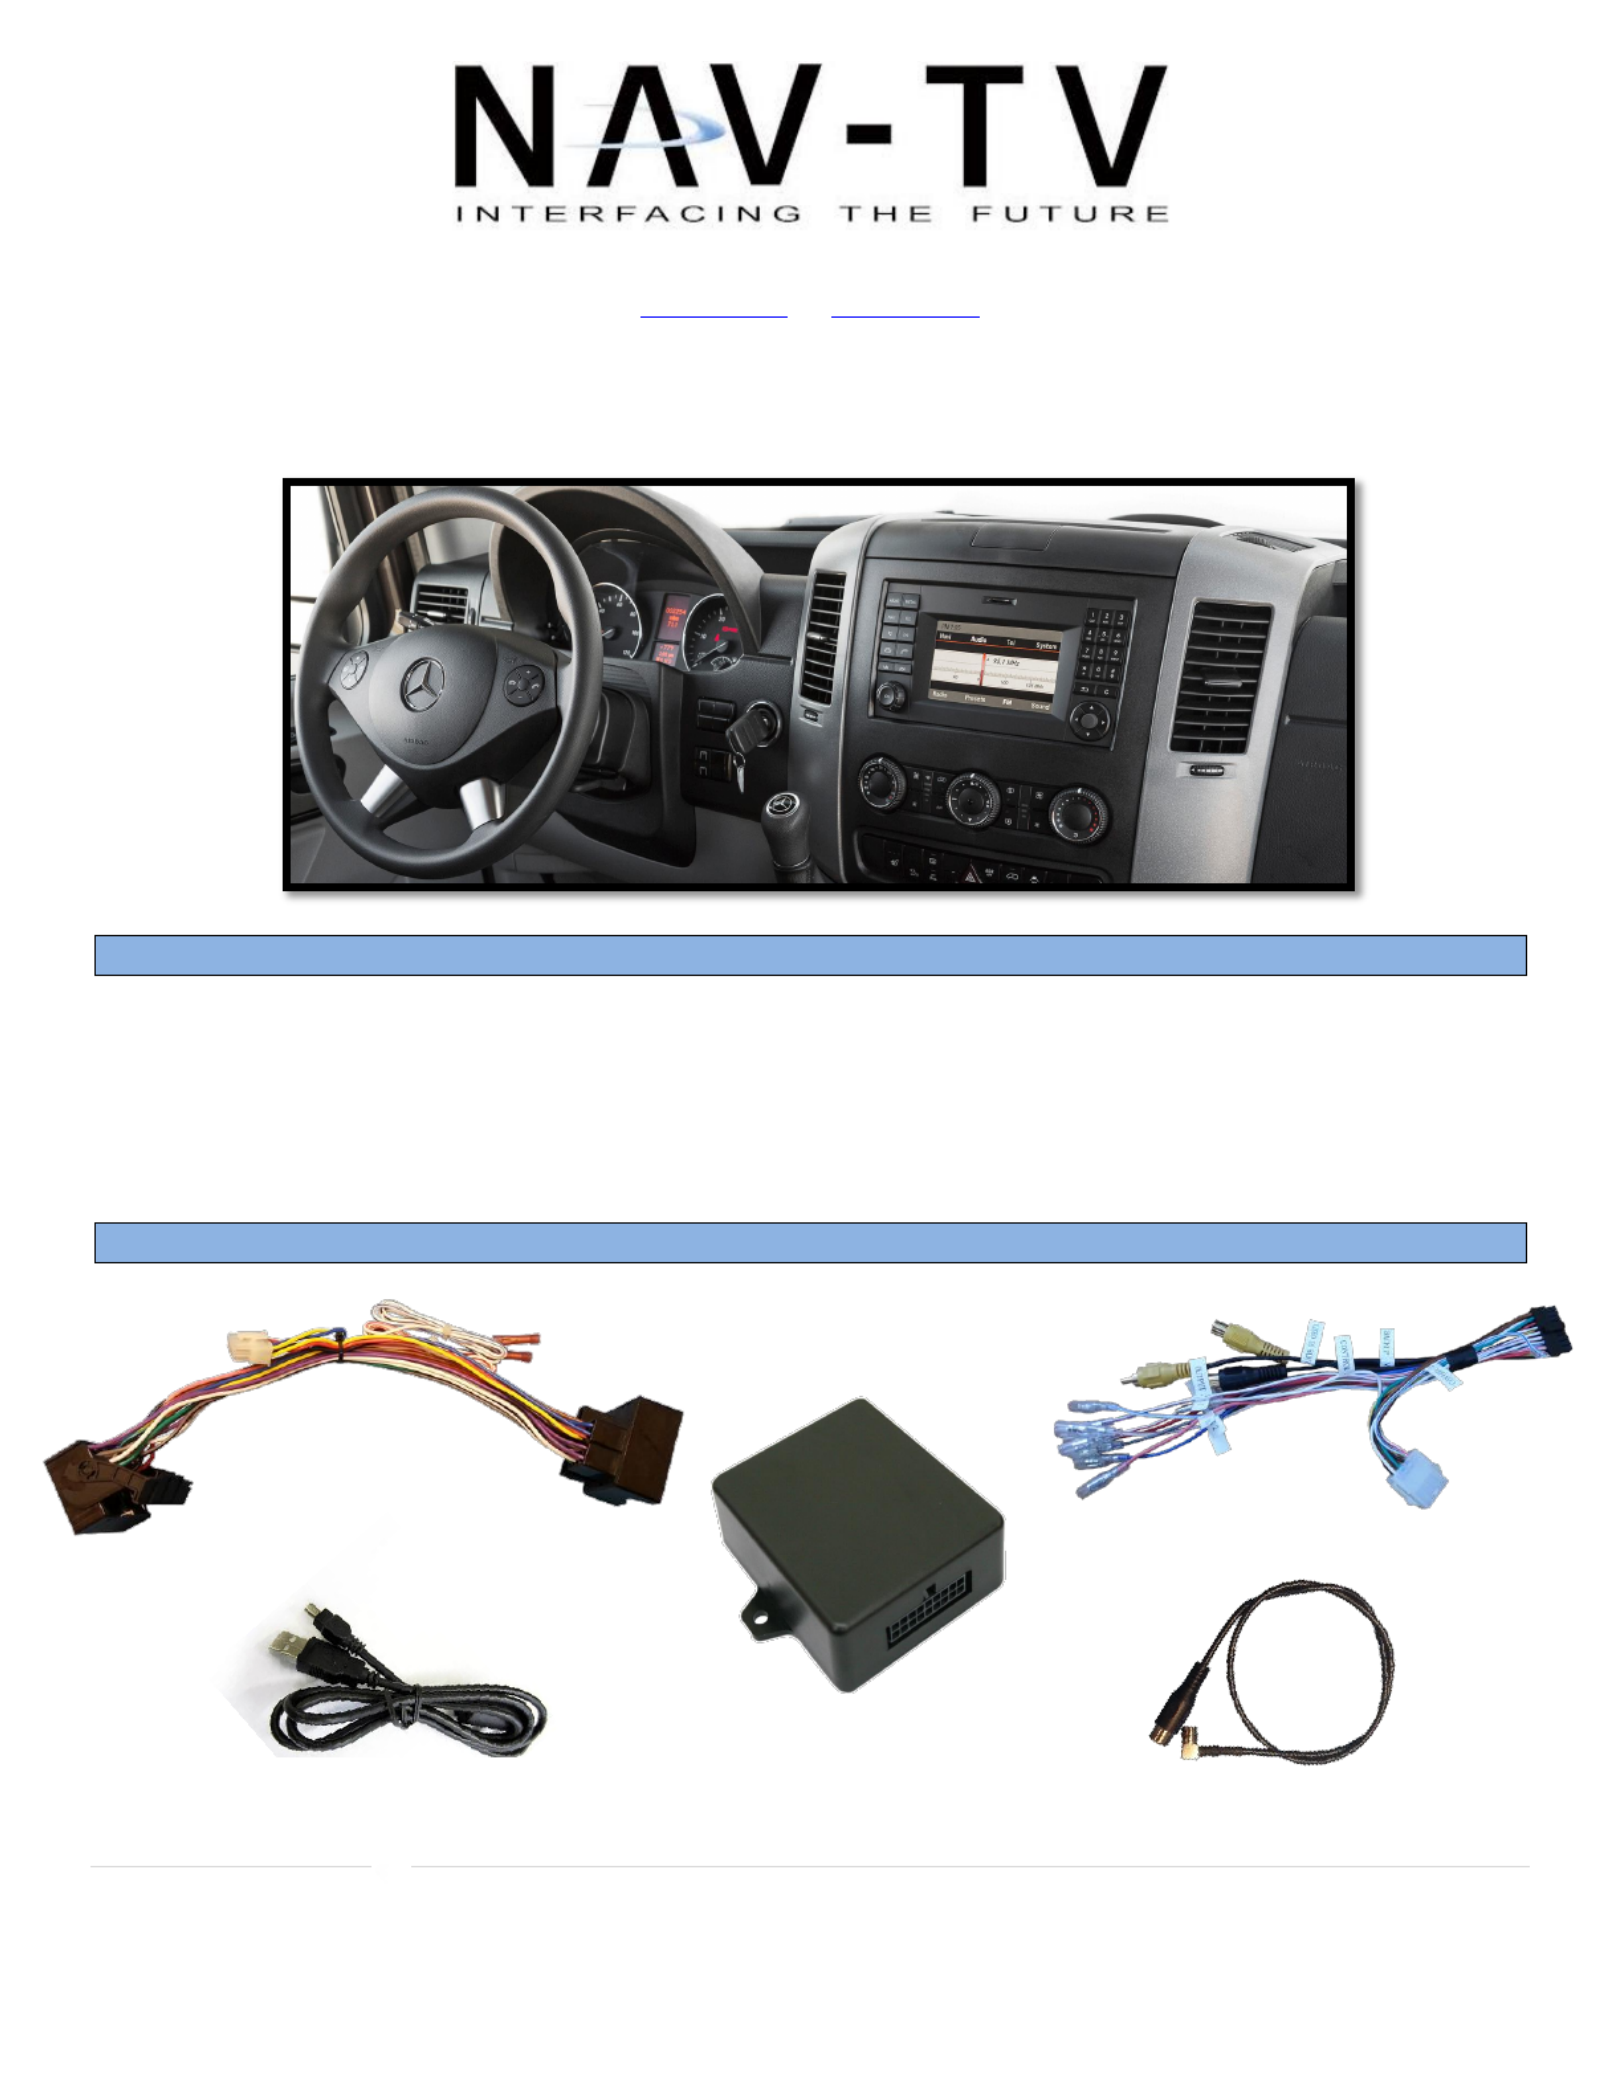
MB Sprinter-CAM
NTV-KIT477
Overview
The MB Sprinter-CAM allows the user to add an aermarket rear camera to the factory screen on the
Mercedes Sprinter. If desired, forced camera is an opon through a mounted toggle switch (not included).
ATTENTION: This module locks the VIN and can only be used on ONE vehicle at a me. to
Kit Contents
Plug & Play T Harness
NTV-HAR 081
SMB to RCA Adapter
NTV-CAB007
USB Cable (updates)
NTV-CAB009
MB Sprinter-CAM
Module
NTV-ASY171
CAN-XG Adapter
NTV-HAR058

BHM
09/28/15
NTV-DOC 154
rB4
Agreement End user agrees to use this product in compliance with all State and Federal laws. NAV-TV Corp. would not be held liable for misuse of its product. :
If you do not agree, please discontinue use immediately and return product to place of purchase. This product is intended for off-road use and passenger
entertainment only.
2 | P a g e
Module Pin Outs
PIN #
Descripon
Color
1
12v Constant (+)
Yellow
2
Input 1 (de-program wire)
Red
3
Input 2 (program wire)
Blue
4
Input 3 (Force CAM)
Pink
8
CAN HI (Radio Side)
White/Green
9
CAN HI (Car Side)
Brown/Black
10
Ground (-)
Black
17
CAN LO (Radio Side)
Green
18
CAN LO (Car Side)
Brown
Installaon
1. Remove the factory radio. This requires pulling panels and removing screws. Disconnect all connected
harnesses and set the radio aside.
2. Connect the male end of the factory 44-pin plug to the female end of the provided Plug & Play T-
Harness.
3. Disconnect the two smaller plugs on the factory 44-pin plug and connect
them both to the male end of the provided Plug & Play T-Harness.
4. Connect the harness to the 8-pin plug located in the center of the CAN-XG Adapter Plug & Play T-
Harness.
5. Connect the to the 18-pin Molex MB Sprinter-CAM module
connector on the end of the . CAN-XG Adapter
Wire Side

BHM
09/28/15
NTV-DOC 154
rB4
Agreement End user agrees to use this product in compliance with all State and Federal laws. NAV-TV Corp. would not be held liable for misuse of its product. :
If you do not agree, please discontinue use immediately and return product to place of purchase. This product is intended for off-road use and passenger
entertainment only.
3 | P a g e
6. Connect the provided to the green port on the back of the SMB to RCA Adapter
Sprinter’s factory radio (if there is already a plug at the green port, disconnect it and
use the provided SMB cable instead).
7. Aer installing and running the reverse camera to the dash
opening (connect power to an ACC source, NOT reverse!),
connect the camera’s signal lead to the RCA side of the SMB
to RCA Adapter Note: ACC power in Mercedes can oen be .
found at the cigaree lighter.
8. Connect the male end of the provided 44-pin Plug & Play T-
Harness leave the module outside of the dash, or accessible. back to the radio and
9. Proceed to .Programming (below)
10. Once programming is complete, start the vehicle and place it into
reverse. The reverse camera’s image should appear on the screen
automacally.
11. Oponal: If forced camera is desired, connect one side of a toggle
switch (not included) to ACC, and the other side to INPUT 3 (pink).
Acvang this switch will force the rear camera in any gear (reverse
camera must be powered with ACC and a reverse wire!) not
Module Programming
1. Begin by installing this kit (page 2, steps 1-9).
2. From the 18-pin Molex connector, nd the labeled Blue wire Input 2.
3. Cut the metal connector o of the and strip the end back. blue wire
4. Connect this wire to 12v (+). temporarily When programming is complete, you must remove this wire
from power! Note: the yellow wire on the white 8-PIN molex connector is CAN wire, not constant a
power Use the RED wire in this plug (constant 12v) or the yellow wire from 18-PIN XG module. .
5. Turn (not ACC or running, but the vehicle’s ignion ON ON).
6. Wait at least for the radio to fully boot and sele. 1 minute
7. With connected to 12v (+), and Input 2 toggle (pull and release once) the high-beam head lamp lever
‘DIAGNOSIS’ will appear on the screen. Refer to the chart below during programming.
8. Once the radio has been programmed, it will shut down (not reboot, but turn o).
9. Aer a few seconds, press the on the radio to bring the radio back up. power buon
10. Remove Input 2 from 12v (+). Insulate the wire end.
11. Connue with installaon: step 10.
Termékspecifikációk
Márka: | NAV-TV |
Kategória: | Dashcam |
Modell: | NTV-KIT483 |
Szüksége van segítségre?
Ha segítségre van szüksége NAV-TV NTV-KIT483, tegyen fel kérdést alább, és más felhasználók válaszolnak Önnek
Útmutatók Dashcam NAV-TV

8 Július 2024

8 Július 2024

8 Július 2024

8 Július 2024

8 Július 2024

8 Július 2024

8 Július 2024

8 Július 2024

8 Július 2024

8 Július 2024
Útmutatók Dashcam
- Dashcam Dometic
- Dashcam Nedis
- Dashcam Philips
- Dashcam Pioneer
- Dashcam Garmin
- Dashcam JVC
- Dashcam AEG
- Dashcam Toyota
- Dashcam Evolveo
- Dashcam HP
- Dashcam Motorola
- Dashcam Boss
- Dashcam Technaxx
- Dashcam Hikvision
- Dashcam Kenwood
- Dashcam Asus
- Dashcam Rollei
- Dashcam Hama
- Dashcam Midland
- Dashcam Lamax
- Dashcam Navitel
- Dashcam Sencor
- Dashcam TrueCam
- Dashcam Xblitz
- Dashcam Ring
- Dashcam Alpine
- Dashcam Cobra
- Dashcam Nextbase
- Dashcam Scosche
- Dashcam Denver
- Dashcam Trevi
- Dashcam EchoMaster
- Dashcam Gembird
- Dashcam Niceboy
- Dashcam Osram
- Dashcam ModeCom
- Dashcam ADATA
- Dashcam Overmax
- Dashcam Mini
- Dashcam Kogan
- Dashcam Prestigio
- Dashcam Clarion
- Dashcam Media-Tech
- Dashcam AZDome
- Dashcam Metra
- Dashcam ION
- Dashcam Blaupunkt
- Dashcam Mio
- Dashcam DOD
- Dashcam Pro-User
- Dashcam Konig
- Dashcam Jensen
- Dashcam Pyle
- Dashcam Salora
- Dashcam CRUX
- Dashcam Uniden
- Dashcam Hertz
- Dashcam Thinkware
- Dashcam IRoad
- Dashcam Trebs
- Dashcam Genius
- Dashcam Valueline
- Dashcam Swann
- Dashcam Caliber
- Dashcam Brigmton
- Dashcam Maginon
- Dashcam Ednet
- Dashcam Steren
- Dashcam Audiovox
- Dashcam Transcend
- Dashcam Laser
- Dashcam Naxa
- Dashcam Waeco
- Dashcam Nikkei
- Dashcam Tracer
- Dashcam Minolta
- Dashcam Navman
- Dashcam Veho
- Dashcam Boyo
- Dashcam Dymond
- Dashcam Jobo
- Dashcam Cowon
- Dashcam Guardo
- Dashcam Eufab
- Dashcam Roadeyes
- Dashcam Kaiser Baas
- Dashcam Ferguson
- Dashcam Braun Phototechnik
- Dashcam Escort
- Dashcam BlackVue
- Dashcam Nordval
- Dashcam Innovv
- Dashcam Carmera
- Dashcam Skytronic
- Dashcam Lidl
- Dashcam VIOFO
- Dashcam CamOne
- Dashcam Mobileye
- Dashcam Blow
- Dashcam Kapture
- Dashcam ProUser
- Dashcam Nanocam+
- Dashcam Vicovation
- Dashcam Dashmate
- Dashcam Andatech
- Dashcam Rexing
- Dashcam RIPOON
Legújabb útmutatók Dashcam

14 Január 2025

14 Január 2025

14 Január 2025

13 Január 2025

11 Január 2025

11 Január 2025

11 Január 2025

11 Január 2025

7 Január 2025

7 Január 2025