Használati útmutató Noctua NH-D9 TR5-SP6 4U
Noctua Hardverkoeling NH-D9 TR5-SP6 4U
Olvassa el alább 📖 a magyar nyelvű használati útmutatót Noctua NH-D9 TR5-SP6 4U (2 oldal) a Hardverkoeling kategóriában. Ezt az útmutatót 14 ember találta hasznosnak és 7 felhasználó értékelte átlagosan 4.0 csillagra
Oldal 1/2
Scan this code to display
multilingual manuals on
your phone.
NOCTUA NH-D9 TR5-SP6 4U
INSTALLATION MANUAL
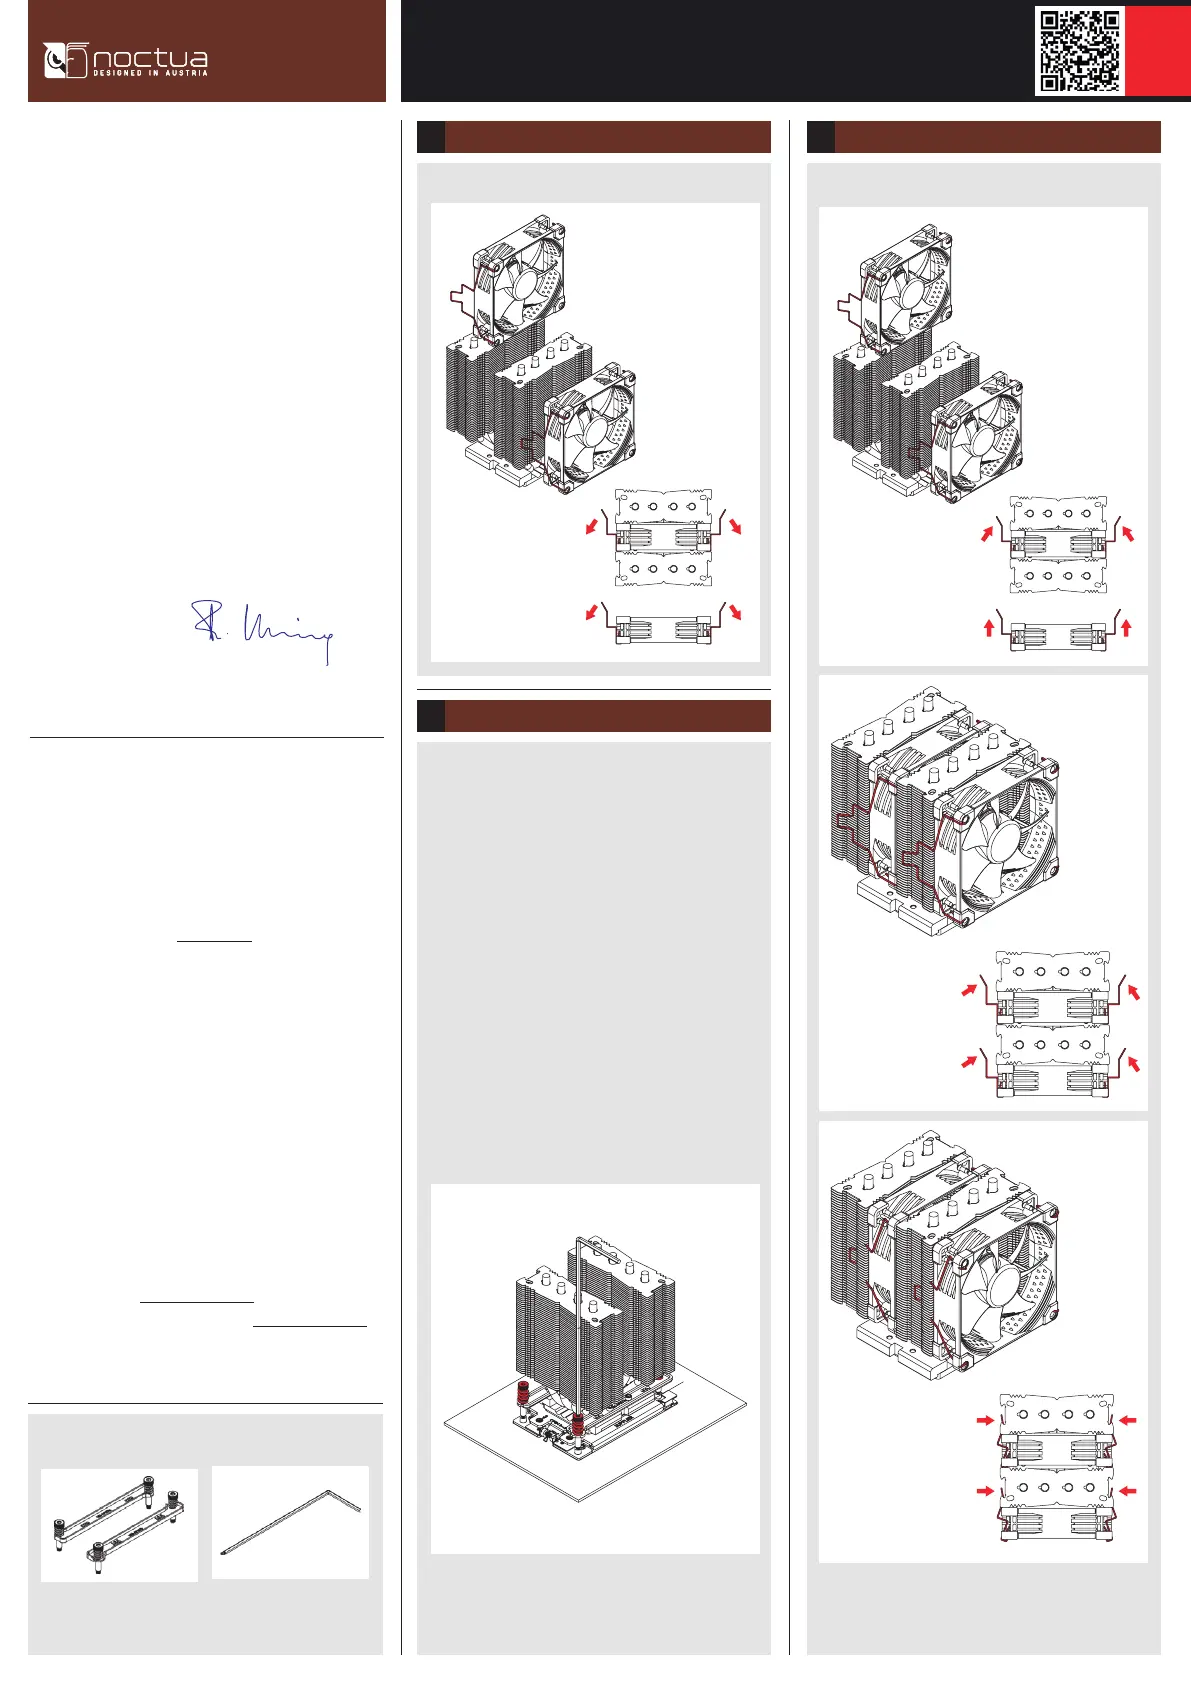
Take the fans off the cooler.
Removing the fans
1
Fastening the heatsink to the CPU
2
Remove the plastic protection cover from the base of
the heatsink and be careful not to damage the layer of
pre-applied thermal compound.
Caution: If you are not using the heatsink for the first
time and it therefore doesn’t have a fresh layer of
pre-applied thermal compound anymore, you need to
apply a thin layer of thermal compound to the CPU yourself
before clipping it to the heatsink. If there are residual
traces of previous thermal paste or thermal pads on
your CPU or on the heatsink, please clean them off first.
Then put the heatsink onto the CPU so that the four spring-
loaded screws align with the threads of the CPU socket.
Use the supplied mounting tool to tighten the screws.
Perform 3 turns on each screw, then repeat until all are
fully tightened.
This manual will guide you through the installation process
of the SecuFirm2™ mounting system step by step.
Prior to installing the cooler, please consult the compatibility
centre on our website (ncc.noctua.at) and verify that the
cooler is fully compatible with your motherboard.
Please also make sure that your PC case offers sufficient
clearance for the cooler and that there are no compatibility
issues with any other components (e.g. tall RAM modules).
Double check that the heatsink and fan clips do not make
contact with the VGA card, other PCIe cards, motherboard
heatsinks or any other components.
Noctua cannot be held responsible for any damage or
losses caused by compatibility issues.
Should you encounter any difficulties, please check the FAQs
on our website (www.noctua.at/faqs) and don’t hesitate
to contact our support team at support@noctua.at.
Dear customer,
Thank you very much for choosing the Noctua NH-D9
TR5-SP6 4U.
Our Threadripper and Epyc coolers have become a standard
choice when it comes to quiet, premium grade air cooling
solutions for AMD-based workstations and servers, and
we’re excited to continue this legacy with the new TR5-SP6
models. I’m confident that you will be able to sense some
of the research, attention and care we’ve put into making
this product.
Enjoy your Noctua NH-D9 TR5-SP6 4U!
Yours sincerely,
Roland Mossig, Noctua CEO
Required mounting parts:
NM-AFB11 fastening brackets
(pre-installed on the cooler)
NM-SMT3 mounting tool
Caution: Gently tighten the screws until they stop, but don’t
use excessive force (max. torque 0.6 Nm).
Installing the fans
3
Reattach the fans to the heatsink using the supplied fan clips:
Connect the fans to the motherboard’s CPU fan header(s). If
necessary, use the supplied NA-YC1 splitter cable to connect
both fans to one fan header.
Termékspecifikációk
| Márka: | Noctua |
| Kategória: | Hardverkoeling |
| Modell: | NH-D9 TR5-SP6 4U |
Szüksége van segítségre?
Ha segítségre van szüksége Noctua NH-D9 TR5-SP6 4U, tegyen fel kérdést alább, és más felhasználók válaszolnak Önnek
Útmutatók Hardverkoeling Noctua

10 Április 2025
10 Január 2025
10 Január 2025
27 December 2024
26 Szeptember 2024
26 Szeptember 2024
24 Szeptember 2024
12 Szeptember 2024
12 Szeptember 2024
1 Szeptember 2024
Útmutatók Hardverkoeling
Legújabb útmutatók Hardverkoeling
9 Április 2025
9 Április 2025
9 Április 2025
8 Április 2025
8 Április 2025
8 Április 2025
8 Április 2025
8 Április 2025
8 Április 2025
8 Április 2025