Használati útmutató NuTone CP2NCSN
NuTone Ajtócsengő CP2NCSN
Olvassa el alább 📖 a magyar nyelvű használati útmutatót NuTone CP2NCSN (4 oldal) a Ajtócsengő kategóriában. Ezt az útmutatót 16 ember találta hasznosnak és 4 felhasználó értékelte átlagosan 4.4 csillagra
Oldal 1/4
1
WIRED / WIRELESS
DOOR CHIME
PUSHBUTTON
To register this product, visit: www.nutone.com
THIS PACKAGE INCLUDES:
nCast Metal Escutcheon
nWired Pushbutton
nWireless Pushbutton and Battery
nMounting Hardware
WIRED PUSHBUTTON INSTALLATION
WARNING
•
TO REDUCE THE RISK OF FIRE, ELECTRIC SHOCK, OR INJURY
TO PERSONS, OBSERVE THE FOLLOWING:
•
Use this unit only in the manner intended by the manufacturer. If you
have questions, contact the manufacturer at the address or telephone
number listed in the warranty.
•
Before servicing or cleaning unit, switch power off at service panel and
lock the service disconnecting means to prevent power from being
switched on accidentally. When the service disconnecting means
cannot be locked, securely fasten a prominent warning device, such
as a tag, to the service panel.
•
Installation work and electrical wiring must be done by a qualified
person(s) in accordance with all applicable codes and standards,
including fire-rated construction codes and standards.
•
When cutting or drilling into wall or ceiling, do not damage electrical
wiring and other hidden utilities.
•
Use NuTone
®
16 volt transformer with a minimum rating of 10 VA
(purchase separately).
•
When stapling wires to studs or joists, do not allow staples to cut
through wire insulation.
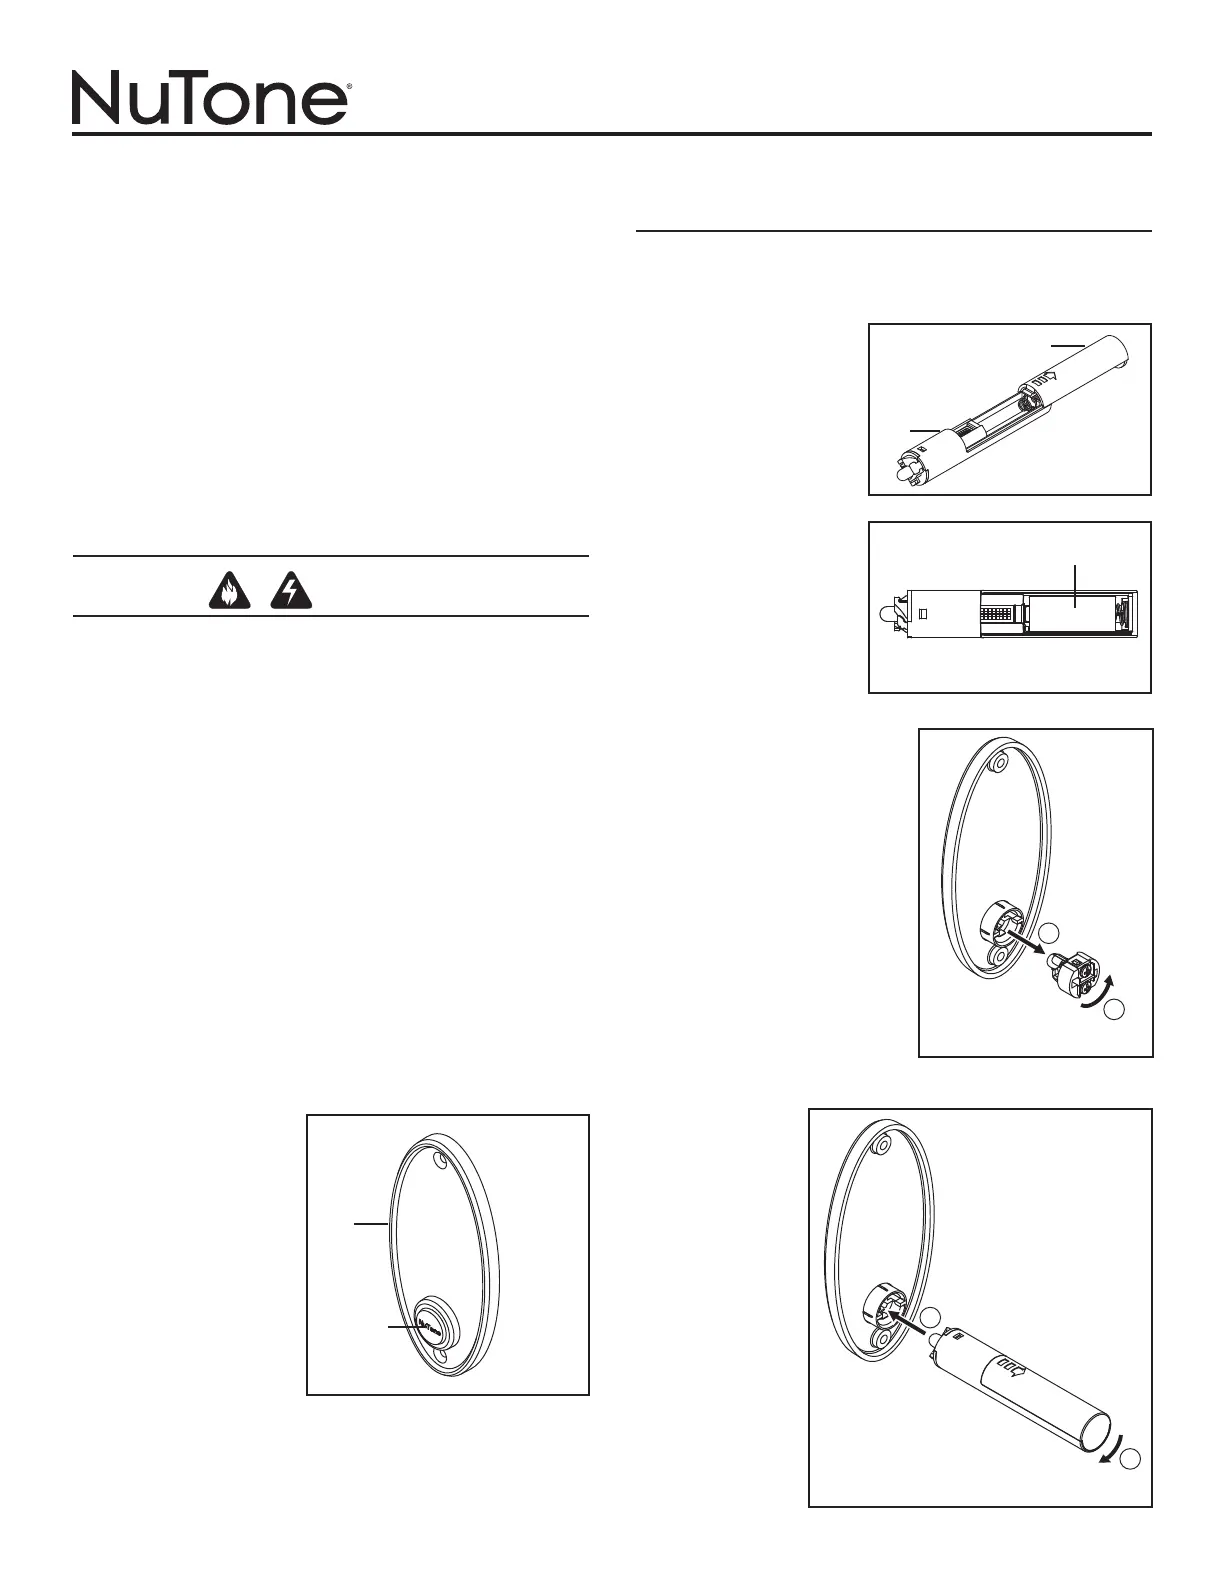
1.Select pushbutton location
and drill a straight and
level 3/4” (19 mm) hole, 1”
(25 mm) deep.
2.Make sure that push button
assembly (A) is inserted
fully into escutcheon (B).
(Figure 1) Install chime
and transformer wires to
pushbutton terminals.
3. Install escutcheon/
pushbutton assembly
into hole and secure with
hardware provided.
4. Restore power at service entrance and press pushbutton to sound
chime.
INSTALLATION & OPERATING INSTRUCTIONS
READ AND SAVE THESE INSTRUCTIONS
WIRELESS PUSHBUTTON
INSTALLATION
The wireless pushbutton (C) is compatible with NuTone wireless
chimes. (Purchase separately) Refer to installation instructions
provided with wireless chime.
1.Open battery cover (D)
by sliding it in direction
indicated by arrow.
(Figure 2)
2. Install battery (E) into
wireless pushbutton.
(Figure 3)
3. Remove wired pushbutton
mechanism from pushbutton /
escutcheon assembly by
turning pushbutton mechanism
counterclockwise and pulling it
out. (Figure 4)
4. Insert wireless
pushbutton
mechanism and
twist clockwise.
(Figure 5)
5. Test operation.
Hold wireless
pushbutton near
chime and press
pushbutton. If
chime does not
sound - see a.
through c. on
page 2.
FIGURE 1
B
A
FIGURE 4
1
2
FIGURE 5
1
2
FIGURE 2
FIGURE 3
C
D
E
+-
Termékspecifikációk
| Márka: | NuTone |
| Kategória: | Ajtócsengő |
| Modell: | CP2NCSN |
Szüksége van segítségre?
Ha segítségre van szüksége NuTone CP2NCSN, tegyen fel kérdést alább, és más felhasználók válaszolnak Önnek
Útmutatók Ajtócsengő NuTone

30 Március 2025
30 Március 2025
30 Március 2025
30 Március 2025
1 Szeptember 2024
1 Szeptember 2024
1 Szeptember 2024
1 Szeptember 2024
1 Szeptember 2024
1 Szeptember 2024
Útmutatók Ajtócsengő
Legújabb útmutatók Ajtócsengő
16 Január 2025
10 Január 2025
8 Január 2025
2 Január 2025
31 December 2025
31 December 2025
30 December 2025
30 December 2025
30 December 2025
30 December 2025