Használati útmutató Rossmax X5
Olvassa el alább 📖 a magyar nyelvű használati útmutatót Rossmax X5 (2 oldal) a vérnyomásmérő kategóriában. Ezt az útmutatót 26 ember találta hasznosnak és 4 felhasználó értékelte átlagosan 4.9 csillagra
Oldal 1/2
1. The monitor has two memory zones (1 and 2). Each zone can store up to 60 meas-
urements.
2. To read memory values from a selected memory zone, use the User-Switching
key to select a memory zone (1 or 2) from which you want to recall values. Press
the Memory key. The rst reading displayed is the average of all morning readings
from the last 7 days.
3. Continue to press the Memory key to view the average of all nighttime readings
from the last 7 days.
4. Press the Memory key again to view the average of the last 3 measurements stored
in memory, and the last previously stored measurement. Every measurement
comes with an assigned memory sequence number.
Note: The memory bank can store up to 60 readings per memory zone. When the
number of readings exceeds 60, the oldest data will be replaced with the new
record.
Note: AM is dened as 4:00 AM – 11:59 AM
Note: PM is dened as 6:00 PM – 2:00 AM
1. Press the User-Switching key to select memory zone 1 or memory zone 2.
2. Press and hold the Memory key for approximately 5 seconds, then the data in the
memory zone can be erased automatically.
1. To adjust the date/time in the monitor after installing or replaces batteries. The
display will show a blinking number showing the year.
2. Change the year by pressing the Memory key, each press will increase the number.
Press the ON/OFF/START key to conrm the entry and the screen will show a blink-
ing number representing the date.
3. Change the date, the hour and the minute as described in Step 2 above, using the
Memory key to change and the ON/OFF/START key to conrm the entries.
4. “0” will reappear as the Blood Pressure Monitor is ready for measurement again.
Rossmax provides a free, integrated and user-friendly blood pressure management
software which can be downloaded and installed on your computer. You may pur-
chase a special designed USB cable in order to connect Rossmax’s blood pressure
monitor and your PC. Please visit the website at http://www.rossmax.com for proceed-
ing the downloading and installation process.
If any abnormality will arise during use, please check the following points.
SymptomsCheck PointsCorrection
No display when the
ON/OFF/START key
is pressed
Have the batteries run
down?
Replace them with four new bat-
teries.
Have the batteries' polarities
been positioned incorrectly?
Re-insert the batteries in the correct
positions.
EE mark shown on
display or the blood
pressure value is dis-
played excessively
low (high)
Is the cuff placed correctly?
Wrap the cuff properly so that it is
positioned correctly.
Did you talk or move during
measurement?
Measure again. Keep arm steady
during measurement.
Did you vigorously shake
the cuff during measure-
ment?
Note: If the unit still does not work, return it to your dealer. Under no circumstance
should you disassemble and repair the unit by yourself.
1. The unit contains high-precision assemblies. Therefore, avoid extreme temperatures,
humidity, and direct sunlight. Avoid dropping or strongly shocking the main unit, and
protect it from dust.
2. Clean the blood pressure monitor body and the cu carefully with a slightly damp,
soft cloth. Do not press. Do not wash the cu or use chemical cleaner on it. Never use
thinner, alcohol or petrol (gasoline) as cleaner.
3. Leaky batteries can damage the unit. Remove the batteries when the unit is not used
for a long time.
4. The unit should not be operated by children so to avoid hazardous situations.
5. If the unit is stored near freezing, allow it to acclimate at room temperature before use.
6. This unit is not eld serviceable. You should not use any tool to open the device nor
should you attempt to adjust anything inside the device. If you have any problems,
please contact the store or the doctor from whom you purchased this unit or please
contact Rossmax International Ltd.
7. As a common issue for all blood pressure monitors using the oscillometric measure-
ment function, the device may have diculty in determining the proper blood pres-
sure for users diagnosed with diabetes, poor circulation of blood, kidney problems, or
for users suered from stroke, or for unconscious users.
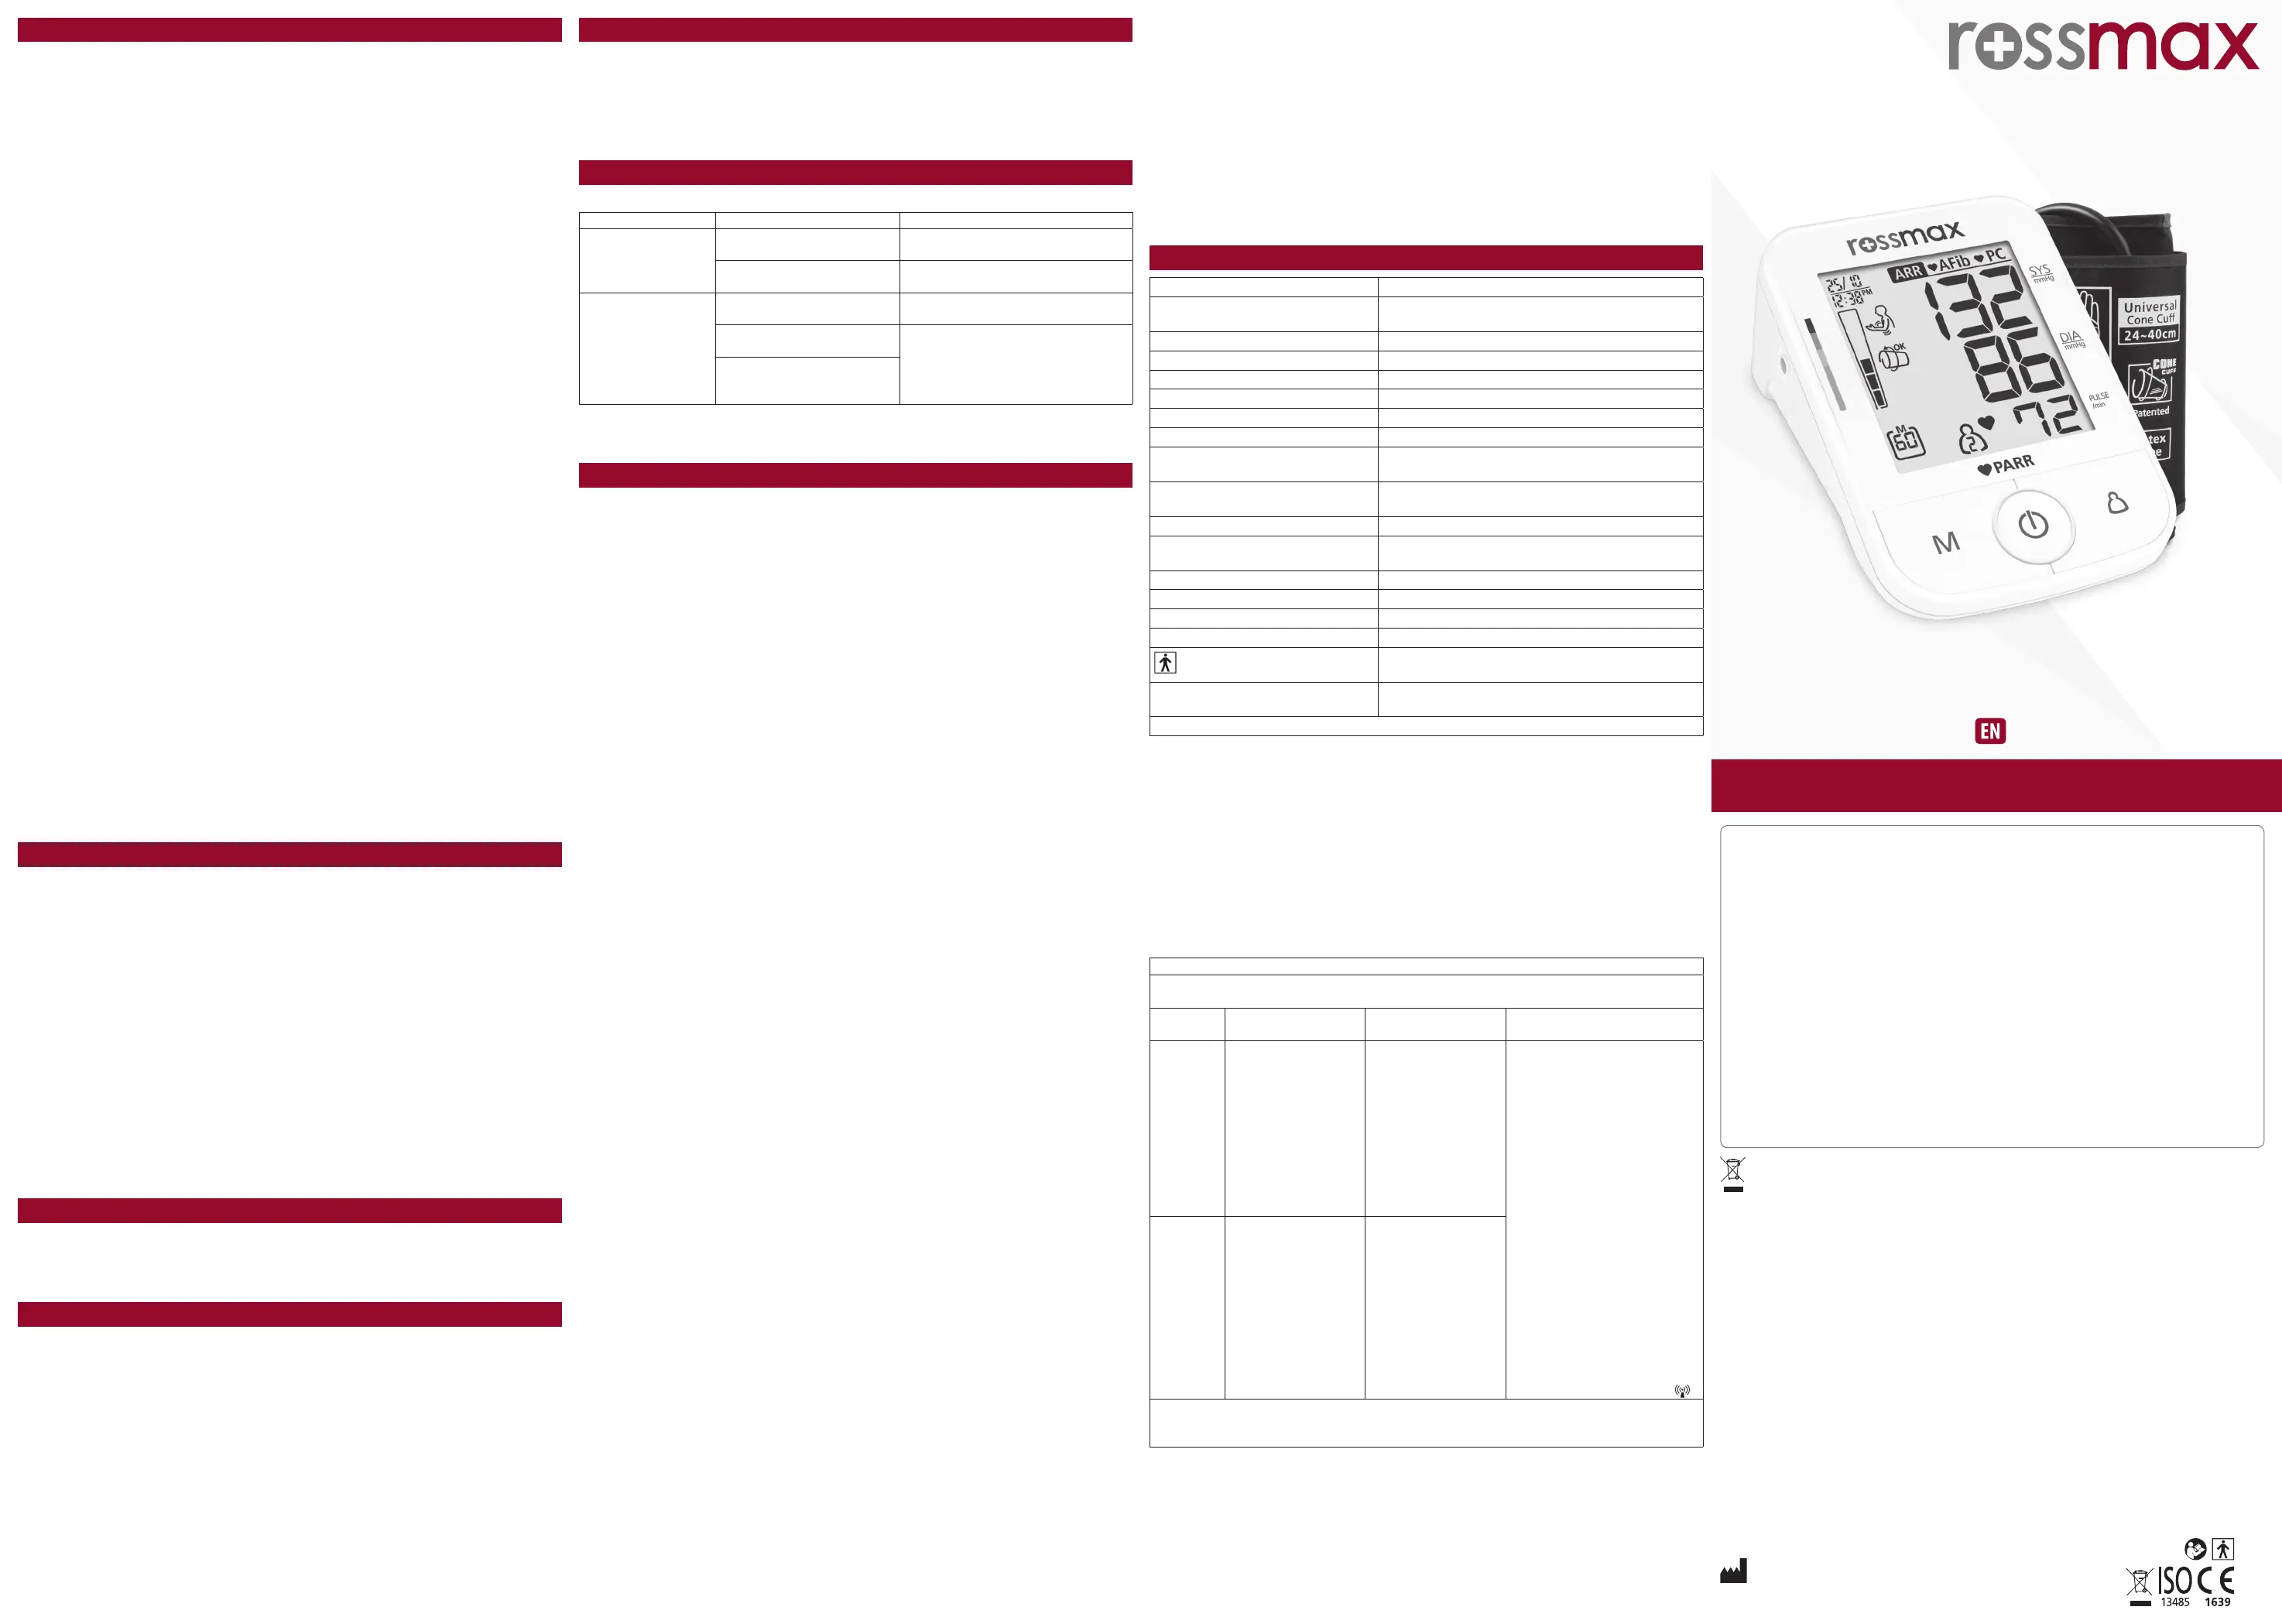
8. This unit is able to detect common arrhythmia (atrial or ventricular premature beats or
atrial brillation). The ARR, AFib and PC icons are displayed after the measurement if
Atrial Fibrillation and Premature Contraction was detected during the measurement.
If ARR, AFib or PC icons are displayed, you are advised to wait for a while and take
another measurement. It is strongly recommended that you consult your physician if
the ARR, AFib or PC icons appear often.
9. While the given device is able to detect specic pulse arrhythmia, the measurement
accuracy of the blood pressure meter may be impaired with the occurrence of pulse
arrhythmia.
10. To stop operation at any time, press the ON/OFF/START key, and the air in the cu
will be rapidly exhausted.
11. Once the ination reaches 300 mmHg, the unit will start deating rapidly for safety
reasons.
12. Please note that this unit can be a home healthcare product, but it is not intended to
serve as a substitute for the advice of a physician or medical professional.
13. Do not use this device for diagnosis or treatment of any health problem or disease.
Measurement results are for reference only. Consult a healthcare professional for in-
terpretation of pressure measurements. Contact your physician if you have or sus-
pect any medical problem. Do not change your medications without the advice of
your physician or healthcare professional.
14. Electromagnetic interference: The device contains sensitive electronic components.
Avoid strong electrical or electromagnetic elds in the direct vicinity of the device
(e.g. mobile telephones, microwave ovens). These may lead to temporary impair-
ment of measurement accuracy.
15. Dispose of device, batteries, components and accessories according to local regula-
tions.
16. This monitor may not meet its performance specication if stored or used outside
temperature and humidity ranges specied in Specications.
17. Please note that when inating, the functions of the limb in question may be im-
paired.
18. During the blood pressure measurement, blood circulation must not be stopped for
an unnecessarily long time. If the device malfunctions, remove the cu from the arm.
19. Avoid any mechanical restriction, compression or bending of the cu line.
20. Do not allow sustained pressure in the cu or frequent measurements. The resulting
restriction of the blood ow may cause injury.
21. Ensure that the cu is not placed on an arm in which the arteries or veins are under-
going medical treatment, e.g. intravascular access or therapy, or an arteriovenous
(AV) shunt.
Measurement Method Oscillometric
Measurement Range Pressure: 30~260 mmHg; Pulse: 40~199 beats/
minute
Pressure SensorSemi conductor
Accuracy Pressure: ± 3 mmHg; Pulse: ± 5% of reading
InflationPump Driven
DeflationAutomatic Air Release Valve
Memory capacity60 memories for each zone x 2 zones
Auto-shut-off1 minute after last key operation
Permissible Operating Temperature
and Humidity
10°C~40°C (50°F~104°F); 15%~85% RH; 700~1060
hPa
Permissible Transport and Storage
Temperature and Humidity
-10°C~60°C (14°F~140°F); 10%~90% RH; 700~1060
hPa
DC Power SourceDC 6V four AAA Batteries
AC Power Source DC 6V, ≥600mA (Plug size: outer(-) is Ø4.0, inner(+)
is Ø1.7)
Dimensions96 (L) X 139.7 (W) X 63.2 (H) mm
Weight248.6g (G.W.) (w/o Batteries)
Arm circumference Adult: 24~40 cm (9.4”~15.7”)
Limited Users Adult users
Type BF: Device and cuff are designed to provide
special protection against electrical shocks.
IP ClassificationIP21: Protection against harmful ingress of water
and particulate matter
*Specifications are subject to change without notice.
Recalling Values from Memory
Clearing Values from Memory
Time Adjustment
Data Transfer to PC
Troubleshooting
Cautionary Notes
Specications
Here are a few helpful tips to help you obtain more accurate readings:
• Blood pressure changes with every heartbeat and is in constant uctuation through-
out the day.
• Blood pressure recording can be aected by the position of the user, his or her
physiological condition and other factors. For greatest accuracy, wait one hour after
exercising, bathing, eating, drinking beverages with alcohol or caeine, or smoking
to measure blood pressure.
• Before measurement, it’s suggested that you sit quietly for at least 5 minutes as
measurement taken during a relaxed state will have greater accuracy. You should
not be physically tired or exhausted while taking a measurement.
• Do not take measurements if you are under stress or tension.
• Sit upright in a chair, and take 5-6 deep breaths. Avoid leaning back while the meas-
urement is being taken.
• Do not cross the legs while sitting and keep the feet at on the oor during meas-
urement.
• During measurement, do not talk or move your arm or hand muscles.
• Take your blood pressure at normal body temperature. If you are feeling cold or hot,
wait a while before taking a measurement.
• If the monitor is stored at very low temperature (near freezing), have it placed at a
warm location for at least one hour before using it.
• Wait 5 minutes before taking the next measurement.
1. Press the User-Switching key to select memory zone 1, memory zone 2 or guest
mode. After a memory zone is selected, press the ON/OFF/START key to reset the
monitor so it can start measurement in the chosen memory zone.
2. Press the ON/OFF/START key. All digits will light up, checking the display functions.
The checking procedure will be completed in 2 seconds.
3. After all symbols appear, the display will show a blinking “0”. The monitor is ready to
measure and will automatically inate the cu slowly to start measurement.
4. When the measurement is completed, the cu will exhaust the pressure inside.
Systolic pressure, diastolic pressure and pulse will be shown simultaneously on the
LCD screen. The measurement is then automatically stored into the pre-designat-
ed memory zone.
5. In order to enhance the probability of pulse arrhythmia detection by the PARR
technology, measurement repetitions are recommended.
This blood pressure monitor will re-inate automatically to higher pressure if the sys-
tem detects that more pressure is needed to take a blood pressure measurement.
Note: 1. This monitor automatically switches o approximately 1 minute after last key
operation.
2. To interrupt the measurement, simply press the ON/OFF/START key; the cu will
deate immediately.
Measurement Procedures
22. Do not apply the cu on the side, where a mastectomy has been performed in your
patient history.
23. Do not place the cu over wounds as this may cause further injury.
24. Only ever use the cus provided with the monitor or original replacement cus. Oth-
erwise erroneous results will be recorded.
25. Batteries can be fatal if swallowed. You should therefore store the batteries and prod-
ucts where they are inaccessible to small children. If a battery has been swallowed,
call a doctor immediately.
26. Do not use the tubing and/or AC adaptor for any other purpose than those specied,
as they can cause risk of strangulation.
27. Do not service or maintain device and cu while in use.
Electromagnetic Compatibility Information
1. This device needs to be installed and put into service in accordance with the information
provided in the user manual.
2. WARNING: Portable RF communications equipment (including peripherals such as
antenna cables and external antennas) should be used no closer than 30 cm (12 inches)
to any part of the X5, including cables specied by the manufacturer. Otherwise,
degradation of the performance of this device could result.
If higher IMMUNITY TEST LEVELS than those specied in Table 9 are used, the minimum
separation distance may be lowered. Lower minimum separation distances shall be
calculated using the equation specied in 8.10.
Manufacturer’s declaration-electromagnetic immunity
The X5 is intended for use in the electromagnetic environment specied below. The cus-
tomer or the user of the X5 should assure that is used in such and environment.
Immunity
test
IEC 60601 test levelCompliance levelElectromagnetic environment-
guidance
Conducted
RF IEC
61000-4-6
3 Vrms:
0,15 MHz – 80 MHz
6 Vrms: in ISM and
amateur radio bands
between
0,15 MHz and 80 MHz
80 % AM at 1 kHz
3 Vrms:
0,15 MHz – 80 MHz
6 Vrms: in ISM and
amateur radio bands
between
0,15 MHz and 80 MHz
80 % AM at 1 kHz
Portable and mobile RF com-
munications equipment should
be used no closer to any part of
the X5 including cables, than
the recommended separation
distance calculated from the
equation applicable to the fre-
quency of the transmitter.
Recommended separation dis-
tance:
d = 1,2 √P, d = 1,2 √P 80MHz to
800 MHz, d = 2,3 √P 800MHz to
2,7 GHz
Where P is the maximum out-
put power rating of the trans-
mitter in watts (W) according
to the transmitter manufactur-
er and d is the recommended
separation distance in metres
(m).
Interference may occur in the
vicinity of equipment marked
with the following symbol:
Radi-
ated RF IEC
61000-4-3
10 V/m
80 MHz – 2,7 GHz
80 % AM at 1 kHz
10 V/m
80 MHz – 2,7 GHz
80 % AM at 1 kHz
NOTE1: At 80 MHz and 800 MHz, the higher frequency range applies.
NOTE2: These guidelines may not apply in all situations. Electromagnetic propagation is
aected by absorption and reection from structures, objects and people.
More information on EMC compliance of the device can be obtained from Rossmax
website: www.rossmax.com.
IN0X50000000000XX
OBM_IB_X5(2)NA9_
EN_SW_ver2028
WARNING:The symbol on this product means that it's an electronic product and following the European directive
2012/19/EU the electronic products have to be disposed on your local recycling centre for safe treatment.
Rossmax Swiss GmbH,
Widnauerstrasse 1, CH-9435
Heerbrugg, Switzerland
Model:X5
www.rossmax.com
Warranty Card
This instrument is covered by a 5 year guarantee from the date of purchase. The guar-
antee is valid only on presentation of the warranty card completed or stamped by the
seller/dealer confirming date of purchase or the receipt. Batteries, cuff and accessories
are not included. Opening or altering the instrument invalidates the guarantee. The
guarantee does not cover damage, accidents or non-compliance with the instruction
manual. Please contact your local seller/dealer or www.rossmax.com.
Customer Name: ____________________________________________________
Address: ___________________________________________________________
Telephone: __________________________________________________________
E-mail address: ______________________________________________________
Product Information
Date of purchase: ___________________________________________________
Store where purchased:
____________________________________________________________________
Blood Pressure Monitor
OBM_IB_X5(2)NA9_EN_SW_ver2028.indd 12020/9/9 上午 11:51:42
Termékspecifikációk
| Márka: | Rossmax |
| Kategória: | vérnyomásmérő |
| Modell: | X5 |
Szüksége van segítségre?
Ha segítségre van szüksége Rossmax X5, tegyen fel kérdést alább, és más felhasználók válaszolnak Önnek
Útmutatók vérnyomásmérő Rossmax

12 Január 2025
30 Augusztus 2024
30 Augusztus 2024
21 Augusztus 2024
20 Augusztus 2024
18 Augusztus 2024
16 Augusztus 2024
15 Augusztus 2024
15 Augusztus 2024
14 Augusztus 2024
Útmutatók vérnyomásmérő
Legújabb útmutatók vérnyomásmérő
7 Április 2025
6 Április 2025
6 Április 2025
5 Április 2025
5 Április 2025
4 Április 2025
3 Április 2025
3 Április 2025
3 Április 2025
31 Március 2025