Használati útmutató StarTech.com 132N-TB4USB4DOCK
StarTech.com
Egyéb számítógépes tartozék
132N-TB4USB4DOCK
Olvassa el alább 📖 a magyar nyelvű használati útmutatót StarTech.com 132N-TB4USB4DOCK (2 oldal) a Egyéb számítógépes tartozék kategóriában. Ezt az útmutatót 10 ember találta hasznosnak és 5.5 felhasználó értékelte átlagosan 4.9 csillagra
Oldal 1/2

Quick-Start Guide
To view manuals, FAQs, videos, drivers, downloads, technical drawings, and more, visit www.startech.com/support.
Manual Revision: October 11, 2023 9:32 AM
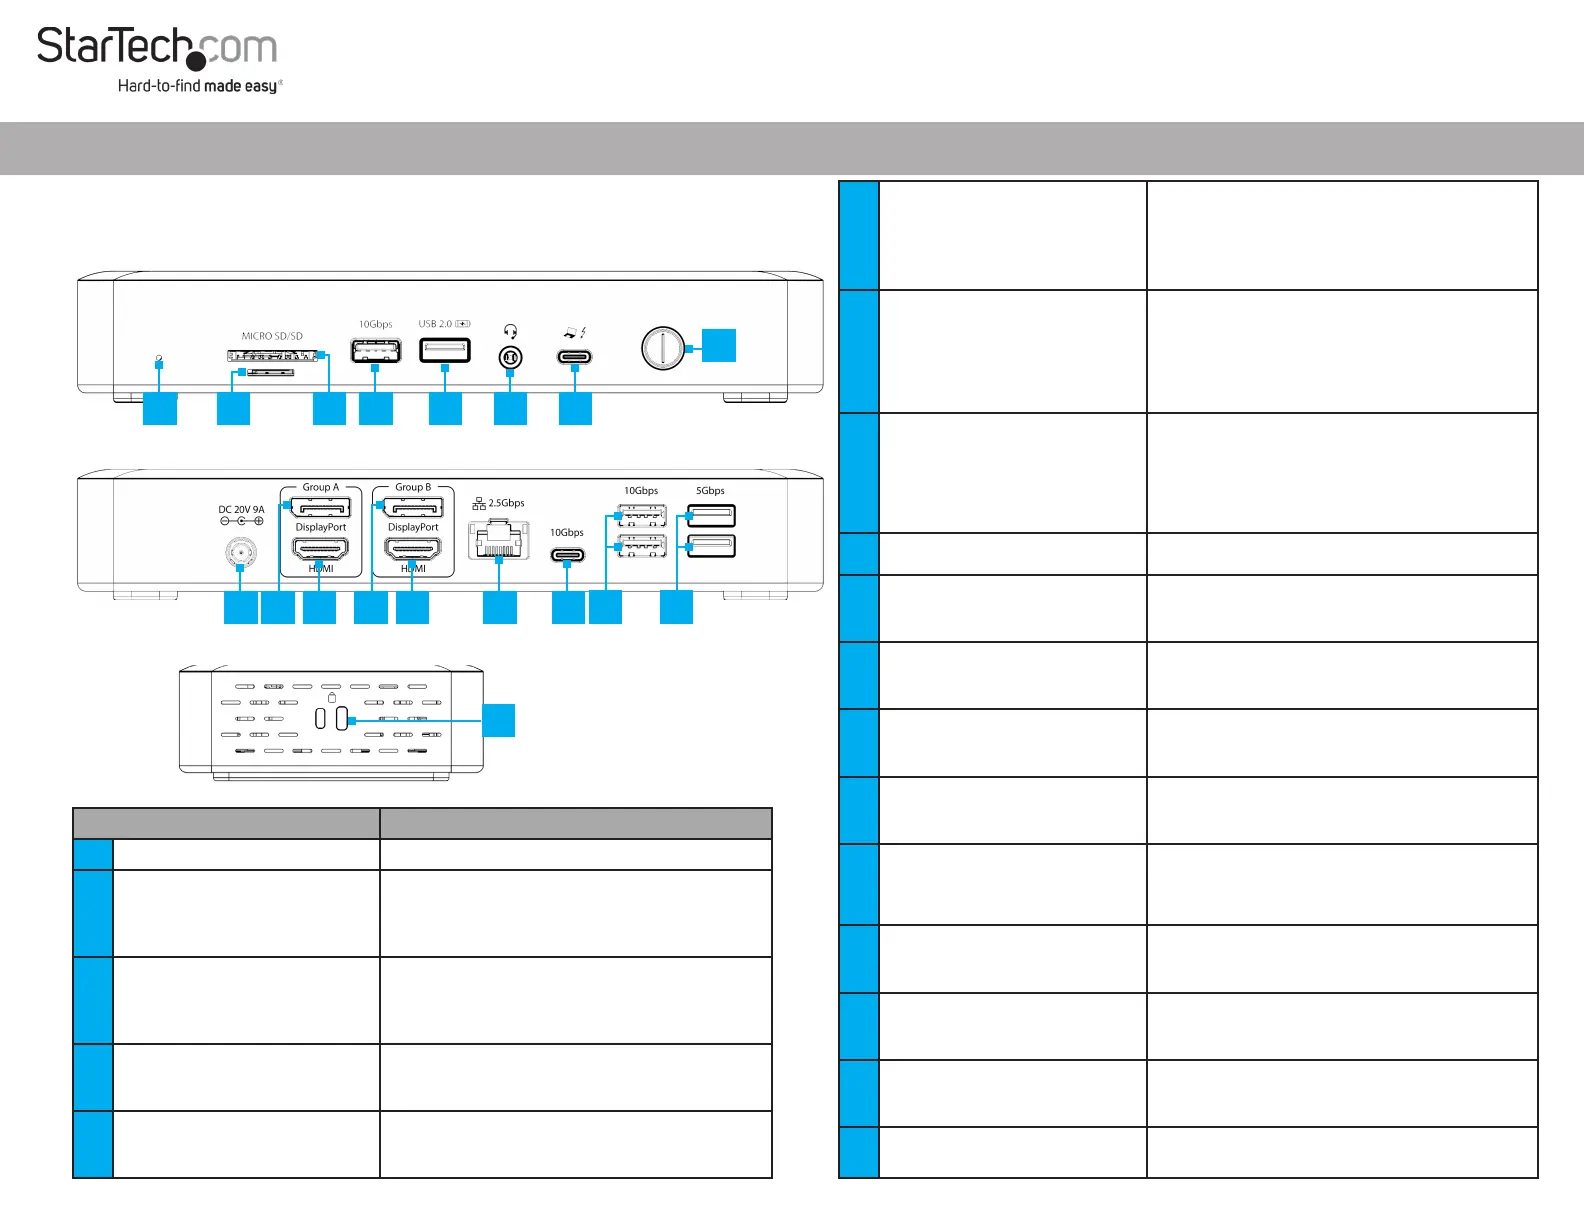
Product Diagram (Side A)
Thunderbolt 4/USB4 Dock, Quad Display, 7x USB, 2.5GbE, 98W Power Delivery
1
13
2
(Side B)
Product ID
132N-TB4USB4DOCK / 132UE-TB4USB4DOCK
(Side C)
Component Function
1 Power Button
• Press and Release to Toggle Power for the Dock
2
Thunderbolt 4 Host Port
(USB Type-C)
• Connect to a Thunderbolt 4 Port on a Host Computer
• Thunderbolt 3/USB4 (40 Gbps)
• Power Delivery 3.0 Specication
• Capability of charging the Host Computer up to 98W
3 3.5mm Headset Jack
• Connect a 3.5mm Audio Device
• 4-Position CTIA
• Mono Audio Input
• Stereo Audio Output
4 USB-A Data/Charge Port
• Connect and/or Charge a USB-A Peripheral
• USB 2.0 (480Mbps)
• Supports 7.5W BC 1.2 Charging (5V/1.5A)
5 USB-A Data Port
• Connect a USB-A Peripheral
• USB 3.2 Gen 2 (10 Gbps)
• Supports 4.5W of Power (5V/0.9A)
129
18
34
11
10
16
15
6 SD Card Reader
• Secure Digital (SD) 4.0 UHS-II, SD 3.0, 2.0, 1.1, and 1.0
compatibility
• Push an SD Card, label side up, into the SD Card Slot
• Note: The Host Computer’s Operating System (OS)
will automatically detect the SD Card and install the
required driver software
7 MicroSD Card Reader
• Micro Secure Digital (microSD) 4.0 UHS-II, microSD
3.0, 2.0, 1.1, and 1.0 compatibility
• Push a microSD Card, label side down, into the
microSD Card Slot
• Note: The Host Computer’s Operating System (OS)
will automatically detect the SD Card and install the
required driver software
8 Status LED
• Illuminates Green, When the Dock is Connected to a
Host Computer
• Illuminates White, When the Dock is Not Connected
to a Host Computer
• Does Not Illuminate, When the Dock is Turned O
9 DC 20V Port
• Connect the Dock to a Power Source, using the
Universal Power Adapter
10
DisplayPort Port
(Group A)
• Connect a DisplayPort Display as Video Output #1
• DisplayPort 1.4
• Resolutions up to 7680 x 4320 60Hz
11
HDMI Port
(Group A)
• Connect an HDMI Display as Video Output #2
• HDMI 2.1
• Resolutions up to 7680 x 4320 60Hz
12
DisplayPort Port
(Group B)
• Connect a DisplayPort Display as Video Output #3
• DisplayPort 1.4
• Resolutions up to 7680 x 4320 60Hz
13
HDMI Port
(Group B)
• Connect an HDMI Display as Video Output #4
• HDMI 2.1
• Resolutions up to 7680 x 4320 60Hz
14 2.5 Gigabit Ethernet Port
• Connect the Dock to a Network Device, using a
Network Cable
• 2.5GBASE-T / 1000BASE-T / 100BASE-T / 10BASE-T
• 2.5Gbps/1000Mbps/100Mbps/10Mbps
15 USB-C Data Port
• Connect a USB-C Peripheral
• USB 3.2 Gen 2 (10 Gbps)
• Supports 4.5W of Power (5V/0.9A)
16 2x USB-A Data Ports
• Connect USB-A Peripherals
• USB 3.2 Gen 2 (10 Gbps)
• Supports 4.5W of Power (5V/0.9A)
17 2x USB-A Data Ports
• Connect USB-A Peripherals
• USB 3.2 Gen 1 (5 Gbps)
• Supports 4.5W of Power (5V/0.9A)
18
2x Lock Slots
(Standard & Nano)
• Connect a K-Slot Style Locking Device to deter the
theft of the Docking Station
14
567
17
8

Regulatory Compliance
FCC - Part 15
This equipment has been tested and found to comply with the limits for a Class B digital device, pursuant to part 15 of the FCC
Rules. These limits are designed to provide reasonable protection against harmful interference in a residential installation.
This equipment generates, uses and can radiate radio frequency energy and, if not installed and used in accordance with the
instructions, may cause harmful interference to radio communications. However, there is no guarantee that interference will
not occur in a particular installation. If this equipment does cause harmful interference to radio or television reception, which
can be determined by turning the equipment o and on, the user is encouraged to try to correct the interference by one or
more of the following measures:
• Connect the equipment into an outlet on a circuit dierent from that to which the receiver is connected.
• Consult the dealer or an experienced radio/TV technician for help
This device complies with part 15 of the FCC Rules. Operation is subject to the following two conditions:
(1) This device may not cause harmful interference, and (2) this device must accept any interference received, including
interference that may cause undesired operation. Changes or modications not expressly approved by StarTech.com could
void the user’s authority to operate the equipment.
Industry Canada Statement
This Class B digital apparatus complies with Canadian ICES-003.
Cet appareil numérique de la classe [B] est conforme à la norme NMB-003 du Canada.
CAN ICES-3 (B)/NMB-3(B)
This device complies with Industry Canada licence-exempt RSS standard(s). Operation is subject to the following two
conditions:
(1) This device may not cause interference, and (2) This device must accept any interference, including interference that may
cause undesired operation of the device.
Le présent appareil est conforme aux CNR d’Industrie Canada applicables aux appareils radio exempts de licence. L’exploitation
est autorisée aux deux conditions suivantes:
(1) l’appareil ne doit pas produire de brouillage, et (2) l’utilisateur de l’appareil doit accepter tout brouillage radioélectrique
subi, même si le brouillage est susceptible d’en compromettre le fonctionnement.
Warranty Information
This product is backed by a three-year warranty.
For further information on product warranty terms and conditions, please refer to www.startech.com/warranty.
Limitation of Liability
In no event shall the liability of StarTech.com Ltd. and StarTech.com USA LLP (or their ocers, directors, employees or agents)
for any damages (whether direct or indirect, special, punitive, incidental, consequential, or otherwise), loss of prots, loss
of business, or any pecuniary loss, arising out of or related to the use of the product exceed the actual price paid for the
product. Some states do not allow the exclusion or limitation of incidental or consequential damages. If such laws apply, the
limitations or exclusions contained in this statement may not apply to you.
FR: startech.com/fr
DE: startech.com/de
ES: startech.com/es
NL: startech.com/nl
IT: startech.com/it
JP: startech.com/jp
StarTech.com
Ltd.
45 Artisans Cres
London, Ontario
N5V 5E9
Canada
StarTech.com Ltd.
Unit B, Pinnacle 15
Gowerton Rd,
Brackmills
Northampton
NN4 7BW
United Kingdom
StarTech.com LLP
4490 South Hamilton
Road
Groveport, Ohio
43125
U.S.A.
StarTech.com Ltd.
Siriusdreef 17-27
2132 WT Hoofddorp
The Netherlands
Installation
1. Connect the Power Adapter from an AC outlet, to the DC 20V Port on the dock.
2. When connecting USB-A peripheral devices, connect a USB-A cable from the USB
peripheral devices to the USB-A Data Ports and/or the USB-A Data/Charge Port on
the Dock.
3. When connecting USB-C peripheral devices, connect a USB-C cable from the USB
peripheral devices to the USB-C Data Port on the Dock.
4. When connecting a wired network, connect an RJ-45 terminated network cable
(CAT 5e or better) from the local area network (e.g. Router, Switch, Modem, etc.)
to the 2.5 Gigabit Ethernet Port on the Dock (CAT 6 or better recommended for
2.5Gb speeds).
5. Connect a DisplayPort monitor to the DisplayPort Port (Group A) on the dock
using a DisplayPort cable (sold separately).
6. Connect an HDMI monitor to the HDMI Port (Group A) on the dock using an
HDMI cable (sold separately).
7. Connect a DisplayPort monitor to the DisplayPort Port (Group B) on the dock
using a DisplayPort cable (sold separately).
8. Connect an HDMI monitor to the HDMI Port (Group B) on the dock using an
HDMI cable (sold separately).
9. Connect the included Thunderbolt 4 Host Cable from a Thunderbolt 4 Port
on the Host Computer, to the Thunderbolt 4 Host Port on the Dock. The Host
Computer will automatically detect and install the Dock.
10. Insert a memory card into the microSD Card Reader on the Dock. The Dock will
recognize the card and mount it as a drive. To remove the memory card, push the
card in and then pull the memory card out.
11. Insert a memory card into the SD Card Reader on the Dock. The Host Computer
will recognize the card and mount it as a drive. To remove the memory card, pull
the memory card out.
Note: To protect the memory card and the data stored on it, it’s important to
safely unmount (eject) the card within the Host Computer operating system,
before physically removing the card from the Dock.
Package Contents
• Thunderbolt 4/USB4 Docking Station x 1
• 3ft (1m) Thunderbolt 4 Host Cable x 1
• Universal Power Adapter x 1
• Quick-Start Guide x 1
Requirements
• Computer
• Thunderbolt 4
• Thunderbolt 3 (Intel or M1 based Mac’s)
• USB-C Port With DP Alt Mode
• This Dock can function with Thunderbolt 4, USB4 or USB-C host ports. For
maximum performance a Thunderbolt 4 or USB4 port is recommended.
• Video support and performance, such as resolution and refresh rate, depend on
the host computer and the performance of the video card or USB4 port.
Notes:
• DisplayPort Video Output ports do not support the use of passive DisplayPort
Adapters.
For the latest drivers, manuals, product information, technical specications, and declarations of conformance,
please visit: www.StarTech.com/132N-TB4USB4DOCK or
www.StarTech.com/132UE-TB4USB4DOCK
Termékspecifikációk
Márka: | StarTech.com |
Kategória: | Egyéb számítógépes tartozék |
Modell: | 132N-TB4USB4DOCK |
Szüksége van segítségre?
Ha segítségre van szüksége StarTech.com 132N-TB4USB4DOCK, tegyen fel kérdést alább, és más felhasználók válaszolnak Önnek
Útmutatók Egyéb számítógépes tartozék StarTech.com
29 December 2024
29 December 2024
7 December 2024
7 December 2024
11 Szeptember 2024
11 Szeptember 2024
2 Szeptember 2024
2 Szeptember 2024
2 Szeptember 2024
2 Szeptember 2024
Útmutatók Egyéb számítógépes tartozék
- Egyéb számítógépes tartozék Micro Connect
- Egyéb számítógépes tartozék Sony
- Egyéb számítógépes tartozék Kindermann
- Egyéb számítógépes tartozék J5 Create
- Egyéb számítógépes tartozék Vantec
- Egyéb számítógépes tartozék Sharkoon
- Egyéb számítógépes tartozék Thermaltake
- Egyéb számítógépes tartozék Henge Docks
- Egyéb számítógépes tartozék Pro-Ject
- Egyéb számítógépes tartozék Microlab
- Egyéb számítógépes tartozék Panasonic
- Egyéb számítógépes tartozék SMK-Link
- Egyéb számítógépes tartozék Biltema
- Egyéb számítógépes tartozék Avocent
- Egyéb számítógépes tartozék Alienware
Legújabb útmutatók Egyéb számítógépes tartozék
16 Január 2025
12 Január 2025
8 Január 2025
3 Január 2025
30 December 2025
30 December 2025
30 December 2025
30 December 2025
27 December 2024
27 December 2024