Használati útmutató Yamaha L-100
Yamaha Keukenmachine L-100
Olvassa el alább 📖 a magyar nyelvű használati útmutatót Yamaha L-100 (1 oldal) a Keukenmachine kategóriában. Ezt az útmutatót 14 ember találta hasznosnak és 4 felhasználó értékelte átlagosan 4.1 csillagra
Oldal 1/1
L-100
EN
Keyboard StandAssembly Manual
DE
Keyboard-StänderMontageanleitung
FR
Stand pour clavierManuel d’assemblage
ES
Soporte de tecladoManual de montaje
RU
Подставка для клавиатурыРуководство по сборке
© 2023 Yamaha Corporation
Published 04/2023 IIEI-A0
VFF3740
ENGLISH
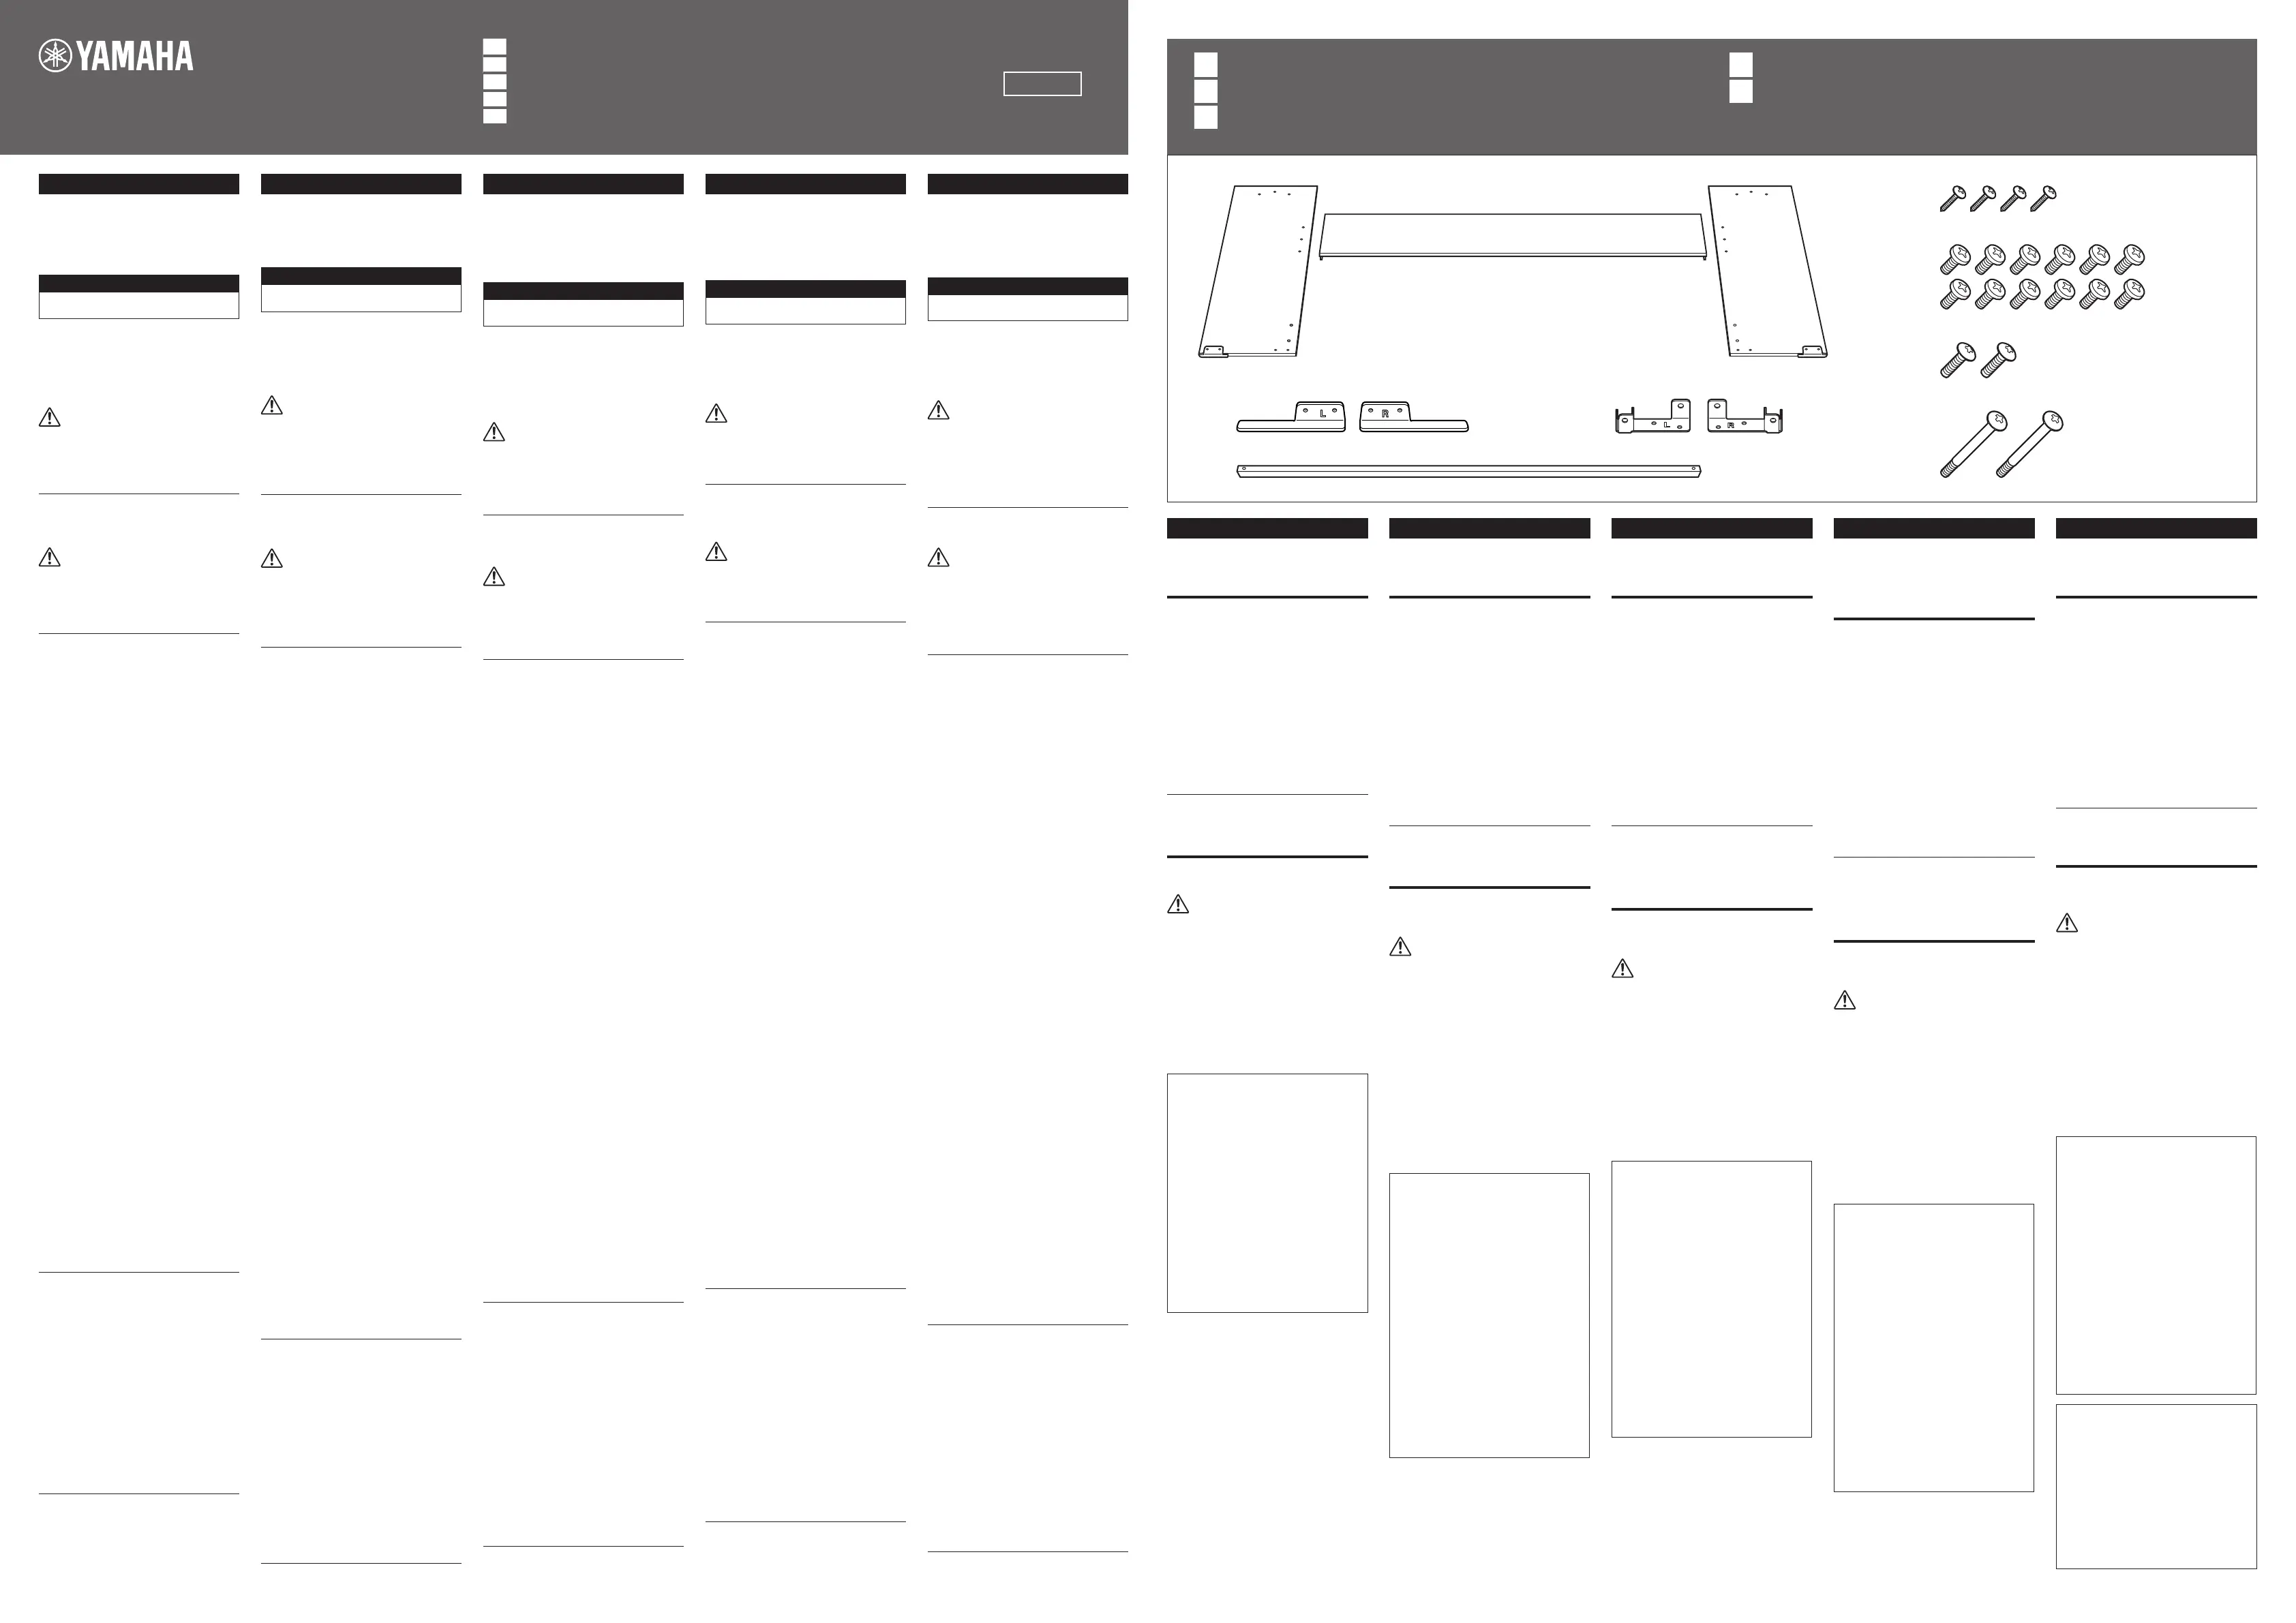
Checking Assembly
Parts
Before assembly, please refer to the diagram
above to make sure you have all the parts.
* If any part is missing, please contact your dealer.
ABack board
BSide board (left)
CSide board (right)
DAnti-fall brackets (left/right)
EMounting brackets (black; left/right)
FSupport rail (black)
G3.5 × 16 mm screws (4 pcs.)
H6 × 14 mm screws (12 pcs.)
I5 × 20 mm screws (2 pcs.)
J5 × 55 mm screws (2 pcs.)
About moving after
assembly
When moving after assembly, be sure to hold
the bottom of the keyboard and do not drag it.
CAUTION
• When transporting or moving the instrument,
always do so with at least two persons.
Attempting to lift the instrument by yourself
may damage your back, result in other injury,
or cause damage to the keyboard if it falls.
NOTICE
• A pedal unit (sold separately) can be
attached to the keyboard stand after
assembly. When moving the instrument in
this state, keep the pedal unit off the floor so
as not to damage the floor. For details, refer
to the Assembly Manual for the pedal unit.
Post-assembly checklist
Once you’ve assembled the stand, check
the following points. If applicable, follow the
suggested solutions.
• Some parts are left over.
→Read the assembly instructions again
so you do not have any leftover parts.
• The instrument touches doors and other
movable fixtures.
→Move the instrument to a location
where it doesn’t obstruct or contact
such items.
• The stand wobbles.
→Tighten all screws properly.
• The instrument makes a creaking noise
or seems unsteady when you play it.
→Refer carefully to the assembly
instructions and retighten all screws.
G
H
I
J
D
B
A
C
F
E
EN
Assembly Parts
DE
Montagebauteile
FR
Éléments à assembler
ES
Piezas para el montaje
RU
Компоненты сборки
Важное примечание: Информация об
условиях Гарантии для Клиентов в
Российской Федерации [Русский]
Для получения подробной информации
об условиях Гарантии на продукцию
Yamaha в России, условиях гарантийного
обслуживания, пожалуйста, посетите
веб-сайт по адресу ниже (на сайте
доступен файл с условиями для
скачивания и печати) или обратитесь
в офис представительства Yamaha в
России.
https://ru.yamaha.com/ru/support/
(63-M01 RU support 01)
DEUTSCH
Überprüfen der
Montagebauteile
Bitte vergewissern Sie sich vor der Montage
anhand der obigen Abbildung, dass alle Teile
vollzählig vorhanden sind.
* Sollte ein Teil fehlen, wenden Sie sich bitte an Ihren
Händler.
ARückwand
BSeitenplatte (links)
CSeitenplatte (rechts)
DKippschutzwinkel (links/rechts)
EMontagehalterungen (schwarz; links/
rechts)
FTragschiene (schwarz)
G3,5 × 16-mm-Schrauben (4 Stück)
H6 × 14-mm-Schrauben (12 Stück)
I5 × 20-mm-Schrauben (2 Stück)
J5 × 55-mm-Schrauben (2 Stück)
Info zum Transport
nach der Montage
Wenn Sie das Keyboard nach der Montage
transportieren, halten Sie es an der Unterseite
fest und ziehen Sie es nicht.
VORSICHT
• Wenn Sie das Instrument transportieren
oder bewegen, sollten Sie dies immer
mit mindestens zwei Personen tun. Wenn
Sie versuchen, das Instrument selbst
anzuheben, können Sie sich den Rücken
verletzen, sich anderweitig verletzen
oder das Keyboard beschädigen, falls es
herunterfällt.
ACHTUNG
• Eine Pedaleinheit (getrennt erhältlich)
kann nach der Montage am Keyboard-
Ständer angebracht werden. Wenn
Sie das Instrument in diesem Zustand
bewegen, halten Sie die Pedaleinheit
vom Boden fern, um den Boden nicht zu
beschädigen. Einzelheiten finden Sie in der
Montageanleitung für die Pedaleinheit.
Checkliste nach der Montage
Überprüfen Sie nach der Montage des
Ständers die folgenden Punkte: Folgen Sie
gegebenenfalls den Lösungsvorschlägen.
• Einige Teile sind übrig geblieben.
→Lesen Sie die Montageanleitung noch
einmal durch, damit Sie keine Teile
übrig haben.
• Das Instrument berührt Türen und
andere bewegliche Vorrichtungen.
→Stellen Sie das Instrument an
einem Ort auf, an dem es solche
Gegenstände nicht behindert oder
berührt.
• Der Ständer wackelt.
→Ziehen Sie alle Schrauben richtig fest.
• Das Instrument macht ein knarrendes
Geräusch oder wirkt instabil, wenn Sie
es spielen.
→Lesen Sie die Montageanleitung
sorgfältig durch, und ziehen Sie alle
Schrauben nach.
FRANÇAIS
Vérification des
éléments à assembler
Avant le montage, veuillez vous reporter au
schéma ci-dessus pour vous assurer que vous
disposez bien de toutes les pièces.
* En l’absence d’une pièce, veuillez contacter votre
revendeur.
APanneau arrière
BPanneau latéral (gauche)
CPanneau latéral (droit)
DSupports antichute (gauche/droite)
ESupports de montage (noirs; gauche/
droite)
FRail porteur (noir)
GVis 3,5 × 16mm (4pièces)
HVis 6 × 14 mm (12pièces)
IVis 5 × 20 mm (2pièces)
JVis 5 × 55 mm (2pièces)
À propos du
déplacement après le
montage
Lorsque vous déplacez le produit après le
montage, veillez à tenir le bas du clavier et à ne
pas le traîner.
ATTENTION
• Deux personnes minimum sont nécessaires
pour transporter ou déplacer l’instrument.
Si vous tentez de soulever l’instrument tout
seul, vous risquez de vous abîmer le dos, ce
qui pourrait vous blesser ou endommager le
clavier s’il tombe.
AVIS
• Un pédalier (vendu séparément) peut être
fixé au stand pour clavier après le montage.
Lorsque vous déplacez l’instrument dans cet
état, maintenez le pédalier hors du sol afin
de ne pas abîmer le sol. Pour en savoir plus,
reportez-vous au manuel d’assemblage du
pédalier.
Liste de vérification après
montage
Une fois que vous avez assemblé le
pupitre, vérifiez les points suivants. Le cas
échéant, suivez les solutions suggérées.
• Certaines pièces ne sont pas utilisées.
→Lisez à nouveau les instructions pour
le montage pour utiliser toutes les
pièces.
• L’instrument entre en contact avec des
portes ou d’autres objets mobiles.
→Déplacez l’instrument dans un endroit
où il ne bloquera pas ou ne touchera
pas de tels objets.
• Le pupitre oscille.
→Serrez correctement toutes les vis.
• L’instrument émet un grincement ou
semble instable lorsque vous en jouez.
→Consultez avec soin les instructions
pour le montage et resserrez toutes
les vis.
ESPAÑOL
Comprobación de
las piezas para el
montaje
Antes de hacer el montaje, consulte el
diagrama de arriba para asegurarse de que p1-ha
recibido todas las piezas.
* Si falta alguna pieza, póngase en contacto con su
distribuidor.
APlaca posterior
BPlaca lateral (izquierda)
CPlaca lateral (derecha)
DAbrazaderas para evitar caídas (izquierda/
derecha)
EAbrazaderas de montaje (negras;
izquierda/derecha)
FRiel de apoyo (negro)
GTornillos de 3,5 × 16 mm (4 uds.)
HTornillos de 6 × 14 mm (12 uds.)
ITornillos de 5 × 20 mm (2 uds.)
JTornillos de 5 × 55 mm (2 uds.)
Acerca del cambio
de sitio después del
montaje
Cuando quiera cambiar de sitio después del
montaje, asegúrese de sujetar por la parte
inferior del teclado y de no arrastrarlo.
ATENCIÓN
• Cuando transporte o mueva de sitio el
instrumento, hágalo siempre entre dos
personas como mínimo. Si intenta levantar
el instrumento usted solo se podría dañar la
espalda, resultando en heridas, u ocasionar
daños al teclado si este se cae.
AVISO
• Se puede colocar una unidad de pedal
(comercializada aparte) al soporte de
teclado después del montaje. Cuando quiera
mover de sitio el instrumento en este estado,
mantenga la unidad de pedal separada
del suelo para no dañar el suelo. Para ver
detalles, consulte el manual de montaje de
la unidad de pedal.
Lista de comprobaciones una
vez realizado el montaje
Una vez que haya montado el soporte,
compruebe los puntos siguientes. Si es
aplicable, siga las soluciones sugeridas.
• Sobran algunas piezas.
→Lea las instrucciones de montaje
otra vez de manera que no le sobre
ninguna pieza.
• El instrumento toca puertas y otros
elementos integrantes movibles.
→Mueva el instrumento a otro sitio
donde no obstruya o toque dichos
elementos.
• El soporte se tambalea.
→Apriete todos los tornillos
debidamente.
• El instrumento hace un ruido de chirrido
o parece inestable cuando toca música.
→Consulte con cuidado las
instrucciones de montaje y vuelva a
apretar todos los tornillos.
РУССКИЙ
Проверка
компонентов сборки
Перед сборкой обратитесь к схеме выше,
чтобы убедиться в наличии всех деталей.
* В случае отсутствия какой-либо детали
обратитесь к своему дилеру.
AЗадняя панель
BБоковая панель (левая)
CБоковая панель (правая)
DКронштейны против падения (левый/
правый)
EМонтажные кронштейны (черные;
левый/правый)
FОпорная рейка (черная)
GВинты 3,5 × 16 мм (4 шт.)
HВинты 6 × 14 мм (12 шт.)
IВинты 5 × 20 мм (2 шт.)
JВинты 5 × 55 мм (2 шт.)
Перемещение после
сборки
При перемещении после сборки держитесь
за нижнюю часть инструмента и не
перетаскивайте ее.
ВНИМАНИЕ
• В процессе транспортировки или
перемещения инструмента должны
участвовать не менее двух человек.
Попытка поднять инструмент в одиночку
может привести к травме спины или
других частей тела или к повреждению
клавиатуры, если она упадет.
УВЕДОМЛЕНИЕ
• После сборки к подставке для
клавиатуры можно прикрепить
блок педалей (продается отдельно).
При перемещении инструмента с
установленным блоком педалей не
допускайте касания пола блоком
педалей во избежание повреждения
пола. Более подробную информацию см.
в руководстве по сборке блока педалей.
Проверка правильности
сборки
После сборки подставки проведите
описанные ниже проверки. Если
применимо, следуйте предлагаемым
решениям.
• Остались лишние детали.
→Еще раз прочтите инструкцию по
сборке, чтобы не осталось лишних
деталей.
• Инструмент касается двери или
других подвижных объектов.
→Передвиньте инструмент в место,
где он не будет мешать и касаться
таких объектов.
• Подставка шатается.
→Хорошо затяните все винты.
• Инструмент скрипит или
покачивается во время игры.
→ Внимательно перечитайте
инструкцию по сборке и повторно
затяните все винты.
ENGLISH
This Keyboard Stand is only for use with
Yamaha Digital Pianos (88-key).
To confirm whether your instrument is
compatible with this stand or not, refer
to the owner’s manual of your particular
instrument.
PRECAUTIONS
PLEASE READ CAREFULLY BEFORE
PROCEEDING
Especially in the case of children, a
guardian should provide guidance on how
to properly use and handle the product
before actual use.
Please keep this Assembly Manual in a safe
and handy place for future reference.
WARNING
Always follow the basic precautions listed below
to avoid the possibility of serious injury or even
death from damage, fire or other hazards.
These precautions include, but are not limited
to, the following:
• Do not place the product near any burning
items or open flames since doing so may
cause a fire.
CAUTION
Always follow the basic precautions listed below
to avoid the possibility of physical injury to you
or others, or damage to the product or other
property. These precautions include, but are not
limited to, the following:
• Be careful not to confuse any of the parts,
and be sure to install all parts in the correct
direction. Please assemble according to the
instructions shown on the back of this sheet.
• Always assemble with two or more people.
• Assemble the stand on a hard and flat floor
with ample space.
• Keep small parts out of the reach of infants,
since they may accidentally swallow them.
• Use only the screws provided when
assembling the stand. Use of any other
screws may result in an inadequate
assembly that may cause damage to both
the keyboard and the stand.
• Be sure to attach the anti-fall brackets to
the product (at the rear), to ensure stability.
Failure to do so might result in damage to
the product or even injury.
• Use the stand only after assembly is
complete. An incomplete assembly may
result in overturning of the stand and
damage to the keyboard, or may result in
injury to the user.
• Always place the stand on a flat, stable
surface. Placing the stand on uneven
surfaces may result in it becoming unstable
or overturning, causing the keyboard to drop
and possibly resulting in injury.
• The stand is not designed to hold anything
other than the specified keyboard. Placing
any object other than the specified keyboard
on the stand may result in the object
dropping or the stand overturning and in
injury.
• Do not use the stand for anything other than
its designed purpose. Sitting on or leaning
against the stand may cause the stand to
overturn and result in injury.
• Do not put your weight on the stand with
your hand or lean on it as it may cause the
stand to overturn or the keyboard to drop
and may result in injury to the user.
• Make sure to tighten the screws regularly.
If the screws become loose, the stand may
overturn, damaging the keyboard or injuring
the user.
• To disassemble, reverse the assembly
instructions shown on the back of this sheet.
NOTICE
To avoid the possibility of malfunction/damage to the
product, damage to data, or damage to other property,
follow the notices below.
Handling
• Do not expose the stand to excessive dust or
vibrations, or extreme cold or heat (such as in direct
sunlight, near a heater, or in a car during the day) to
prevent the possibility of disfiguration.
Maintenance
• When cleaning the instrument, use a soft and dry/
slightly damp cloth. Do not use paint thinners,
solvents, alcohol, cleaning fluids, or chemical-
impregnated wiping cloths.
• During extreme changes in temperature or humidity,
condensation may occur and water may collect
on the surface of the instrument. If water is left,
the wooden parts may absorb the water and
be damaged. Make sure to wipe any water off
immediately with a soft cloth.
About disposal
When disposing of this product, please contact the
appropriate local authorities.
* The illustrations as shown in this Assembly Manual
are for instructional purposes only.
DEUTSCH
Dieser Keyboard-Ständer ist nur für Yamaha
Digitalpianos (88 Tasten) vorgesehen.
Um festzustellen, ob Ihr Instrument mit
diesem Ständer kompatibel ist oder nicht,
schlagen Sie in der Bedienungsanleitung
Ihres betreffenden Instruments nach.
VORSICHTSMAẞNAHMEN
BITTE VOR DEM FORTFAHREN
SORGFÄLTIG DURCHLESEN
Vor allem bei Kindern sollte eine
Aufsichtsperson vor dem eigentlichen Gebrauch
eine Anleitung für die richtige Verwendung und
Handhabung des Produkts geben.
Bitte bewahren Sie diese Montageanleitung
zum späteren Nachschlagen an einem
sicheren Ort griffbereit auf.
WARNUNG
Befolgen Sie stets die unten aufgeführten
grundlegenden Vorsichtsmaßnahmen, um die
Möglichkeit schwerer Verletzungen oder sogar
des Todes durch Beschädigung, Feuer oder
andere Gefahren zu vermeiden. Zu diesen
Vorsichtsmaßnahmen gehören unter anderem
die folgenden:
• Stellen Sie das Produkt nicht in der Nähe
von brennenden Gegenständen oder
offenen Flammen auf, da dies einen Brand
verursachen kann.
VORSICHT
Befolgen Sie stets die unten aufgeführten
grundlegenden Vorsichtsmaßnahmen, um
die Möglichkeit von Verletzungen bei Ihnen
oder anderen Personen bzw. von Schäden am
Produkt oder an anderen Gegenständen zu
vermeiden. Zu diesen Vorsichtsmaßnahmen
gehören unter anderem die folgenden:
• Achten Sie darauf, die Teile nicht zu
verwechseln, und installieren Sie alle Teile in
der richtigen Ausrichtung. Gehen Sie beim
Zusammenbau bitte gemäß den Anweisungen
auf der Rückseite dieses Blattes vor.
• Die Montage sollte von mindestens zwei
Personen vorgenommen werden.
• Montieren Sie den Ständer auf einem stabilen,
flachen Boden, der ausreichend Platz bietet.
• Bewahren Sie Kleinteile außerhalb der
Reichweite von Kleinkindern auf, da diese
sie versehentlich verschlucken könnten.
• Verwenden Sie nur die mitgelieferten
Schrauben zum Montieren des Ständers. Die
Verwendung anderer Schrauben kann zu
einer unzureichenden Montage führen, die
sowohl das Keyboard als auch den Ständer
beschädigen kann.
• Achten Sie darauf, die Kippschutzwinkel
am Produkt (hinten) zu befestigen, um die
Stabilität zu gewährleisten. Anderenfalls
kann es zu Schäden am Produkt oder sogar
zu Verletzungen kommen.
• Verwenden Sie den Ständer erst nach
Abschluss der Montage. Eine unvollständige
Montage kann zum Umkippen des Ständers
und zur Beschädigung des Keyboards oder
zu Verletzungen des Benutzers führen.
• Stellen Sie den Ständer immer auf eine ebene,
stabile Fläche. Das Aufstellen des Ständers
auf unebenen Flächen kann dazu führen, dass
er instabil wird oder umkippt, wodurch das
Keyboard herunterfallen und möglicherweise
Verletzungen verursachen kann.
• Der Ständer ist nicht dafür ausgelegt, etwas
anderes als das angegebene Keyboard zu
halten. Wenn Sie einen anderen Gegenstand
als das angegebene Keyboard auf den
Ständer stellen, kann dieser Gegenstand
herunterfallen, oder der Ständer kann
umkippen und zu Verletzungen führen.
• Verwenden Sie den Ständer nicht für andere
Zwecke als die vorgesehenen. Wenn Sie
sich auf den Ständer setzen oder dagegen
lehnen, kann der Ständer umkippen und zu
Verletzungen führen.
• Belasten Sie den Ständer nicht mit Ihrem
Gewicht durch Abstützen oder Anlehnen mit
Ihrer Hand, da dies dazu führen kann, dass
der Ständer umkippt oder das Keyboard
herunterfällt, was zu Verletzungen des
Benutzers führen kann.
• Achten Sie darauf, dass die Schrauben
regelmäßig nachgezogen werden. Wenn
sich die Schrauben lösen, kann der Ständer
umkippen und das Keyboard beschädigen
oder den Benutzer verletzen.
• Gehen Sie zur Demontage in umgekehrter
Reihenfolge vor, wie auf der Rückseite
dieses Blattes beschrieben.
ACHTUNG
Um die Möglichkeit einer Fehlfunktion/Beschädigung
des Produkts, einer Beschädigung von Daten oder von
Schäden an anderen Gegenständen zu vermeiden,
beachten Sie die folgenden Hinweise.
Handhabung
• Setzen Sie den Ständer weder übermäßigem Staub
oder Vibrationen noch extremer Kälte oder Hitze
aus (z. B. in direktem Sonnenlicht, in der Nähe einer
Heizung oder tagsüber in einem Auto), um eine
mögliche Verformung zu vermeiden.
Wartung
• Verwenden Sie zur Reinigung des Instruments ein
weiches, trockenes/leicht feuchtes Tuch. Verwenden
Sie keine Lackverdünner, Lösungsmittel, Alkohol,
Reinigungsflüssigkeiten oder chemisch imprägnierte
Wischtücher.
• Bei extremen Temperatur- oder
Luftfeuchtigkeitsschwankungen kann es zu Kondensation
und Wasseransammlungen auf der Oberfläche des
Instruments kommen. Wenn Wasser zurückbleibt,
können die Holzteile das Wasser absorbieren und
beschädigt werden. Wischen Sie etwaiges Wasser
unbedingt sofort mit einem weichen Tuch ab.
Info zur Entsorgung
Bitte wenden Sie sich zur Entsorgung dieses Produkts
an die zuständigen örtlichen Behörden.
* Die in dieser Montageanleitung gezeigten
Abbildungen dienen nur zu Anleitungszwecken.
FRANÇAIS
Ce stand pour clavier est destiné
exclusivement aux pianos Yamaha
numériques (88touches).
Afin de confirmer si votre instrument
est compatible ou non avec ce
pupitre, consultez le mode d’emploi
l’accompagnant.
PRÉCAUTIONS D’USAGE
À LIRE ATTENTIVEMENT AVANT DE
POURSUIVRE
Dans le cas particulier des enfants,
un tuteur doit fournir des conseils sur
l’utilisation et la manipulation correctes du
produit avant son utilisation réelle.
Veuillez conserver ce manuel d’assemblage
dans un endroit sûr et à portée de main
pour référence ultérieure.
AVERTISSEMENT
Suivez toujours les précautions élémentaires
indiquées ci-dessous pour éviter tout risque de
blessures graves, voire mortelles en raison de
dommages, d’un incendie ou d’autres dangers.
Ces précautions incluent, sans s’y limiter, les
points suivants:
• Ne placez pas le produit à proximité d’objets
en feu ou de flammes nues sous peine de
provoquer un incendie.
ATTENTION
Suivez toujours les précautions élémentaires
indiquées ci-dessous pour éviter tout risque de
blessures corporelles pour vous-même ou pour
d’autres personnes ou de dommages matériels
ou du produit. Ces précautions incluent, sans
s’y limiter, les points suivants:
• Veillez à ne pas mélanger les pièces et à les
installer dans le bon sens. Veuillez procéder
au montage conformément aux instructions
indiquées au dos de cette feuille.
• Procédez toujours au montage à deux ou plus.
• Assemblez le pupitre sur un sol dur et plat
offrant suffisamment d’espace.
• Gardez les petites pièces hors de la portée
des nourrissons qui pourraient les avaler
accidentellement.
• Lorsque vous assemblez le pupitre, utilisez
uniquement les vis fournies. L’utilisation
d’autres vis peut entraîner un montage
incorrect susceptible d’endommager le
clavier et le pupitre.
• Veillez à fixer les supports antichute au
produit (à l’arrière) afin de garantir la
stabilité. Le non-respect de cette consigne
peut entraîner des dommages matériels,
voire corporels.
• N’utilisez le pupitre qu’une fois le
montage terminé. Si le montage n’est pas
complètement terminé, le pupitre risque de
se renverser et le clavier d’être endommagé
ou bien l’utilisateur d’être blessé.
• Placez toujours le pupitre sur une surface
plane et stable. Si vous placez le pupitre
sur une surface irrégulière, il risque d’être
instable ou de se renverser, entraînant la
chute du clavier et de potentielles blessures.
• Le pupitre n’est pas conçu pour recevoir
autre chose que le clavier spécifié. Si vous
placez un objet autre que le clavier spécifié
sur le pupitre, l’objet risque de tomber ou le
pupitre peut se renverser et vous blesser.
• N’utilisez pas le pupitre à d’autres fins que
celles prévues. Si vous vous asseyez ou
vous appuyez contre le pupitre, vous risquez
de le renverser et de vous blesser.
• N’appuyez pas votre main de tout votre
poids sur le pupitre ni ne prenez appui
dessus sous peine de le renverser ou de
provoquer la chute du clavier et vous blesser.
• Veillez à serrer les vis régulièrement. Si
les vis se desserrent, le pupitre peut se
renverser, endommageant le clavier et
blessant l’utilisateur.
• Pour le démontage, inversez l’ordre des
instructions pour le montage indiquées au
dos de cette feuille.
AVIS
Pour éviter d’endommager l’appareil ou de perturber
son fonctionnement, de détruire des données ou de
détériorer le matériel avoisinant, il est indispensable de
respecter les avis ci-dessous.
Manipulation
• N’exposez pas le pupitre à de la poussière ou des
vibrations excessives ou à des conditions de chaleur
et de froid extrêmes (en plein soleil, à proximité d’un
radiateur ou dans une voiture en pleine journée)
sous peine de le déformer.
Entretien
• Utilisez un chiffon doux, sec ou légèrement humide
pour nettoyer l’instrument. N’utilisez pas de diluants
à peinture, de solvants, d’alcools, de produits
d’entretien ou de tampons de nettoyage imprégnés
de produits chimiques.
• En cas de changements extrêmes de température
ou d’humidité, de la condensation peut se former
et de l’eau peut s’accumuler à la surface de
l’instrument. S’il reste de l’eau, les parties en bois
peuvent absorber l’eau et être endommagées.
Veillez à essuyer immédiatement toute trace d’eau
avec un chiffon doux.
À propos de la mise au rebut
Lors de la mise au rebut de ce produit, veuillez
contacter les autorités locales compétentes.
* Les illustrations figurant dans le présent manuel
d’assemblage sont fournies à titre indicatif
uniquement.
ESPAÑOL
Este soporte de teclado es para su uso
exclusivo con pianos digitales Yamaha
(88 teclas).
Para confirmar si su instrumento es
compatible con este soporte o no,
consulte el manual de instrucciones de su
instrumento particular.
PRECAUCIONES
LE ROGAMOS QUE LEA ATENTAMENTE
ANTES DE PROCEDER
Especialmente cuando se trate de niños, un
tutor deberá ofrecer ayuda sobre cómo usar
y manejar debidamente el producto antes
de su uso real.
Guarde este manual de montaje en un lugar
seguro y accesible para futuras consultas.
ADVERTENCIA
Observe siempre las precauciones básicas
indicadas abajo para evitar la posibilidad de
heridas graves o incluso la muerte a causa
de daños, incendio u otros riesgos. Estas
precauciones incluyen, entre otras, lo siguiente:
• No ponga el producto cerca de ningún
elemento que esté ardiendo ni de una llama
expuesta porque si lo hace podría ocasionar
un incendio.
ATENCIÓN
Observe siempre las precauciones básicas
indicadas abajo para evitar la posibilidad de
heridas a usted o a otras personas, o daños
al producto o a otras propiedades. Estas
precauciones incluyen, entre otras, lo siguiente:
• Tenga cuidado de no confundir ninguna de
las piezas, y asegúrese de instalar todas
las piezas en el sentido correcto. Realice el
montaje de acuerdo con las instrucciones
mostradas en el reverso de esta hoja.
• Haga siempre el montaje entre dos o más
personas.
• Monte el soporte en un suelo duro y plano
en el que haya suficiente espacio.
• Mantenga las piezas pequeñas alejadas
de los niños pequeños porque podrían
tragárselas sin querer.
• Cuando monte el soporte, emplee solo
los tornillos provistos. El empleo de otros
tornillos puede resultar en un montaje
defectuoso que podría ocasionar daños al
teclado y al soporte.
• Asegúrese de colocar en el producto las
abrazaderas para evitar caídas (en la parte
trasera), y garantizar la estabilidad. No
hacerlo podría resultar en daños al producto
o incluso heridas.
• Utilice el soporte solamente después de
haber completado el montaje. Un montaje
incompleto puede resultar en un vuelco del
soporte y daños al teclado, o en heridas al
usuario.
• Ponga siempre el soporte sobre una
superficie plana y estable. Poner el soporte
sobre superficies irregulares puede resultar
en que se vuelva inestable o se vuelque,
ocasionando que el teclado se caiga y
posiblemente ocasionar heridas.
• El soporte no p1-ha sido diseñado para sostener
nada que no sea el teclado especificado.
Poner cualquier objeto que no sea el teclado
especificado encima del soporte podría
resultar en que el objeto se caiga o en que el
soporte se vuelque y ocasione heridas.
• No utilice el soporte para nada que no sea
el propósito para el que p1-ha sido diseñado.
Sentarse en el soporte o apoyarse en él
puede ocasionar que el soporte se vuelque
y ocasionar heridas.
• No aplique su peso sobre el soporte con
la mano ni se apoye en él porque podría
ocasionar que el soporte se vuelque o que
el teclado se caiga y ocasionar heridas al
usuario.
• Asegúrese de apretar los tornillos con
regularidad. Si los tornillos llegan a aflojarse,
el soporte se podría volcar, dañando el
teclado o hiriendo al usuario.
• Para el desmontaje, invierta las
instrucciones de montaje mostradas en el
reverso de esta hoja.
AVISO
Para evitar la posibilidad de un mal funcionamiento o
daños al producto, daños a los datos, o daños a otras
propiedades, siga los avisos de abajo.
Manejo
• No exponga el soporte a un exceso de polvo o
vibraciones, ni a frío o calor extremo (como a la
luz directa del sol, cerca de un calefactor, o en un
vehículo durante el día) para evitar la posibilidad de
que se deforme.
Mantenimiento
• Cuando limpie el instrumento, utilice un paño
suave y seco, ligeramente humedecido. No utilice
diluyentes de pintura, disolventes, alcohol, líquidos
de limpieza, ni paños de limpieza impregnados con
productos químicos.
• Cuando haya cambios extremos de temperatura o
humedad, puede que se produzca condensación
y que se acumule agua sobre la superficie del
instrumento. Si se deja que el agua permanezca,
las piezas de madera podrán absorberla y dañarse.
Asegúrese de retirar cualquier resto de agua
inmediatamente con un paño suave.
Acerca del desecho
Cuando vaya a desechar de este producto, póngase en
contacto con las autoridades locales apropiadas.
* Las ilustraciones mostradas en este manual
de montaje son para propósitos instructivos
únicamente.
РУССКИЙ
Данная подставка предназначена для
использования только с 88-клавишными
цифровыми фортепиано Yamaha.
Чтобы определить, совместим ли
инструмент с этой подставкой,
обратитесь к руководству пользователя
конкретного инструмента.
ПРАВИЛА ТЕХНИКИ БЕЗОПАСНОСТИ
ВНИМАТЕЛЬНО ПРОЧИТАЙТЕ ПЕРЕД
ТЕМ, КАК ПРОДОЛЖИТЬ
В случае использования изделия
детьми, опекун должен дать указания
по правильному обращению с изделием
до его фактического использования.
Храните данное руководство по сборке
в надежном и легкодоступном месте для
дальнейшего его использования.
ПРЕДУПРЕЖДЕНИЕ
Обязательно соблюдайте перечисленные
ниже основные правила техники
безопасности, чтобы избежать риска
получения серьезной травмы или даже
смерти в результате повреждения,
пожара или других опасностей. Правила
техники безопасности включают, но не
ограничиваются следующими:
• Не размещайте изделие рядом с
горящими объектами или открытым огнем,
так как это может привести к возгоранию.
ВНИМАНИЕ
Обязательно соблюдайте перечисленные
ниже основные правила техники
безопасности, чтобы избежать риска
получения телесных повреждений вами
или другими людьми или повреждения
изделия или другого имущества. Правила
техники безопасности включают, но не
ограничиваются следующими:
• Не перепутайте детали подставки
и устанавливайте их в правильной
последовательности. Выполняйте сборку
согласно инструкции, приведенной на
обратной стороне этого листа.
• Для сборки потребуется участие не
менее двух человек.
• Собирайте подставку на твердой и
плоской поверхности пола при наличии
достаточного свободного места.
• Держите мелкие детали в недоступном
для детей месте, так как дети могут
случайно их проглотить.
• При сборке подставки применяйте только
винты, входящие в комплект поставки.
Использование других винтов может
привести к неправильной сборке и вызвать
повреждение клавиатуры и подставки.
• Для обеспечения устойчивости
обязательно прикрепите к изделию
кронштейны против падения (сзади).
Невыполнение этого указания может
привести к повреждению изделия или
даже к травме.
• Используйте подставку только после
завершения сборки. Неполная сборка
может привести к опрокидыванию
подставки и повреждению цифрового
фортепиано или нанести травму
пользователю.
• Всегда помещайте подставку на ровную
твердую поверхность. Если расположить
подставку на неровной поверхности, то
она может потерять устойчивость или
перевернуться, что приведет к падению
инструмента и может нанести травму.
• Подставка предназначена исключительно
для размещения указанного цифрового
фортепиано. Помещение на подставку
предметов, отличных от указанного
инструмента, может привести к их
падению или опрокидыванию подставки.
• Используйте подставку только по
назначению. Не садитесь на подставку и
не опирайтесь о нее, так как это может
привести к опрокидыванию подставки и
нанесению травмы.
• Не опирайтесь на подставку рукой и не
опирайтесь на нее, так как это может
привести к опрокидыванию подставки
или падению клавиатуры и нанести
травму пользователю.
• Регулярно затягивайте винты. Если
винты ослабнут, подставка может
перевернуться и повредить клавиатуру
или нанести травму пользователю.
• Для разборки, выполняйте операции
инструкции, приведенной на обратной
стороне этого листа, в обратном порядке.
УВЕДОМЛЕНИЕ
Во избежание неисправности/повреждения
изделия, повреждения данных или имущества
следуйте приведенным ниже указаниям.
Обращение
• Не подвергайте подставку чрезмерному
воздействию пыли или вибраций, очень
низких или высоких температур (например,
под прямыми солнечными лучами, рядом с
обогревателем или в автомобиле днем), чтобы
предотвратить возможность деформации.
Обслуживание
• При очистке инструмента используйте мягкую
и сухую/слегка влажную ткань. Не используйте
разбавители краски, растворители, спирт,
чистящие жидкости или ткань, пропитанную
химическими веществами.
• При резких перепадах температуры или
влажности может образовываться конденсат,
и на поверхности инструмента может
скапливаться вода. Если вода останется,
деревянные детали могут впитать воду и
получить повреждения. Немедленно вытирайте
остатки воды мягкой тканью.
Утилизация
Для утилизации данного изделия обращайтесь в
соответствующие местные органы.
* Иллюстрации в данном руководстве по сборке
приведены только в качестве примеров.
Termékspecifikációk
| Márka: | Yamaha |
| Kategória: | Keukenmachine |
| Modell: | L-100 |
Szüksége van segítségre?
Ha segítségre van szüksége Yamaha L-100, tegyen fel kérdést alább, és más felhasználók válaszolnak Önnek
Útmutatók Keukenmachine Yamaha

10 Január 2025
1 Január 2025
1 Január 2025
1 Január 2025
14 December 2024
14 December 2024
14 December 2024
14 December 2024
14 December 2024
14 Október 2024
Útmutatók Keukenmachine
Legújabb útmutatók Keukenmachine
16 Március 2025
13 Január 2025
28 December 2024
20 December 2024
14 December 2024
14 December 2024
14 December 2024
29 Szeptember 2024
20 Szeptember 2024
18 Szeptember 2024