Használati útmutató Assault Fitness Bike Pro X
Assault Fitness Szobakerékpár Bike Pro X
Olvassa el alább 📖 a magyar nyelvű használati útmutatót Assault Fitness Bike Pro X (20 oldal) a Szobakerékpár kategóriában. Ezt az útmutatót 27 ember találta hasznosnak és 9 felhasználó értékelte átlagosan 4.5 csillagra
Oldal 1/20
© Assault Fitness 2023
1489
913
1499
1490
1483
Part# 23-AS-1515
QUICK START GUIDE
AS SHIPPED
ASSEMBLY
Introduction
• The ASSAULTBIKE PRO X requires only minor assembly. All tools required to complete the initial setup and assembly have
been included.
• Remove the unit and all parts from the carton and packaging. Conrm all parts shown in the section above titled “As Shipped”
are included before attempting assembly of the ASSAULTBIKE PRO X.
Assembly Step One:
Front & Rear Stabilizer Installation
• Align the front stabilizer (1483) with the receiver on the main frame, and install the two screws, lock washers and at
washers (1506, 1427 & 1426) with the supplied 5mm hex wrench.
• Align the rear stabilizer (1489) with the receiver on the main frame, and install the two screws, lock washers and at
washers (1506, 1427 & 1426) with the supplied 5mm hex wrench.
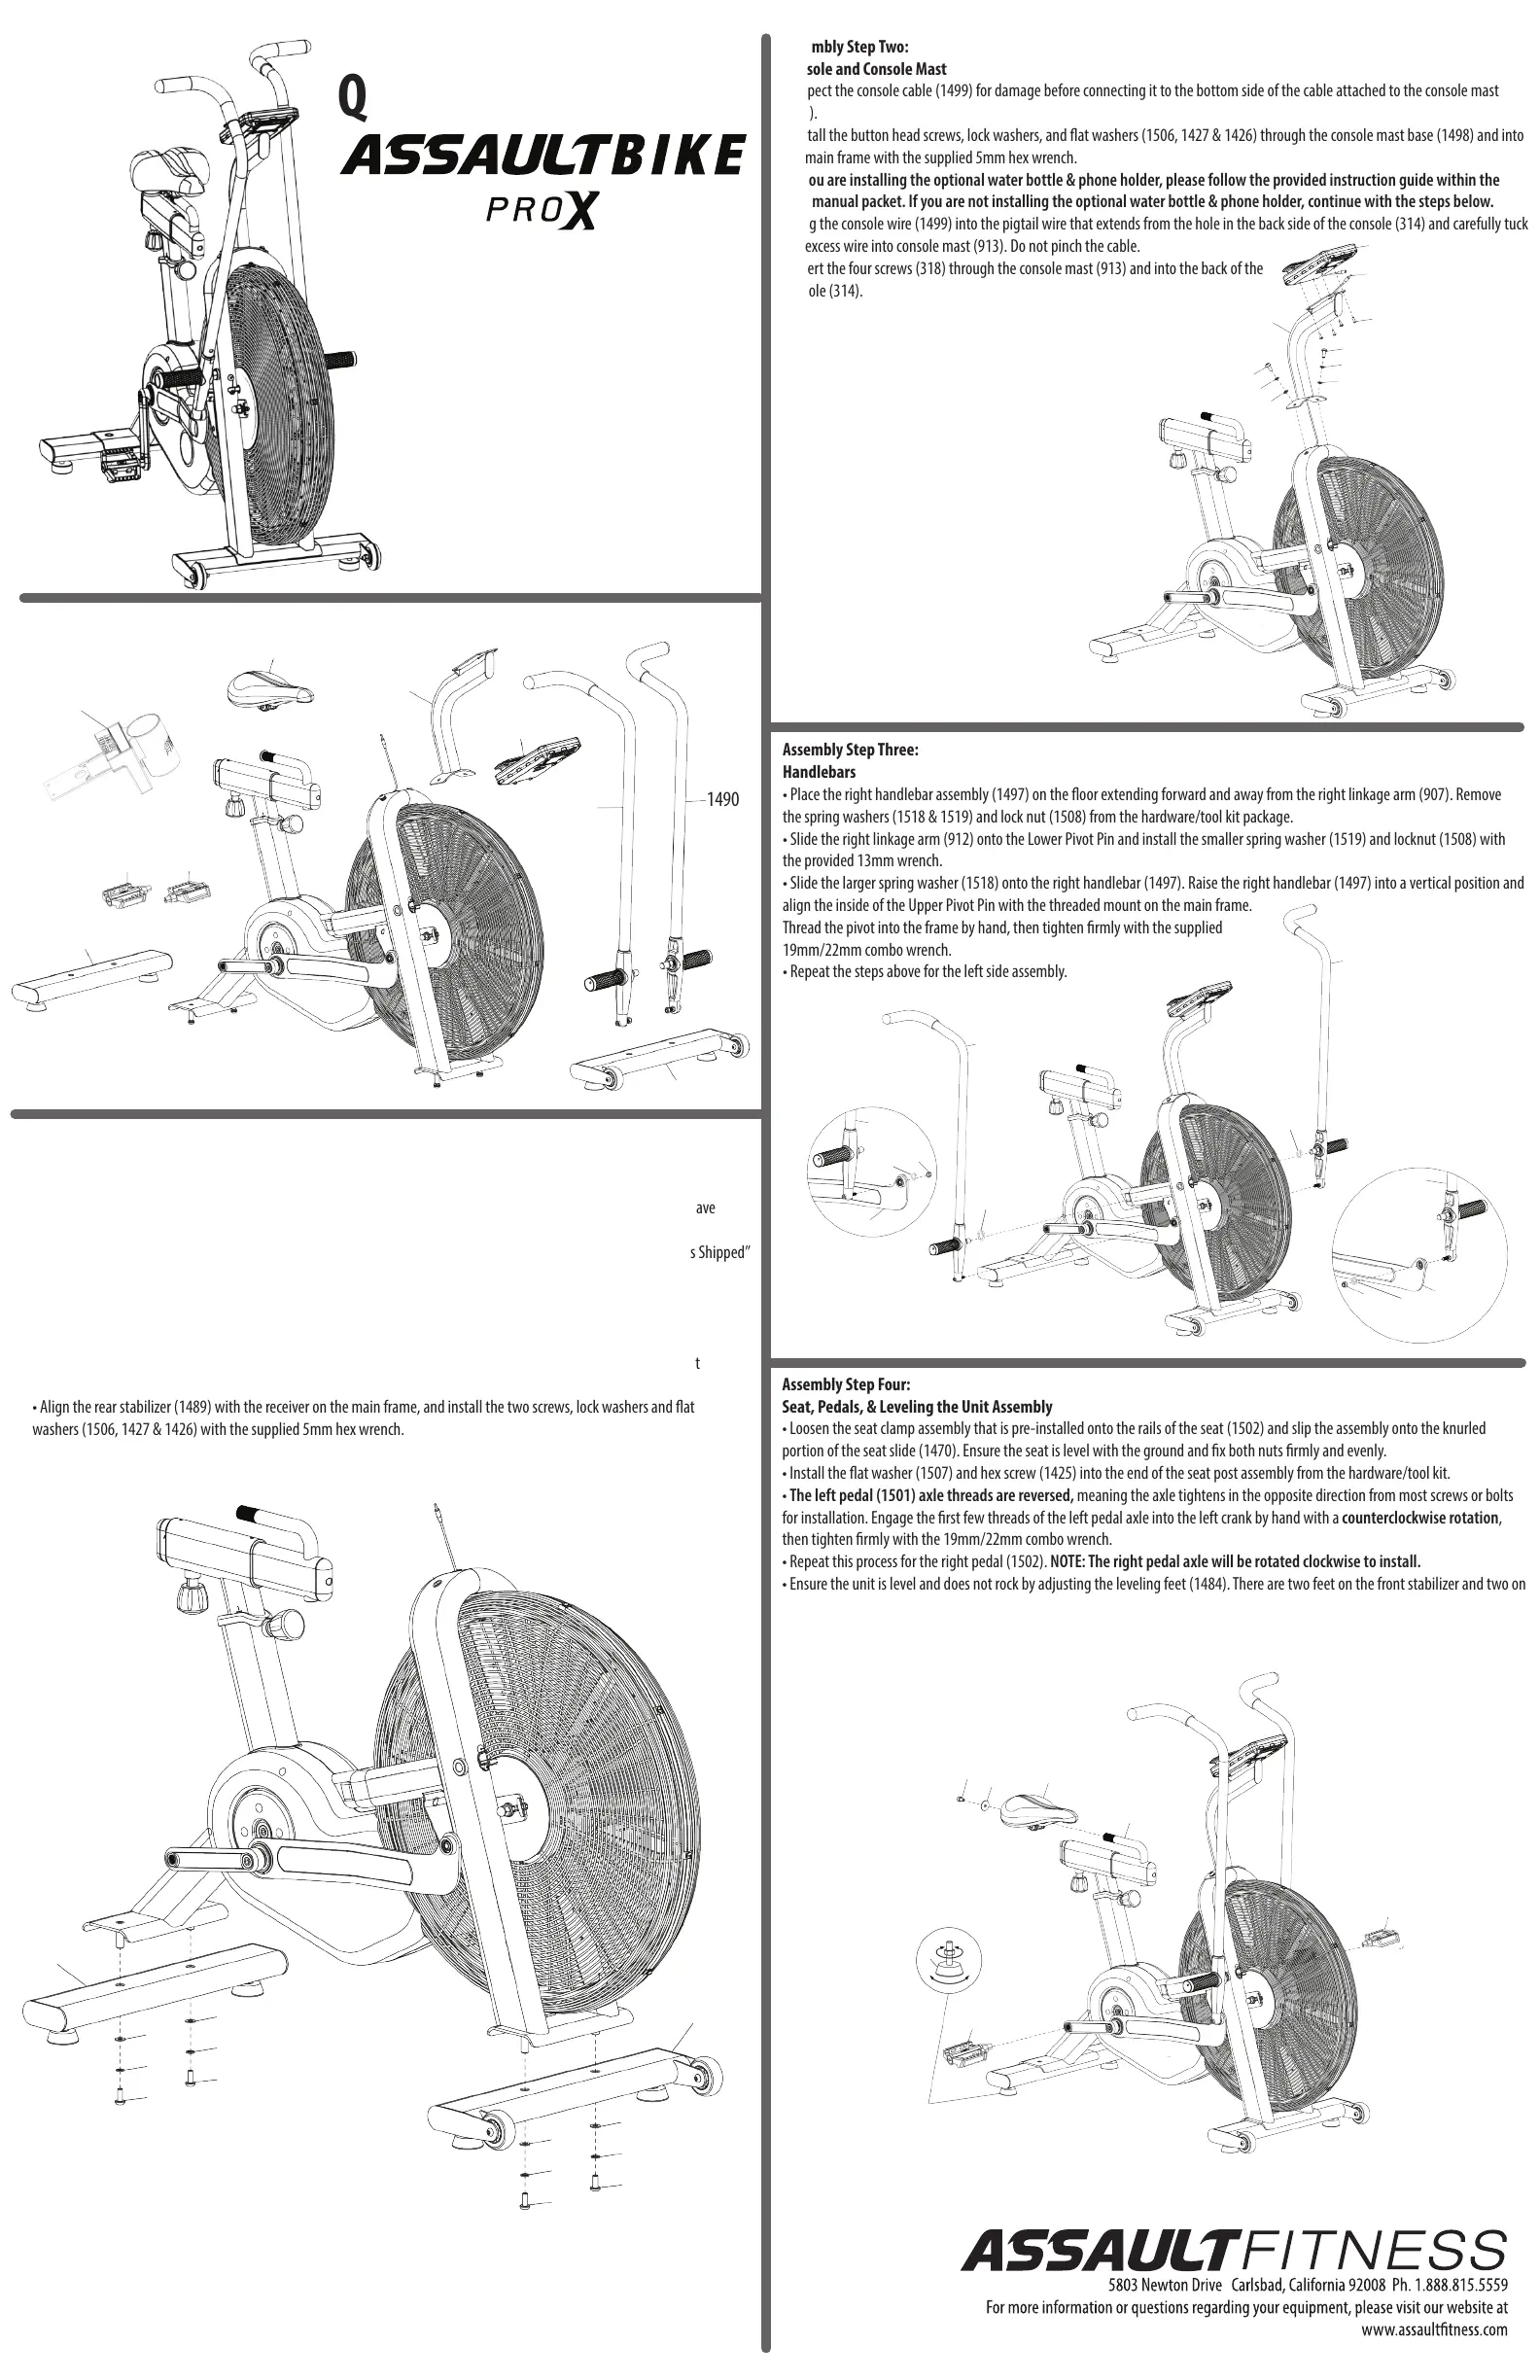
Assembly Step Two:
Console and Console Mast
• Inspect the console cable (1499) for damage before connecting it to the bottom side of the cable attached to the console mast
(913).
• Install the button head screws, lock washers, and at washers (1506, 1427 & 1426) through the console mast base (1498) and into
the main frame with the supplied 5mm hex wrench.
*If you are installing the optional water bottle & phone holder, please follow the provided instruction guide within the
user manual packet. If you are not installing the optional water bottle & phone holder, continue with the steps below.
• Plug the console wire (1499) into the pigtail wire that extends from the hole in the back side of the console (314) and carefully tuck
the excess wire into console mast (913). Do not pinch the cable.
• Insert the four screws (318) through the console mast (913) and into the back of the
console (314).
Assembly Step Three:
Handlebars
• Place the right handlebar assembly (1497) on the oor extending forward and away from the right linkage arm (907). Remove
the spring washers (1518 & 1519) and lock nut (1508) from the hardware/tool kit package.
• Slide the right linkage arm (912) onto the Lower Pivot Pin and install the smaller spring washer (1519) and locknut (1508) with
the provided 13mm wrench.
• Slide the larger spring washer (1518) onto the right handlebar (1497). Raise the right handlebar (1497) into a vertical position and
align the inside of the Upper Pivot Pin with the threaded mount on the main frame.
Thread the pivot into the frame by hand, then tighten rmly with the supplied
19mm/22mm combo wrench.
• Repeat the steps above for the left side assembly.
1489
1506
1506
1506
1506
1427
1427
1427
1427
1426
1426
1426
1426
1483
1507
1425
318
314
913
1499
1506
1427
1426
1506
1427
1426
Assembly Step Four:
Seat, Pedals, & Leveling the Unit Assembly
• Loosen the seat clamp assembly that is pre-installed onto the rails of the seat (1502) and slip the assembly onto the knurled
portion of the seat slide (1470). Ensure the seat is level with the ground and x both nuts rmly and evenly.
• Install the at washer (1507) and hex screw (1425) into the end of the seat post assembly from the hardware/tool kit.
• The left pedal (1501) axle threads are reversed, meaning the axle tightens in the opposite direction from most screws or bolts
for installation. Engage the rst few threads of the left pedal axle into the left crank by hand with a counterclockwise rotation,
then tighten rmly with the 19mm/22mm combo wrench.
• Repeat this process for the right pedal (1502). NOTE: The right pedal axle will be rotated clockwise to install.
• Ensure the unit is level and does not rock by adjusting the leveling feet (1484). There are two feet on the front stabilizer and two on
the rear stabilizer. As a starting point, loosen each foot by threading the assembly downward/clockwise, and then thread the
locknuts downward (clockwise) against the foot base. Check the unit for stability and make any adjustments as necessary. Once
stable, lock the leveling feet (1484) in place by tightening the jam nut upward/counterclockwise, against the underside of the
stabilizer to lock the current position of each foot.
314
1503
1504
1504
1497
1497
1490
1490
907
1508
1508
912
1502
1470
1502
1501
1484
1519
1519
1518
1518
1506
Termékspecifikációk
| Márka: | Assault Fitness |
| Kategória: | Szobakerékpár |
| Modell: | Bike Pro X |
Szüksége van segítségre?
Ha segítségre van szüksége Assault Fitness Bike Pro X, tegyen fel kérdést alább, és más felhasználók válaszolnak Önnek
Útmutatók Szobakerékpár Assault Fitness

29 Augusztus 2024
Útmutatók Szobakerékpár
Legújabb útmutatók Szobakerékpár
10 Április 2025
10 Április 2025
10 Április 2025
10 Április 2025
10 Április 2025
10 Április 2025
10 Április 2025
10 Április 2025
10 Április 2025
10 Április 2025