Használati útmutató Audio-Technica AT-HRP5
Audio-Technica
nincs kategorizálva
AT-HRP5
Olvassa el alább 📖 a magyar nyelvű használati útmutatót Audio-Technica AT-HRP5 (2 oldal) a nincs kategorizálva kategóriában. Ezt az útmutatót 15 ember találta hasznosnak és 8 felhasználó értékelte átlagosan 4.5 csillagra
Oldal 1/2
クイックスタートガイド/ メディアプレーヤー
Quick Start Guide
/
Media Player
本製品の詳しい使いかたの確認、困ったときの解決方法については、当社ホームペー
ジ掲載の取扱説明書をご確認ください。
https://www.audio-technica.co.jp/
support/
For more information on how to use this product and troubleshoot any problems,
refer to the user manual on the Audio-Technica website.
https://www.audio-technica.com
日本語
お買い上げありがとうございます。ご使用の前にこの取扱説明書を必ずお読みのうえ、正しくご使用
ください。また、いつでもすぐ読める場所に保管しておいてください。
音声・映像、さまざまなファイルを再生できるHi-Res 対応メディアプレーヤー
•
USB出力によりAT-HRD1・AT-HRD5・AT-HRD500とのデジタル高音質接続
•
S/PDIF出力(COAXIAL・OPTICAL)によりデジタル入力対応機器に高音質接続
•
HDMI出力によりHDMI 入力対応機器との音声・映像デジタル接続
•
RCA出力によりRCA 入力対応機器へ音声・映像アナログ接続
•
PCM32~384kHz/24bit、DSD64・DSD128に対応
安全上の注意
本製品は安全性に充分な配慮をして設計していますが、使いかたを誤ると事故が起こることがあります。事故
を未然に防ぐために下記の内容を必ずお守りください。なお、下記の内容は当社の車載用製品全般について
記載していますので、お買い上げいただいた製品には当てはまらない内容もありますが、ご了承ください。
警告
この表示は「取り扱いを誤った場合、使用者が死亡または重傷を負う可能性があります」
を意味しています
。
注意
この表示は「取り扱いを誤っ た場合、使用者が傷害を負う、 または物的損害が発生する可
能性があります」を意味 しています。
警告
•
DC12Vマイナスアース車専用
24V車で使用しないでください。故障や火災
の原因になります。
•
車体に穴を開けて取り付ける場合は、 保安上問
題になる場所やパイプ類・タンク・電気配線を
傷付けない
交通事故や火災の原因になります。
•
配線作業の前に必ずバッテリーのマイナス端子
→プラス端子の順にケーブルを外す
ショートによる感電や火災の原因になります。
•
ステアリング系統、ブレーキ系統、燃料タン
クなどの保安部品に使用しているボルトや
ナットは絶対に使用しない
火災や事故などの原因となります。
•
運転操作の妨げにならない場所に取り付ける
交通事故の原因となります。
•
分解や改造はしない/ケーブル類は途中で
切断しない
感電、事故や火災の原因になります。
•
エアバッグの動作の妨げにならない場所に
取り付ける
エアバッグが正常に動作しないなどの事故の
原因になります。
•
異常(音、煙、臭いや発熱、損傷など)に気付
いたら使用しない
異常が起きたらすぐに電源を切り、お買い上げ
の販売店か当社サービスセンターに相談くだ
さい。そのまま使用すると、事故や火災などの
原因になります。
•
幼児の手の届く所に置かない
事故の原因になります。
•
布などで覆わない
火災や事故の原因になります。
•
ヒューズは規定容量以外のヒューズを使用
しない
規定容量を超えるヒューズを使用すると、火
災の原因になります。
•
走行中は本製品および本製品と接続している
周辺機器を操作しない
必ず安全な場所に車を停車させてから行って
ください。交通事故の原因になります。
•
本製品に異物(燃えやすい物、金属、液体な
ど)を入れない
感電、故障や火災の原因になります。
•
作業終了後、電装品が正常に動作するか確認
する
正常に動作しない状態で使用すると、火災や
感電、事故の原因になります。
®
AT-HRP5
注意
•
取り付け・配線は専門技術のある販売店に依頼
する
安全のため、お買い上げの販売店に依頼してく
ださい。誤った取り付け・配線を行うと、事故の原
因になります。
•
ネジやシートレールなどにケーブル類を挟むなど、
可動部の妨げになる取り付けや配線は行わない
断線やショートにより火災など事故の原因となり
ます。
•
ケーブル類が金属と接触する場合は保護テープ
を巻く
保護テープを巻かずに使用すると、火災や感電の
原因になります。
•
車載用以外で使用しない
感電やけがの原因になります。
•
濡れた手で触れない
感電やけがの原因になります。
•
エアバッグの注意事項を車両メーカーに確認する
注意事項を確認せずに作業を行うとエアバッグが
誤動作する原因になることがあります。
•
以下の場所には取り付けない
■エンジンやマフラーの配管付近 ■直射日光の
当たる場所 ■ヒーターの熱風が直接当たる場所
■雨や水のかかる場所 ■振動の多い場所 ■固
定できない不安定な場所 ■通風孔や放熱板を
ふさぐ場所 ■熱のこもる場所
使用上の注意
•
ご使用の際は、接続する機器の取扱説明書も必ずお読みください。
•
接続するケーブルのプラグは根元まで確実に差し込んでください。
•
USB 接続の際は、本製品と機器を直接接続してください。USB ハブは使用しないでください。
•
USB 入力端子には、USBメモリー以外の機器を接続しないでください。
•
USB 入力端子に接続できるUSBメモリーの最大容量は1TB(合計2TB)です。
•
USB出力端子には、当社製品のAT-HRD500/AT-HRD5/AT-HRD1以外の機器を接続しな
いでください。
•
本製品のUSB接続時に、万一機器のデータなどが消失しても、当社では責任を負いません。
•
本製品のUSB端子でスマートフォンなどの充電はできません。
•
外部からのノイズ混入を防止するため、本製品を車両ハーネスなどから離して接続してください。
•
リモコン受光ケーブルの受光部は、直射日光の当たらない場所に取り付けてください。
•
高サンプリングレート(176.4kHz、192kHz)のデータ通信を行う場合、高精度のデータ転送が
可能な角形光デジタルケーブル(別売)が必要になります。PCM352.8kHz・384kHz、DSD64・
DSD128はPCM192kHzに変換して出力されます。光ファイバー先端形状の状態によってデー
タ転送に影響が出るため、下記を参考に角形光デジタルケーブルを使用してください。
光ファイバーが太く、
先端が平らに加工さ
れているもの
光ファイバーの
先端に傷や破損
があるもの
光ファイバーの先端
が丸く加工されてい
るもの
光ファイバー自体
が細くなっている
もの
光ファイバー正面図
光ファイバー正面図
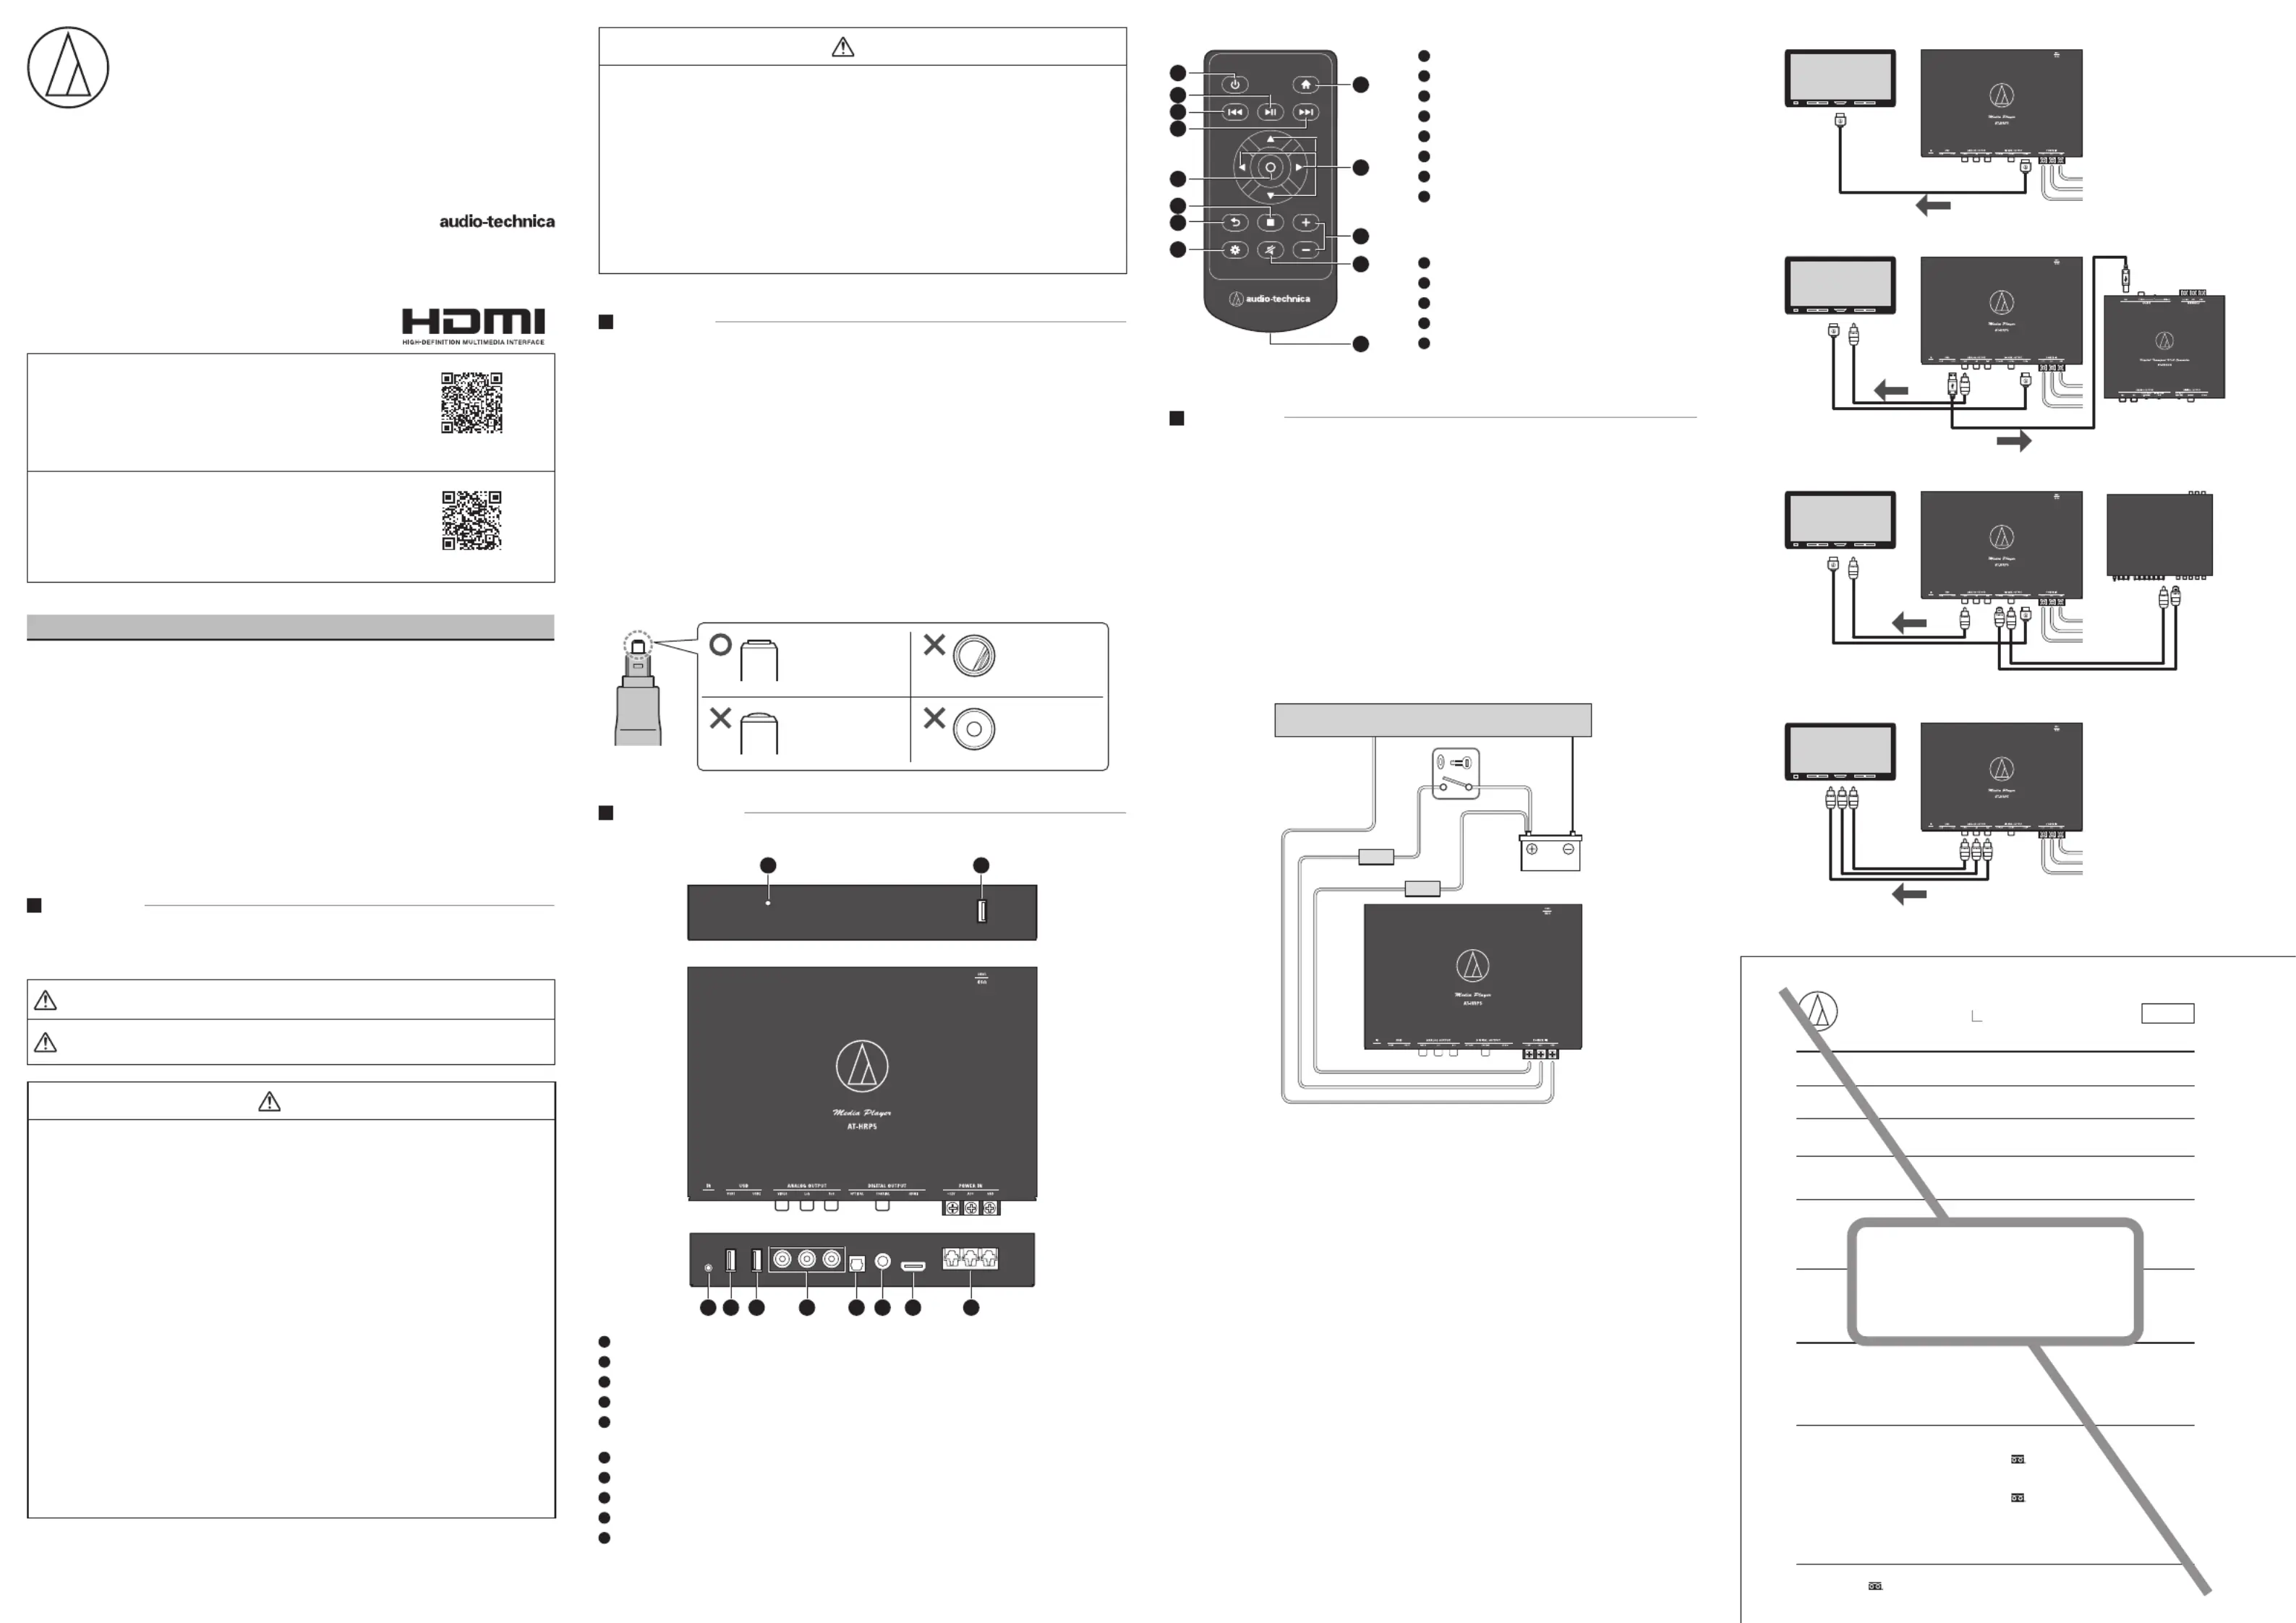
各部の名称と機能
■本体
1 2
3 4 5 6 7 8 9
10
1
インジケーター
2
USB 入力端子(USB3)
3
リモコン受光ケーブル端子
4
USB 入力端子(USB1)
5
USB 出力端子(USB2)
当社製品のAT-HRD500/AT-HRD5/AT-HRD1のいずれかを接続する専用の端子です。
6
RCA 出力端子
7
角型光デジタル出力端子
8
同軸デジタル出力端子
9
HDMI出力端子
10
電源接続端子(+12V・ACC・GND)
■リモコン
1
電源ボタン
2
再生/一時停止ボタン
3
前へ/早戻しボタン
4
次へ/早送りボタン
5
決定ボタン
6
停止ボタン
7
戻るボタン
8
設定ボタン
接続する車載モニターがPAL方式の場合は、設定ボ
タンを長押し(約2秒)してください。「ビデオ設定」
が「NTSC」から「PAL」に変更されます。
9
ホームボタン
10
選択ボタン
11
音量ボタン
12
ミュートボタン
13
電池ケース
電池は同梱されていません。市販のコイン形リチウム
電池(CR2032)をお買い求めください。
接続のしかた
•
ご使用の際は、接続する機器の取扱説明書も必ずお読みください。
•
ご使用する前に当社ホームページで最新のファームウェアをご確認ください。ファームウェアの確
認方法、アップデートについては、取扱説明書をご確認ください。
•
接続する際は、各入出力に接続する機器の音量を最小にしてから接続してください。
•
本製品は12V 車専用です。12V車以外には接続できません。ご注意ください。
•
必ずインジケーターの点灯確認および動作確認を行ってから本製品を設置してください。
1. 接続する前に必ずエンジンキーを抜き、自動車のバッテリーからバッテリーケーブルを取り外します。ケー
ブルはマイナス( -) から取り外し、次にプラス(+)のケーブルを取り外してください。
2. 本製品の電源接続端子(+12V・ACC・GND)を別売の電源ケーブルで下記の通り接続します。
12V : 常時通電されている電源ケーブル
電源ケーブルに2Aのヒューズ(別売)を必ず接続してください。
ACC : 車両からアクセサリー電源ケーブル*(ON/OFF)に接続します。
電源ケーブルに1Aのヒューズ(別売)を必ず接続してください。
*自動車のエンジンキーが「ON」または「ACC」の位置になっている場合に12Vバッテリーが供給される線
GND : バッテリーのマイナス端子 *または車両のアースの取れる金属部分に接続します。
*バッテリーのマイナス端子に接続する場合は、6.で接続してください。
+12V
2A
1A
12V
ACC
GND
車の金属部分
アースケーブル
ヒューズ
バッテリー
ヒューズ
エンジンキースイッチ
3. 付属のリモコン受光ケーブルをリモコン受光ケーブル端子に接続します。
4. 車載モニターに映像ケーブルを接続します。
HDMI出力とRCA出力を同時に出力することはできません。どちらか一つの出力端子に映像ケーブルを
接続してください。
● HDMI 対応モニターの場合
HDMI入力対応モニターにHDMIケーブル(別売)で接続します。
● RCA 対応モニターの場合
RCA入力対応モニターにRCAビデオケーブル(別売)で接続します。
5. 音声ケーブルを接続します。
● HDMI出力端子を使用する場合
4.で接続したHDMIケーブルで音声も出力されます。
画面メニューの「セッティング」→「音声出力」で「HDMI」を選択してください。
● USB出力端子を使用する場合
当社製品のAT-HRD500/AT-HRD5/AT-HRD1のUSB入力端子にUSB2.0相当以上のUSBケー
ブル(別売)で接続してください。
画面メニューの「セッティング」→「音声出力」で「USB」を選択してください。
● 同軸デジタル、角形光デジタル出力端子を使用する場合
AT-HRD500またはSPDIF対応デジタルシグナルプロセッサーのデジタル入力端子に同軸デジタルケー
ブル(別売)、または角形光デジタルケーブル(別売)で接続してください。
画面メニューの「セッティング」→「音声出力」で「OTHERS」を選択してください。
● アナログオーディオ出力端子を使用する場合
カーオーディオ、カーナビゲーションなどの外部入力端子にRCAオーディオケーブル(別売)で接続して
ください。
画面メニューの「セッティング」→「音声出力」で「OTHERS」を選択してください。
6. 1.で取り外したバッテリーのケーブルを接続します。プラス(+)ケーブルを接続し、次にマイナス(-)ケー
ブルを接続します。
7. 自動車のエンジンキーを「ON」または「ACC」の位置にして、本製品が正常に動作するかご確認ください。
11
12
13
1
2
3
4
5
6
7
8
9
10
■HDMIケーブルで接続
12V
ACC
GND
車載モニター
HDMIケーブル
■AT-HRD500などとの接続
12V
ACC
GND
車載モニター
HDMIケーブルまたは
RCAビデオケーブル*
USBケーブル
■DSPなどとの接続
12V
ACC
GND
車載モニター
HDMIケーブルまたは
RCAビデオケーブル*
同軸デジタルケーブル、角形光デジタルケーブル
■RCAケーブルで接続
12V
ACC
GND
車載モニター
RCAケーブル
* 接続できるケーブルはどちらか一つです。
フリガナ
保証書
持込修理
AT-HRP5
年 月 日
お問い合わせ先(電話/平日9:00~17:30)
修理品のご送付先
「保証規定のご案内」を必ずお読みください。
〒194-8666 東京都町田市西成瀬2-46-1
www.audio-techn ca.co.jp
保証期間 ご購入日より
1年
販売店・住
ご住所 〒 ☎ ( )
ご購入年月日
型番
ご氏名
製品の仕様・使いかたや修理・部品のご相談は、お買い上げのお店または当社窓口およびホームページの
サポートまでお願いします。
・お客様相談窓口( -77製品の 0120仕様・使いかた) 3 - 417
(携帯電話・PHSなどのご利用は 03-6746-0211)
:FAX 042-739-9120 Eメール:support@audio-technica.co.jp
・ )サービスセンター(修 理・部品 0120 - - 416887
(携帯電話・PHSなどのご利用は 03-6746-0212)
ル:Eメー servicecenter@audio-technica.co.jp
・ホームページ(サポート) htt ps://ww w.audio-technica.co.jp/support/
〒 591 -0003 福井県越前市戸谷町87-1 オーディオテクニカサービスセンター宛
0120 - - 416 887
(携帯電話・PHSなどのご利用は 03-6746-021 転送電2[ 話 ])
株式会社オ
ー
ディオテクニカ
転載不可
Termékspecifikációk
| Márka: | Audio-Technica |
| Kategória: | nincs kategorizálva |
| Modell: | AT-HRP5 |
Szüksége van segítségre?
Ha segítségre van szüksége Audio-Technica AT-HRP5, tegyen fel kérdést alább, és más felhasználók válaszolnak Önnek
Útmutatók nincs kategorizálva Audio-Technica

28 December 2024

7 December 2024

7 December 2024

7 December 2024

7 December 2024

7 December 2024

7 December 2024

7 December 2024

7 December 2024

7 December 2024
Útmutatók nincs kategorizálva
- nincs kategorizálva VOX
- nincs kategorizálva Manduca
- nincs kategorizálva Old Blood Noise
- nincs kategorizálva Gator Frameworks
- nincs kategorizálva Forodi
- nincs kategorizálva Ygnis
- nincs kategorizálva BEEM
- nincs kategorizálva Anthro
- nincs kategorizálva Maxview
- nincs kategorizálva Aquael
- nincs kategorizálva NUK
- nincs kategorizálva Drayton
- nincs kategorizálva Dual
- nincs kategorizálva Ciclo
- nincs kategorizálva Gre
Legújabb útmutatók nincs kategorizálva

10 Április 2025

10 Április 2025

10 Április 2025

9 Április 2025

9 Április 2025

9 Április 2025

9 Április 2025

9 Április 2025

9 Április 2025

9 Április 2025