Használati útmutató Austral Super 5
Austral nincs kategorizálva Super 5
Olvassa el alább 📖 a magyar nyelvű használati útmutatót Austral Super 5 (4 oldal) a nincs kategorizálva kategóriában. Ezt az útmutatót 24 ember találta hasznosnak és 8 felhasználó értékelte átlagosan 4.6 csillagra
Oldal 1/4
Austral Clothes Hoists Pty. Ltd.
Incorporated In Victoria A.B.N.: 68 006 790 727
32-34 Hydrive Close, Dandenong South 3175, Australia
Tel: (03) 9799 8122, Fax: (03) 9799 8266
International Tel: +61 3 9799 8122, Fax: +61 3 9799 8266
www.australclotheshoists.com.au
admin@australclotheshoists.com.au
Installation Instructions for: Super & Deluxe Hoists
Your Austral Rotary Clothes Hoist is designed to last a long time. It is important to follow these instructions so you will
enjoy the benefits of a properly installed hoist. Incorrect installation could damage your hoist and/or void your guarantee.
If at any time your Austral Hoist should not function correctly or if spare parts are requiredcall your state distributor ,
listed on the guarantee page.
Site Selection & Digging (S- teps 1 3)
Important: Before digging, ensure the area is safe and clear of electrical, gas and plumbing services etc (refer to Dial Before
You Dig (Aus), beforeUdig (NZ), any architectural drawings etc).
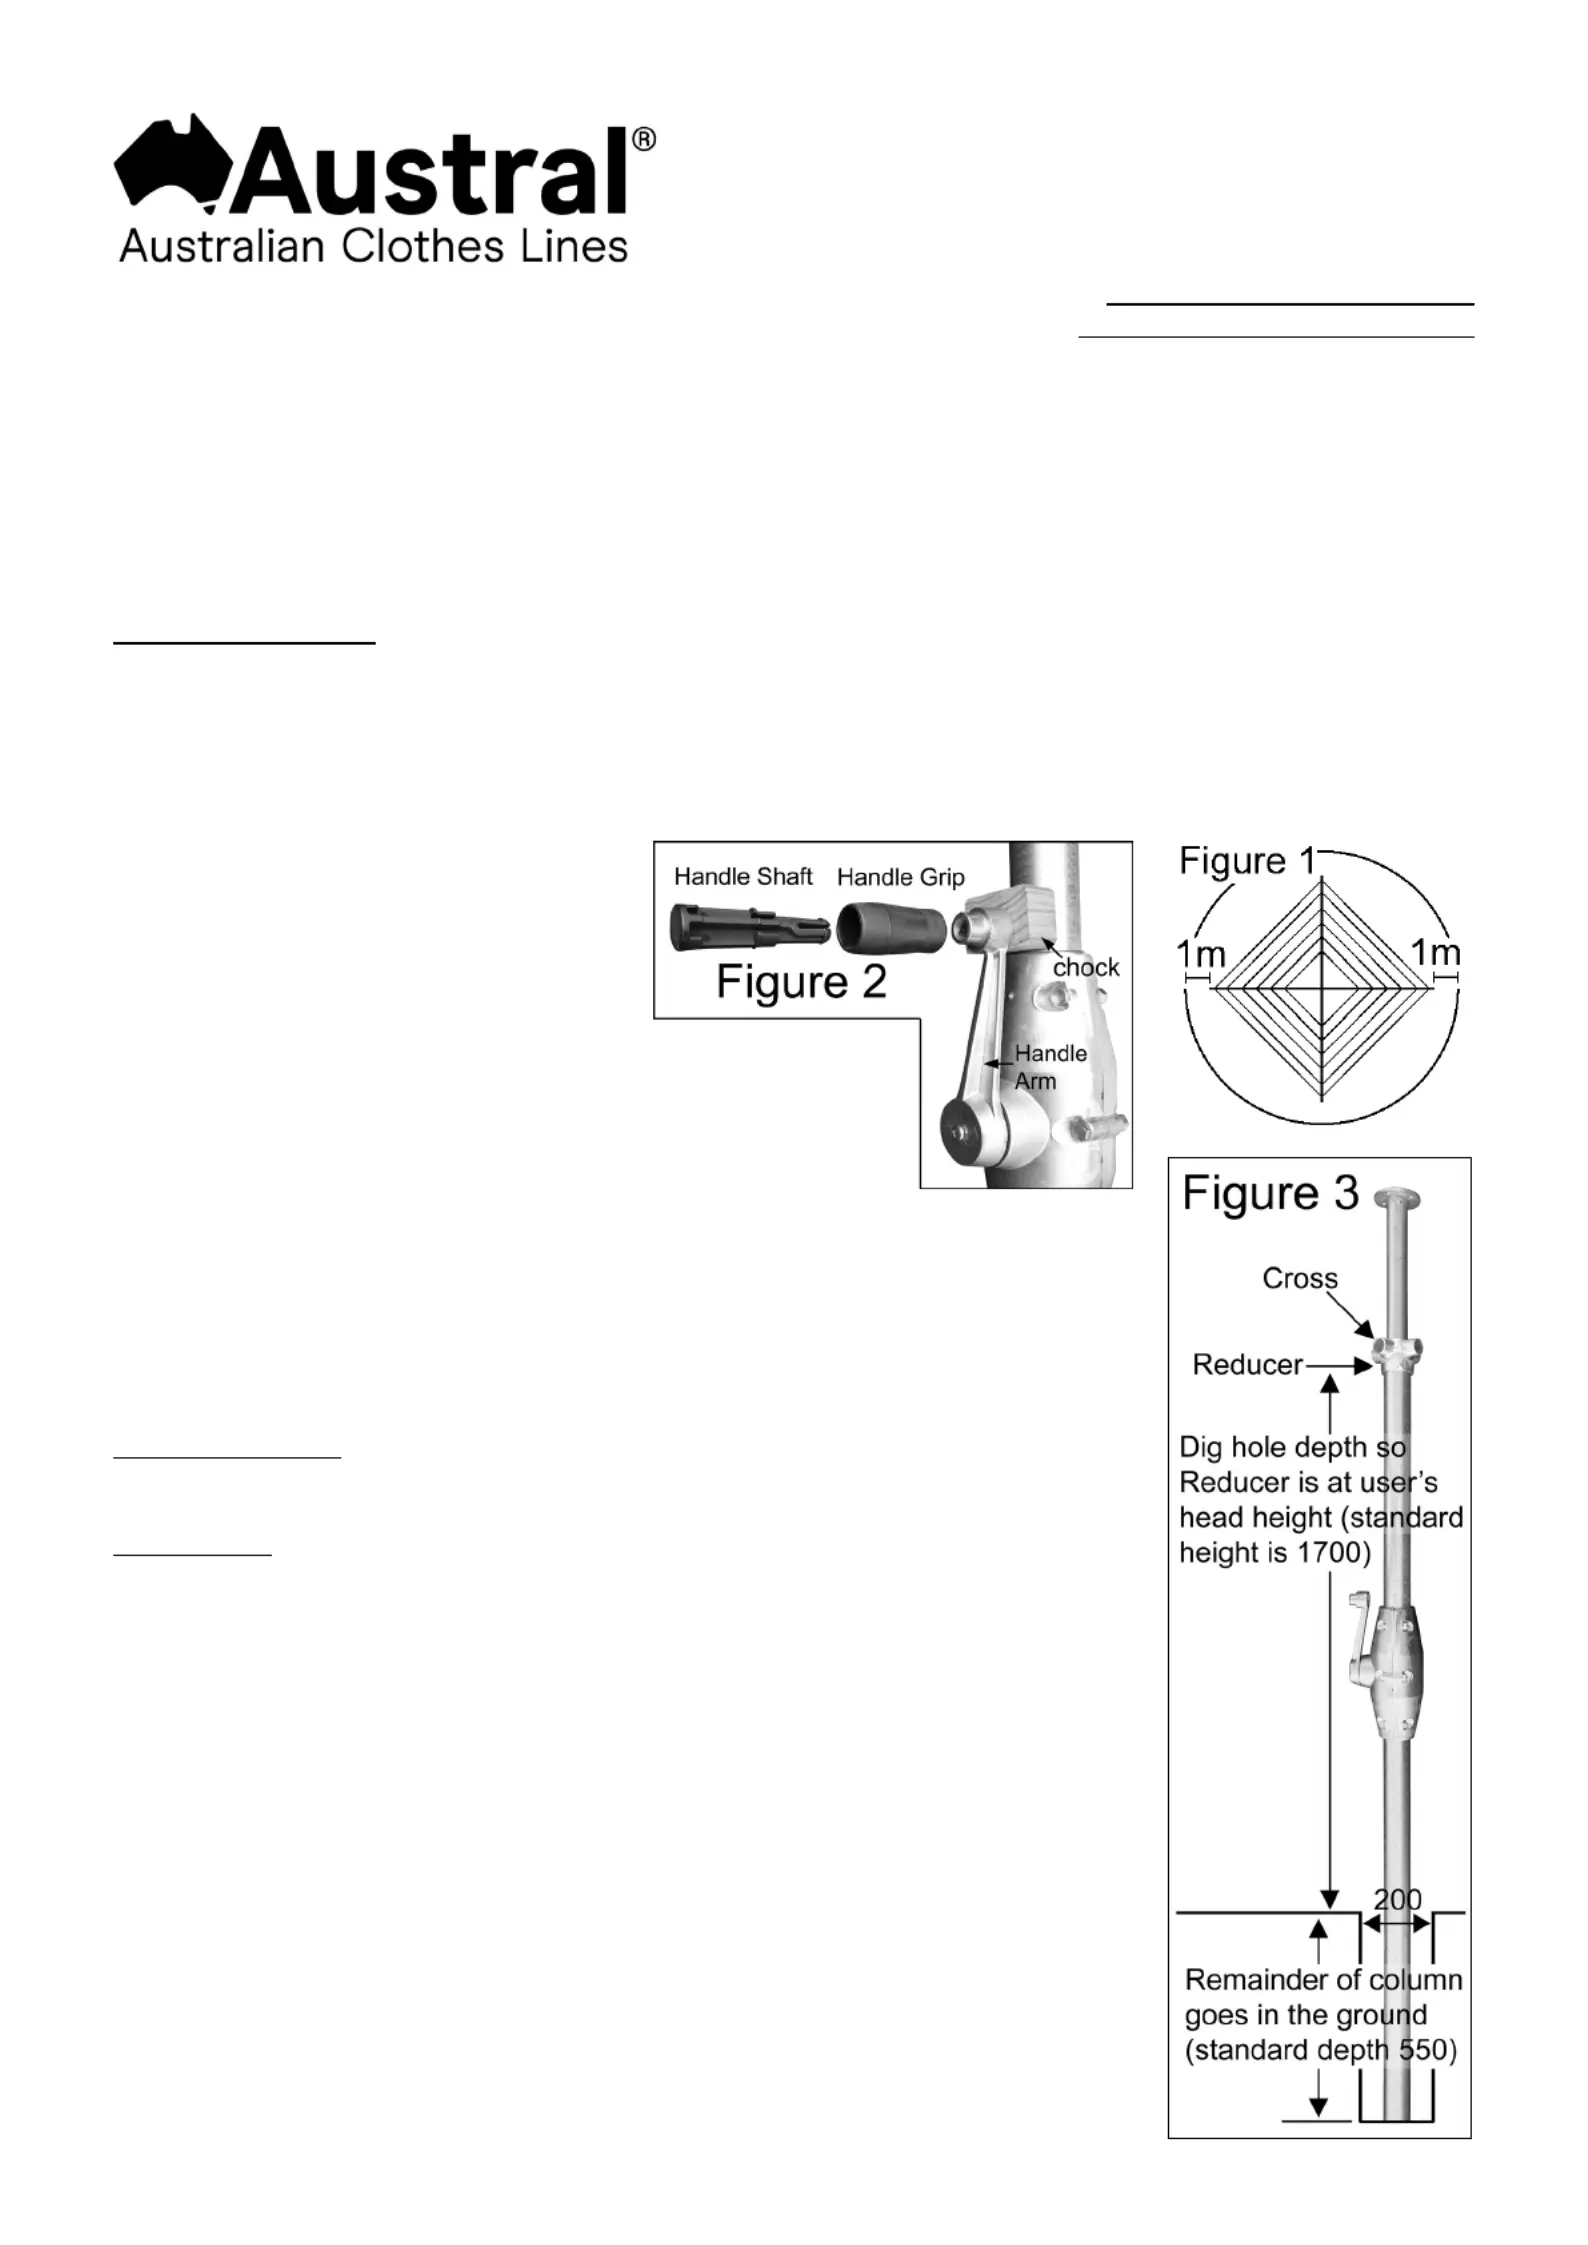
1 1. Select a site that gives 1m clearance to the end of each arm of the hoist (2m more than hoist’s diameter), see Figure
2 P lace Handle Shaftthrough Handle Grip then
tap into hole in Handle Arm whilstsupporting
behind the A rm with a chock,seeFigure 2.
Turn the handle antiensure the- clockwiseto
hoist is wound down as far as itgoes. Also fit
Handle Cover to Deluxe models.
3 Ensure it is safe to dig at the selected site. At its centre, startdigging
- a hole 150200mm in diameter. Dig the hole deep enoughsothat
Cwhenthe olumn is stood upright in the hole the Reducer is levelwith
theuser’s head height, see Figure 3. A depth of 550mmwill resultin
the Crossbeing1700mm high and the outer lines being approximately 1850mmhigh when
the hoistiswound down. After height is set, allow Column to lean over and rest in the hole.
3a Deluxe models only: remove the olumn frCom the hole and insert the Steel Rod through the
pre-drilled holes in the bottom of the olumn back in the hole. CColumn. Place Note:
instead of Steel Rod, Super modelshave a crimped bottom a tube to hold firm in concrete.
Equipment Required
Spirit level, crowbar, shovel, , pliers, concrete, drainage gravel, tape measurescrewdriver
Parts Supplied
Qty
Description
Part Number
1
Rotary or Helical Column
R/COL (Super)or H/COL(Deluxe)
4
Arms (m 1975mor 2475mm)
RH01AR06A (4mmodel) or ) (5mmodel
1
Handle Grip, Black Plastic
FRC11
1
Handle Shaft, Black Plastic
FRC12
4
Round End Caps, Black Plastic
R19
1
Wire Roll (50m or 70m)
R14 or R15
4
Tubular Stays (150095mm or 19mm)
RH03AR08A (4m model)or (5m model)
4
Bolt, 35mm x 6mm
FA18
4
Bolt, 20mm x 6mm
RH04
8
Nylon Lock Nut, 6mm
FRC22
4
Washer, 6mm
R18
Deluxe Hoists only:
1
Handle Cover, Black Plastic
HE03
1
Steel Rod, 150mm x 8mm
FA24
Termékspecifikációk
| Márka: | Austral |
| Kategória: | nincs kategorizálva |
| Modell: | Super 5 |
Szüksége van segítségre?
Ha segítségre van szüksége Austral Super 5, tegyen fel kérdést alább, és más felhasználók válaszolnak Önnek
Útmutatók nincs kategorizálva Austral

3 Szeptember 2024
Útmutatók nincs kategorizálva
Legújabb útmutatók nincs kategorizálva
10 Április 2025
10 Április 2025
10 Április 2025
9 Április 2025
9 Április 2025
9 Április 2025
9 Április 2025
9 Április 2025
9 Április 2025
9 Április 2025