Használati útmutató Be Quiet! Pure Rock Pro 3
Be Quiet! légkondicionáló Pure Rock Pro 3
Olvassa el alább 📖 a magyar nyelvű használati útmutatót Be Quiet! Pure Rock Pro 3 (2 oldal) a légkondicionáló kategóriában. Ezt az útmutatót 21 ember találta hasznosnak és 9 felhasználó értékelte átlagosan 4.3 csillagra
Oldal 1/2
Installation of the mounting brackets
Put the plastic spacers onto the previously
positioned Intel backplate. Then position the Intel
mounting brackets over the plastic spacers to
affix these with the thumb screws. Make sure that
the position of the mounting brackets matches
your socket. You can use a cross-tip screwdriver
for this.
Installation der Montagebrücken
Stecke die Kunststoffhülsen auf die zuvor platzierte
Intel Backplate. Positioniere dann die Intel Montage-
brücken auf die Kunststoffhülsen, um sie mit den
Rändelschrauben zu fixieren. Achte darauf, dass die
Position der Montagebrücken mit deinem Sockel
übereinstimmt. Hierzu kannst du einen Kreuz-
schraubendreher nutzen.
Befestigung der Backplate
Platziere die Intel Backplate Schrauben in die
auf der Rückseite der Intel Backplate befindlichen
Aussparungen. Beachte hierzu die Positionen auf der
Rückseite der Intel Backplate für deinen Sockel.
Verwende zur Befestigung der Backplate-Schrauben
auf der Intel Backplate die O-Ringe. Sobald die
Intel Backplate für den jeweiligen Intel-Sockel
zusammengebaut ist, positioniere es unter dem
Mainboard. Achte dabei darauf, dass die Intel
Backplate-Schrauben genau in den Mainboard-
löchern positioniert sind.
Mounting the CPU cooler
The protective covering on the underneath of
the cooler must be removed prior to installation
against the CPU.
Caution:The preapplied thermal paste is not
suitable for human consumption. If swallowed,
drink lots of water and urgently seek medical
attention. Keep it out of the reach of children.
Avoid contact with skin and eyes.
Montage des CPU-Kühlers
Entferne vor der Montage zunächst die Schutz-
kappe von der Unterseite des CPU-Kühlers.
Vorsicht:Die bereits aufgetragene Wärmeleitpaste
ist nicht zum Verzehr geeignet. Bei Verzehr aus-
reichend Wasser trinken und umgehend einen Arzt
aufsuchen. Außerhalb der Reichweite von Kindern
aufbewahren. Vermeide Haut- und Augenkontakt.
Place the cooler unit onto the CPU. Now screw
the cooler alternately tight. You can use any
cross-tip screwdriver for this.
Mounting the fan (Pure Rock Pro 3)
Fasten the Pure Wings 3 fan in the center onto
the cooler unit using the fan clips. Connect
both fans via the Y-cable. Now connect the
fans to the motherboard's PWM signal. When
dismantling the fan, push the notches of the fan
clips away from the fan. You can remove the fan
clips of the Pure Wings 3 fan in the front to adjust
the height.
Platziere den Kühler auf der CPU. Schraube
den Kühler abwechselnd fest. Nutze dazu einen
handelsüblichen Kreuzschraubendreher.
Montage des Lüfters (Pure Rock Pro 3)
Befestige den Pure Wings 3 Lüfter in der Mitte
mit Hilfe der Lüfterklammern am Kühler. Verbinde
beide Lüfter mit der Y-Weiche. Verbinde die Lüfter
anschließend mit dem CPU-Lüfteranschluss des
Mainboards. Drücke die Kerben der Lüfterklammern
weg, um den Lüfter zu demontieren. Du kannst
die Lüfterklammern des vorderen Pure Wings
3 Lüfters abnehmen und in der Höhe verstellen.
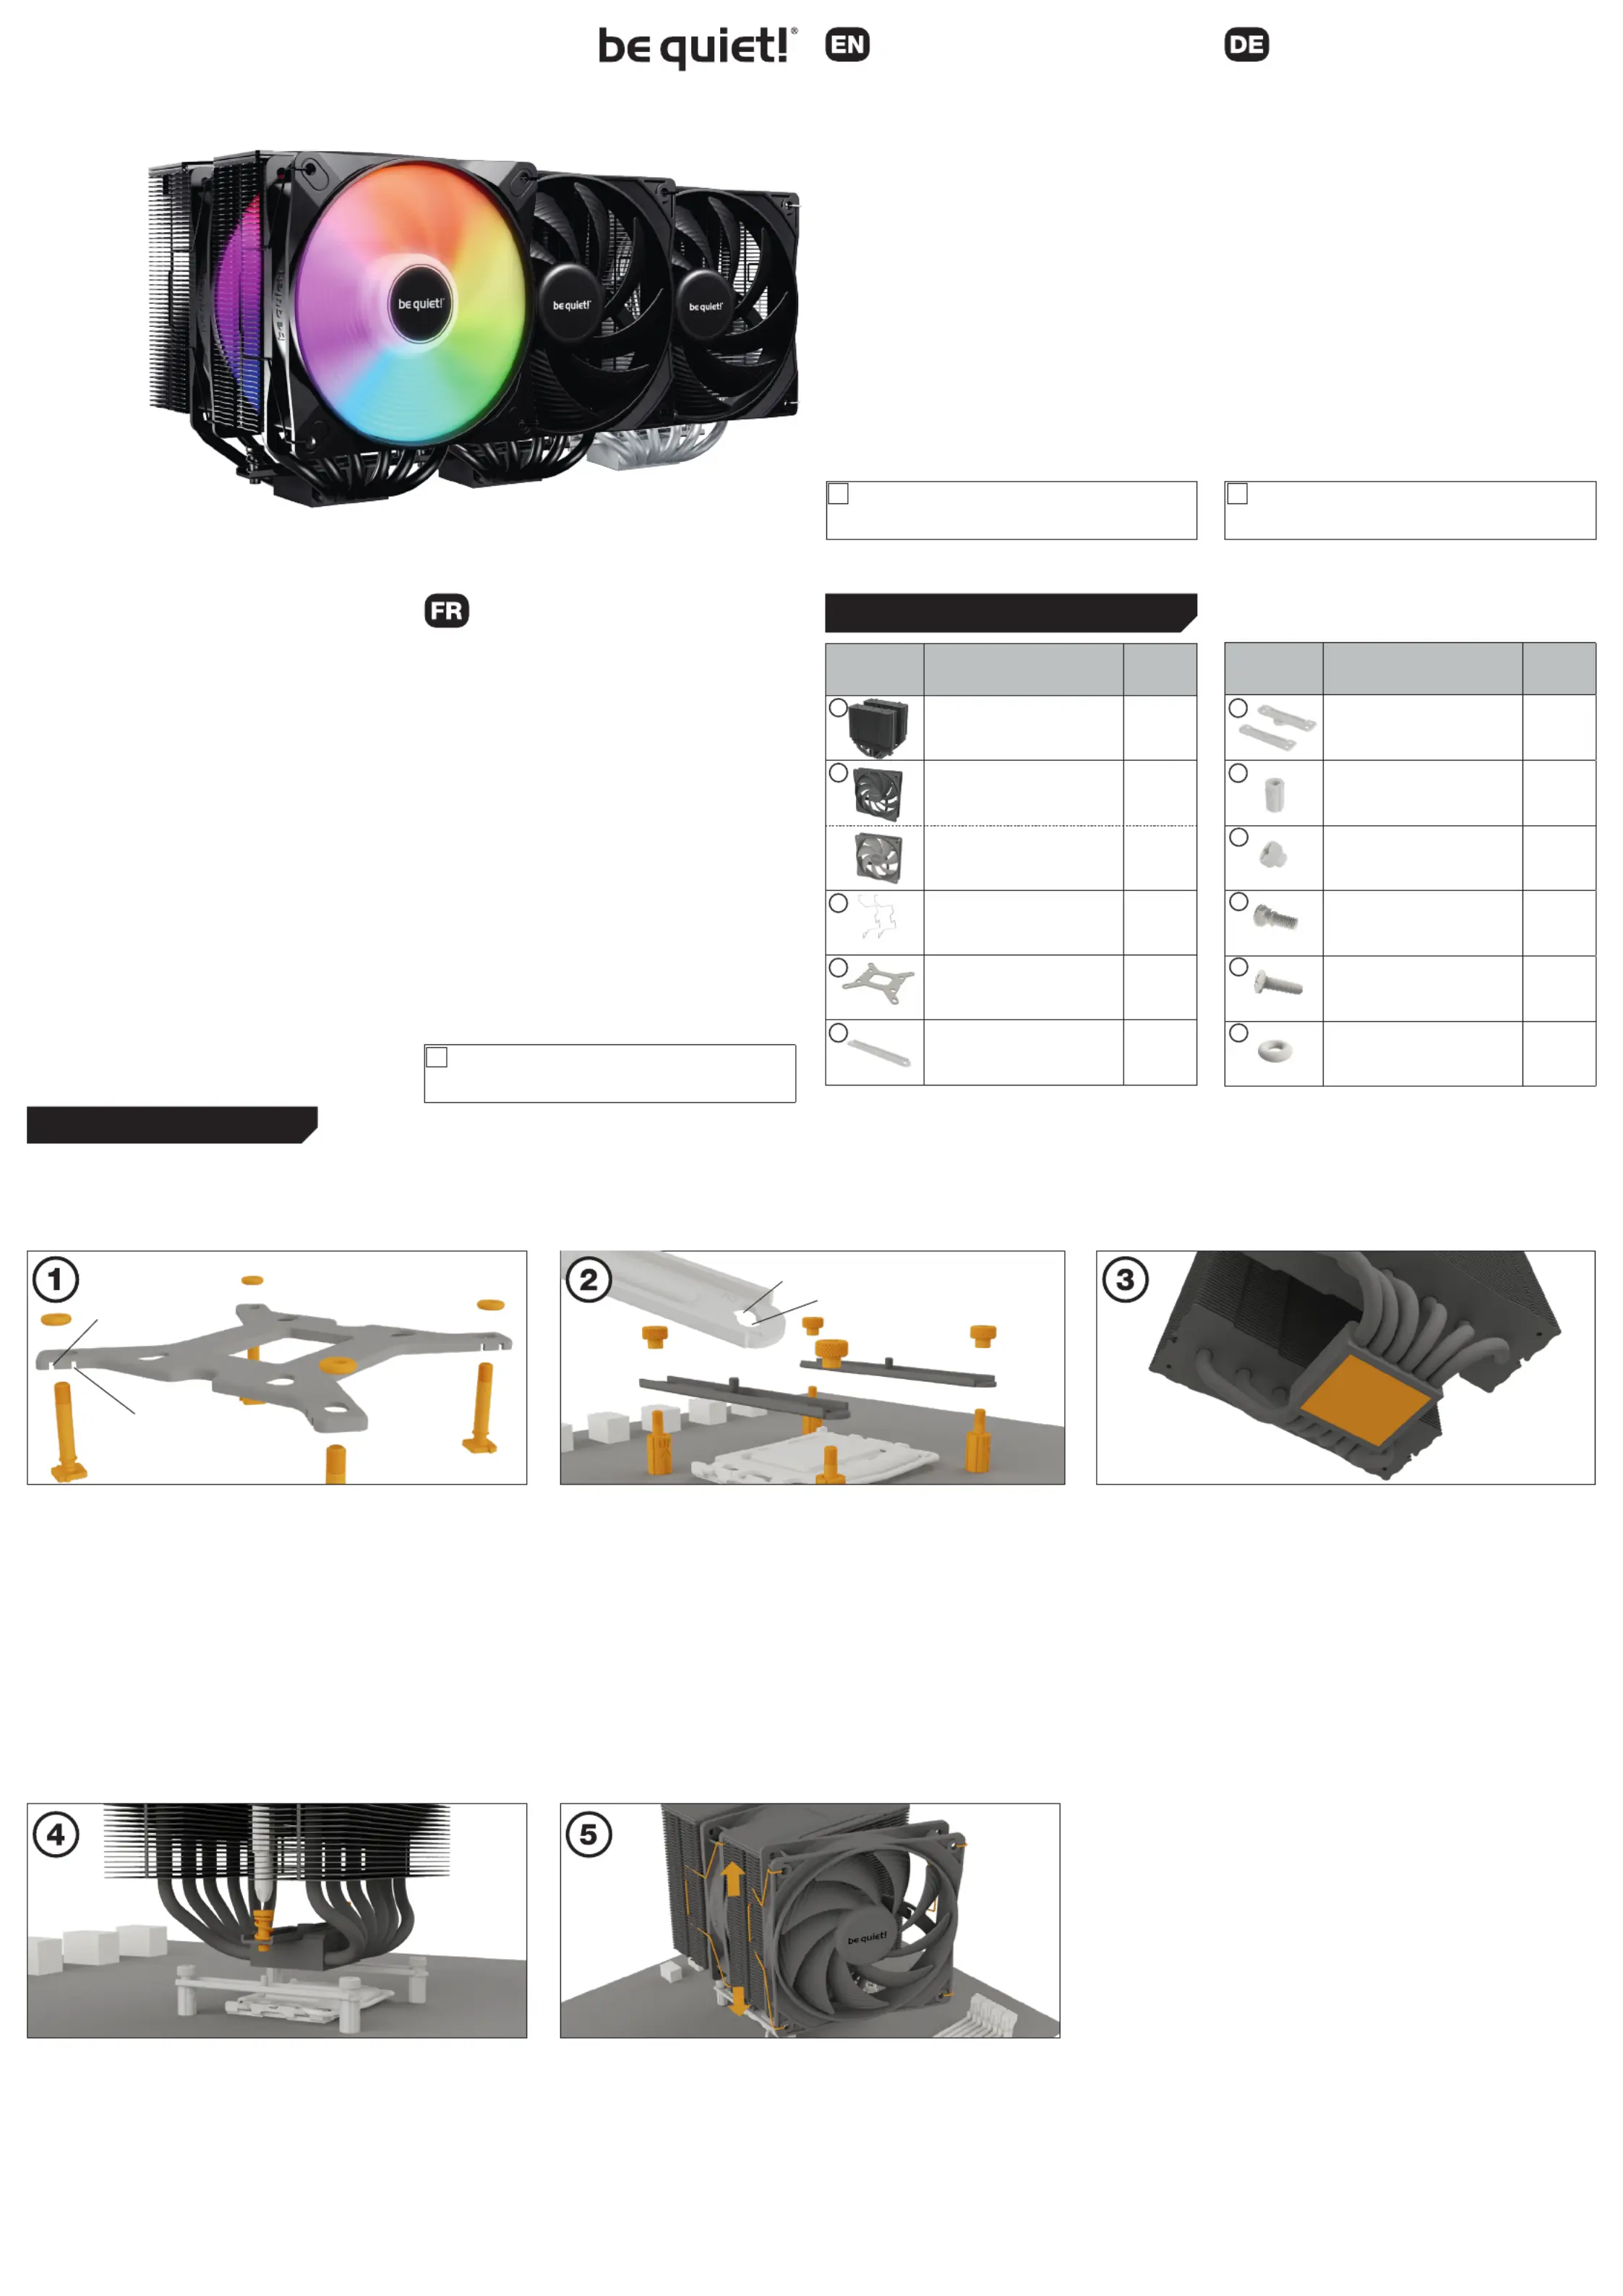
The following parts are needed for this: Es werden folgende Bauteile benötigt: Pour ce faire, vous aurez besoin des pièces suivantes :••
1x Pure Rock Pro 3 CPU cooler (1), 2x fan (2), 4x fan clips (3), 1x Intel backplate (4), 2x Intel mounting brackets (5), 4x Plastic spacers (7),
4x Thumb screws (8), 4x Intel backplate screws (9), 4x O-rings (11)
Mounting the backplate
Position the Intel backplate screws in the notches
situated on the rear side of the Intel backplate. Note
the positions on the backside of the Intel backplate
for your socket.
For fixing the backplate screws onto the Intel back-
plate use the O-rings. Once assembly of the Intel back-
plate for the respective Intel socket has been completed,
position it under the motherboard. In so doing make
sure that the Intel backplate screws are precisely
located within the motherboard holes.
Fixation de la plaque arrière
Placez les vis de la plaque arrière Intel dans les encoches situées à l’arrière de celle-ci. Repérez
les trous destinés au connecteur du processeur existant.
Utilisez les joints toriques pour fixer les vis sur la plaque arrière Intel. Une fois l'assemblage de la
plaque arrière Intel terminée, positionnez-la sous la carte mère. Assurez-vous que les vis de la
plaque arrière Intel coïncident exactement avec les trous de la carte mère.
Placez le refroidisseur sur le processeur. Maintenant, serrez les vis de la plaque arrière Intel en
alternance. Pour cette étape, vous pouvez utiliser un tournevis cruciforme standard.
Installation des supports de montage
Placez les entretoises en plastique sur la plaque arrière Intel préalablement positionnée. Ensuite,
positionnez les supports de montage Intel sur les entretoises en plastique et fixez-les avec les vis à
main. Assurez-vous que la position des supports de montage correspond à votre socket. Pour cette
étape, vous pouvez utiliser un tournevis cruciforme standard.
Montage du refroidisseur du ventirad
Le revêtement de protection situé en-dessous du refroidisseur doit être retiré avant l'installation
contre le ventirad.
Attention : La pâte thermique fournie n'est pas adaptée à la consommation humaine. En cas d'ingestion,
boire beaucoup d'eau et consulter un médecin de toute urgence. Gardez-le hors de la portée des enfants.
Eviter le contact avec la peau et les yeux..
Montage du ventilateur (Pure Rock Pro 3)
Fixez le ventilateur Pure Wings 3 sur le refroidisseur en utilisant les clips de fixation. Connectez
les deux ventilateurs via le câble en Y. Connectez le ventilateur au signal PWM de la carte mère.
Lors du démontage du ventilateur Pure Wings 3, appuyez sur les encoches des clips de fixation pour
le détacher. Vous pouvez retirer les clips de fixation du Pure Wings 3 pour ajuster la hauteur.
Intel: LGA 1851 / 1700 / 1200 / 1150 / 1151 / 1155
Einleitung:Vielen Dank, dass du dich für ein be quiet! Produkt
entschieden hast. Diese Anleitung wird dir beim Installationsprozess
helfen. Kontaktiere bitte unseren Kundenservice unter service@bequiet.
com, sollten bei der Installation Schwierigkeiten auftreten. be quiet! kann
keinerlei Haftung für durch Kompatibilitätsprobleme bedingte Schäden
übernehmen.
Garantie:
• 3 Jahre Herstellergarantie für Endkonsumenten (nur Erst-erwerb vom
autorisierten be quiet! Händler), ab Datum des Kaufbelegs
• Eine Garantieabwicklung ist nur in Verbindung mit einer beige-
fügten Kopie des Kaufbeleges eines autorisierten be quiet! Händlers möglich
• Manipulationen und bauliche Veränderungen jeglicher Art, sowie
Beschädigungen durch äußere mechanische Einwirkungen führen zum
totalen Garantieverlust
• Es gelten unsere Allgemeinen Garantiebestimmungen, die du unter
www.bequiet.com im Internet abrufen kannst
Listan GmbH
Wilhelm-Bergner-Straße 11c · 21509 Glinde · Deutschland
Für weitere Unterstützung erreichst du uns via E-Mail:
service@bequiet.com
Introduction :Nous vous remercions d’avoir choisi un produit de qualité be
quiet!. Cette notice est conçue pour vous aider à installer votre matériel. Si
vous rencontrez des difficultés au cours de cette installation, n’hésitez pas
à nous contacter à service.fr@bequiet.com. Nous attirons votre attention :
be quiet! ne peut assumer la responsabilité des dommages résultants de
problèmes d’incompatibilité.
Garantie :
• 3 ans de garantie constructeur pour le client final (uniquement pour
un premier achat auprès d’un distributeur be quiet! agréé)
• La prise en charge de la garantie est assujettie à la fourniture
d'une copie de la preuve d’achat auprès d’un distributeur
be quiet! agréé.
• Les manipulations et modifications de construction de tous
types ainsi que les dommages causés par des actions méca-
niques extérieures entraînent la perte totale de la garantie
• Les conditions détaillées de garantie peuvent être consultées sur
le site web bequiet.com
Listan GmbH
Wilhelm-Bergner-Straße 11c · 21509 Glinde · Allemagne
Pour plus d'informations contactez-nous par e-mail :
service.fr@bequiet.com
Introduction: Thank you for deciding to purchase a be quiet! product. The
following instructions will guide you through the installation process. If you
do encounter installation problems, please don't hesitate to contact our
customer services by mailing service@bequiet.com. Please note that be
quiet! cannot accept liability for damage caused by compatibility problems.
Warranty:
• 3-year manufacturer guarantee for consumers (original purchase from
authorized be quiet! dealers only)
• Guarantee work can only be processed with a copy included of the
purchase receipt from an authorized be quiet! dealer
• Manipulation and structural changes of any kind, including any damage
caused by external mechanical force, will lead to a complete voiding
of the guarantee
• Our General Warranty Conditions apply, which can be viewed on
bequiet.com
Listan GmbH
Wilhelm-Bergner-Straße 11c · 21509 Glinde · Germany
For further information contact us via e-mail:
service@bequiet.com
We recommend preparatory mounting of the cooler outside the PC
case for subsequent installation. The cooler should be removed
prior to transportation as well.
!
Für die Montage des Kühlers empfehlen wir die Installation
außerhalb des Gehäuses. Für einen Transport sollte der Kühler
ausgebaut werden.
!
V1/24
bequiet.com
PURE ROCK PRO 3
1: 1851, 1700
Nous recommandons le montage préparatoire du radiateur à
l'extérieur du boîtier PC pour une installation ultérieure. Nous
préconisons aussi d'enlever le radiateur avant le transport.
!
2: 1200, 1150, 1151, 1155
Part name
Bezeichnung
Nom de la pièce
Quantity
Anzahl
Quantité
Pure Rock Pro 3 CPU cooler
1
Pure Wings 3 120mm PWM fan
2
Light Wings LX 120mm PWM fan
2
Fan clips
4
Intel backplate
1
Intel mounting brackets
2
Part name
Bezeichnung
Nom de la pièce
Quantity
Anzahl
Quantité
Short AMD mounting brackets
2
Plastic spacers
4
Thumb screws
4
Intel backplate screws
4
AMD backplate screws
4
O-rings
4
8
10
11
2
3
4
5
7
9
1
SCOPE OF DELIVERY • LIEFERUMFANG • ELEMENTS FOURNIS
6
1: 1851, 1700
2: 1200, 1150, 1151, 1155
Termékspecifikációk
| Márka: | Be Quiet! |
| Kategória: | légkondicionáló |
| Modell: | Pure Rock Pro 3 |
Szüksége van segítségre?
Ha segítségre van szüksége Be Quiet! Pure Rock Pro 3, tegyen fel kérdést alább, és más felhasználók válaszolnak Önnek
Útmutatók légkondicionáló Be Quiet!

27 Március 2025
17 Szeptember 2024
2 Szeptember 2024
7 Augusztus 2024
26 Július 2024
17 Július 2024
21 Május 2024
Útmutatók légkondicionáló
Legújabb útmutatók légkondicionáló
10 Április 2025
10 Április 2025
10 Április 2025
9 Április 2025
9 Április 2025
9 Április 2025
9 Április 2025
9 Április 2025
9 Április 2025
9 Április 2025