Használati útmutató Canon LM-V1

Olvassa el alább 📖 a magyar nyelvű használati útmutatót Canon LM-V1 (4 oldal) a nincs kategorizálva kategóriában. Ezt az útmutatót 7 ember találta hasznosnak és 2 felhasználó értékelte átlagosan 4.5 csillagra

Oldal 1/4
MONITORING
10 EN
Monitoring
LM-V1 / LM-V2 LCD Monitor
Connect the LCD monitor to the camera to add a large monitoring screen with touch screen operations
(touch to focus), menu operation buttons and joystick and two assignable buttons.
For details on how to attach and use the LCD monitor, see the instruction manual of the camera being
used.
An optional attachment unit is also required to attach the monitor to the camera.
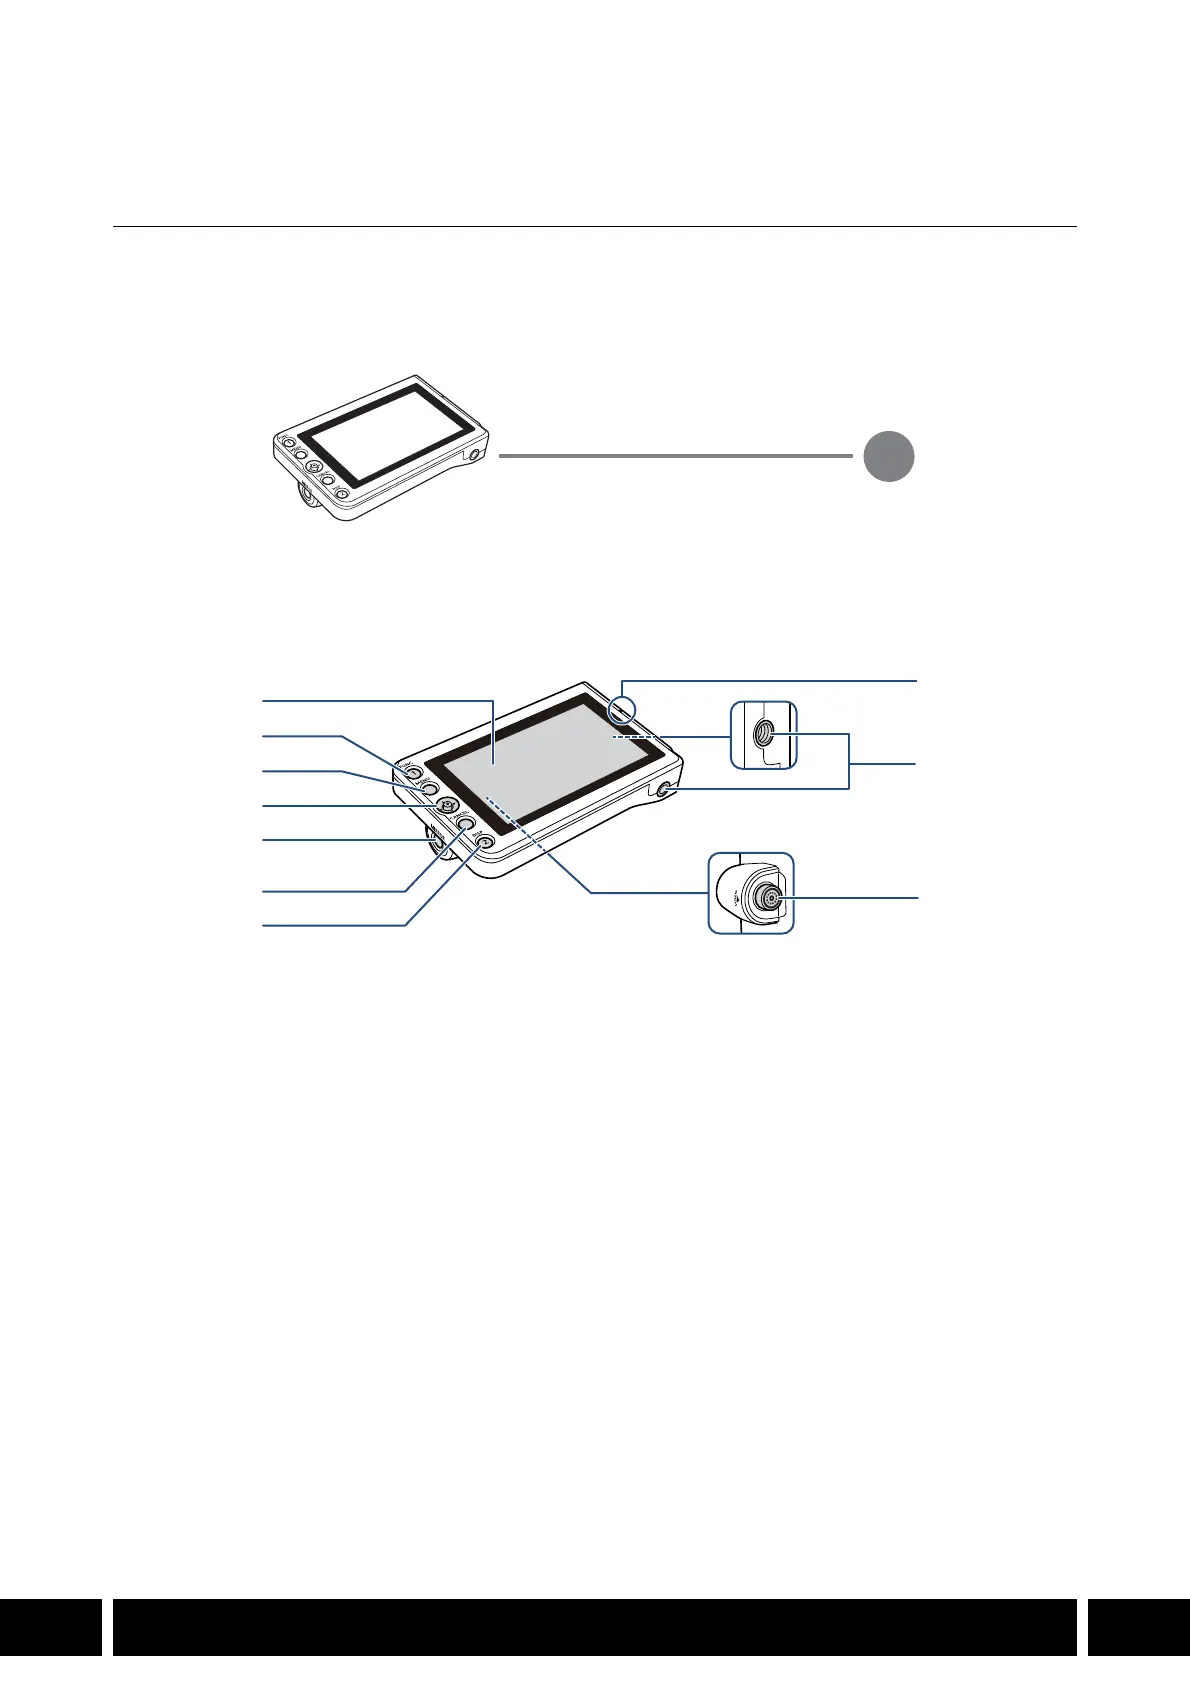
Names of Parts
1 LCD panel with touch screen
2 FUNC (main functions) button / Assignable
button LCD LM-V1/V2 1
3 MENU button
4 Joystick
5 MIRROR (invert the displayed image) button
6 CANCEL button
7 DISP (display) button / Assignable button LCD
LM-V1/V2 2
8 LCD monitor’s position alignment mark Í
9 Screw holes for 1/4"-20 screws (11.2 mm
(0.44 in.) deep, x2)
10 VIDEO terminal
VIDEO terminal
UN-5 / UN-10 Unit Cable (optional)
1
2
3
4
5
6
7
8
9
10
MONITORING
11 EN
Attaching the LCD Monitor
About the LCD Attachment Unit
Use the optional LA-V1 or D monitor to the handle unit or to LA-V2 LCD Attachment Unit to attach the LC
the camera’s body itself. For details see the instruction manual of the camera being used.
Attaching the LCD Monitor to the Handle Unit
1. Turn off the camera.
2. On the LCD attachment unit, rotate the LCD
monitor mount in the direction of the locking knob
to make the LCD monitor fixation bolt accessible.
3. Attach the LCD monitor to the LCD monitor mount.
Align the Í marks on the monitor and monitor
mount. If necessary, you can also mount the LCD
monitor facing the other way around.
Tighten the LCD monitor fixation bolt using the hex
wrench for 0.64 cm, 1/4" screws.
4. Attach the LCD attachment unit to the handle unit.
Align the attachment mount on the LCD attachment
unit to the handle unit’s front accessory mount.
Tighten the locking knob firmly.
5. Rotate the LCD monitor 90 degrees toward the
handle unit.
6. Connect the LCD monitor to the camera’s VIDEO
terminal using the UN-5 Unit Cable.
Align the Í marks on the cable’s plugs and
terminals.
7. Put the cable though the LCD attachment unit’s
cable clamp.
If necessary, adjust the position of the cable so that
it does not get in the picture or obstruct the view.
LCD Monitor
LM-V1 LM-V2
LCD Attachment Unit LA-V1 N
LA-V2 N
MONITORING
12 EN
Specifications
* All dimensions and weights are approximate.
Depending on the situation, the screws may become loose. If necessary, use the hex wrench
for 0.64 cm, 1/4" screws to tighten them.
Maintenance of the LCD screen
– Clean the LCD screen using a clean, soft lens-cleaning cloth and commercially available
cleaning fluid for eyeglasses.
– Condensation may form on the surface of the screen when the temperature changes
suddenly. Wipe it with a soft dry cloth.
LCD Monitor
LM-V1 LM-V2
Screen
Type Color LCD
Size 10.1 cm (4.0 in.) 10.9 cm (4.3 in.)
Approximate dot count 1,230,000 2,760,000
Aspect ratio 16:9
Coverage 100%
Touch screen Capacitive touch screen operation
VIDEO terminal Exclusively for connecting the camera
Operating temperature 0 °C – 40 °C (32 °F – 104 °F)
Dimensions* (W x H x D) 120 x 75 x 37 mm
(4.7 x 3.0 x 1.5 in.)
133 x 87 x 38 mm
(5.2 x 3.4 x 1.5 in.)
Weight* 185 g (6.5 oz.) 204 g (7.2 oz.)

Termékspecifikációk

Márka: Canon
Kategória: nincs kategorizálva
Modell: LM-V1

Szüksége van segítségre?

Ha segítségre van szüksége Canon LM-V1, tegyen fel kérdést alább, és más felhasználók válaszolnak Önnek


Útmutatók nincs kategorizálva Canon

Útmutatók nincs kategorizálva

Legújabb útmutatók nincs kategorizálva

MOZA

MOZA SR-P Útmutató

10 Április 2025
CaterChef

CaterChef 445001 Útmutató

9 Április 2025
IFM

IFM E40581 Útmutató

9 Április 2025
Livn

Livn Bolt Útmutató

9 Április 2025
Livn

Livn Beats Útmutató

9 Április 2025
IFM

IFM O3R252 Útmutató

9 Április 2025