Használati útmutató Extron FOXBOX Tx DVI Plus MM
Extron wifi ismétlő FOXBOX Tx DVI Plus MM
Olvassa el alább 📖 a magyar nyelvű használati útmutatót Extron FOXBOX Tx DVI Plus MM (2 oldal) a wifi ismétlő kategóriában. Ezt az útmutatót 30 ember találta hasznosnak és 2 felhasználó értékelte átlagosan 4.0 csillagra
Oldal 1/2
This card provides quick start instructions for an experienced installer to set up and
operate an Extron® FOXBOX DVI Plus transmitter and receiver.
NOTES:•OnlytheFOXBOXRxDVIPlusreceivercanacceptinputfroma
FOXBOX Tx DVI Plus transmitter.
•TheFOXBOXRxDVIPlusreceivercanacceptinputsfromanyFOX
500 or FOXBOX transmitter, including VGA models.
Installation
Step 1 — Mounting
Turn off or disconnect all equipment power sources and mount the transmitter and receiver as required.
Step 2 — Input and Output Connections
a. ConnectaDVIvideosourcetothetotheInputconnectoronthetransmitterandtheaDVIDisplaytothe
DVI-D INPUT
Ouput connectors on the receiver.
b. Connect unbalanced stereo or mono audio input and an audio output device to the 3.5 mm mini jack audio
AUDIO
ports on both units.
c. IfyouwanttheFOXBOXunitstopassserialdataorcontrolsignals,suchasforserialcontrolofaprojector,
ALARM
Tx Rx1 2
RS-232
OVER FIBER
connectthemasterdevicetothetransmitterandtheslavedeviceusingtherstthreepolesoftheRS-232
OverFiber/Alarm5-polecaptivescrewconnectorsonbothunits.
NOTE:ForRS-232responses(fromthereceivertothetransmitter),youmustinstallthecableinstep3b and leave
the receiver in normal configuration.
d. Forremotemonitoringofthestatusoftheopticallinks,connectalocallyconstructedorobtaineddeviceto
RS-232
OVER FIBER
ALARM
Tx Rx1 2
thetwoAlarmpolesoftheunits’RS-232OverFiber/Alarm5-polecaptivescrewconnectors.Thetwopoles
are shorted together when no light is detected.
NOTES:TheAlarmportonthetransmitterreportsthestatusoftheRxlightlink.
The Alarm port on the receiver reports the status of the Tx light link.
Step 3 — Throughput Connections
NOTE:Youcanconnectthetransmitterandoneormorereceiversinoneofthreeways:
•Oneway(transmittertoreceiver)only,performstep3a.
•Twoway(transmittertoreceiverandreturn),performsteps 3a and 3b.
•Oneway(transmittertoreceiver)withdaisychain(receivertoreceiver),performsteps3a and 3c.
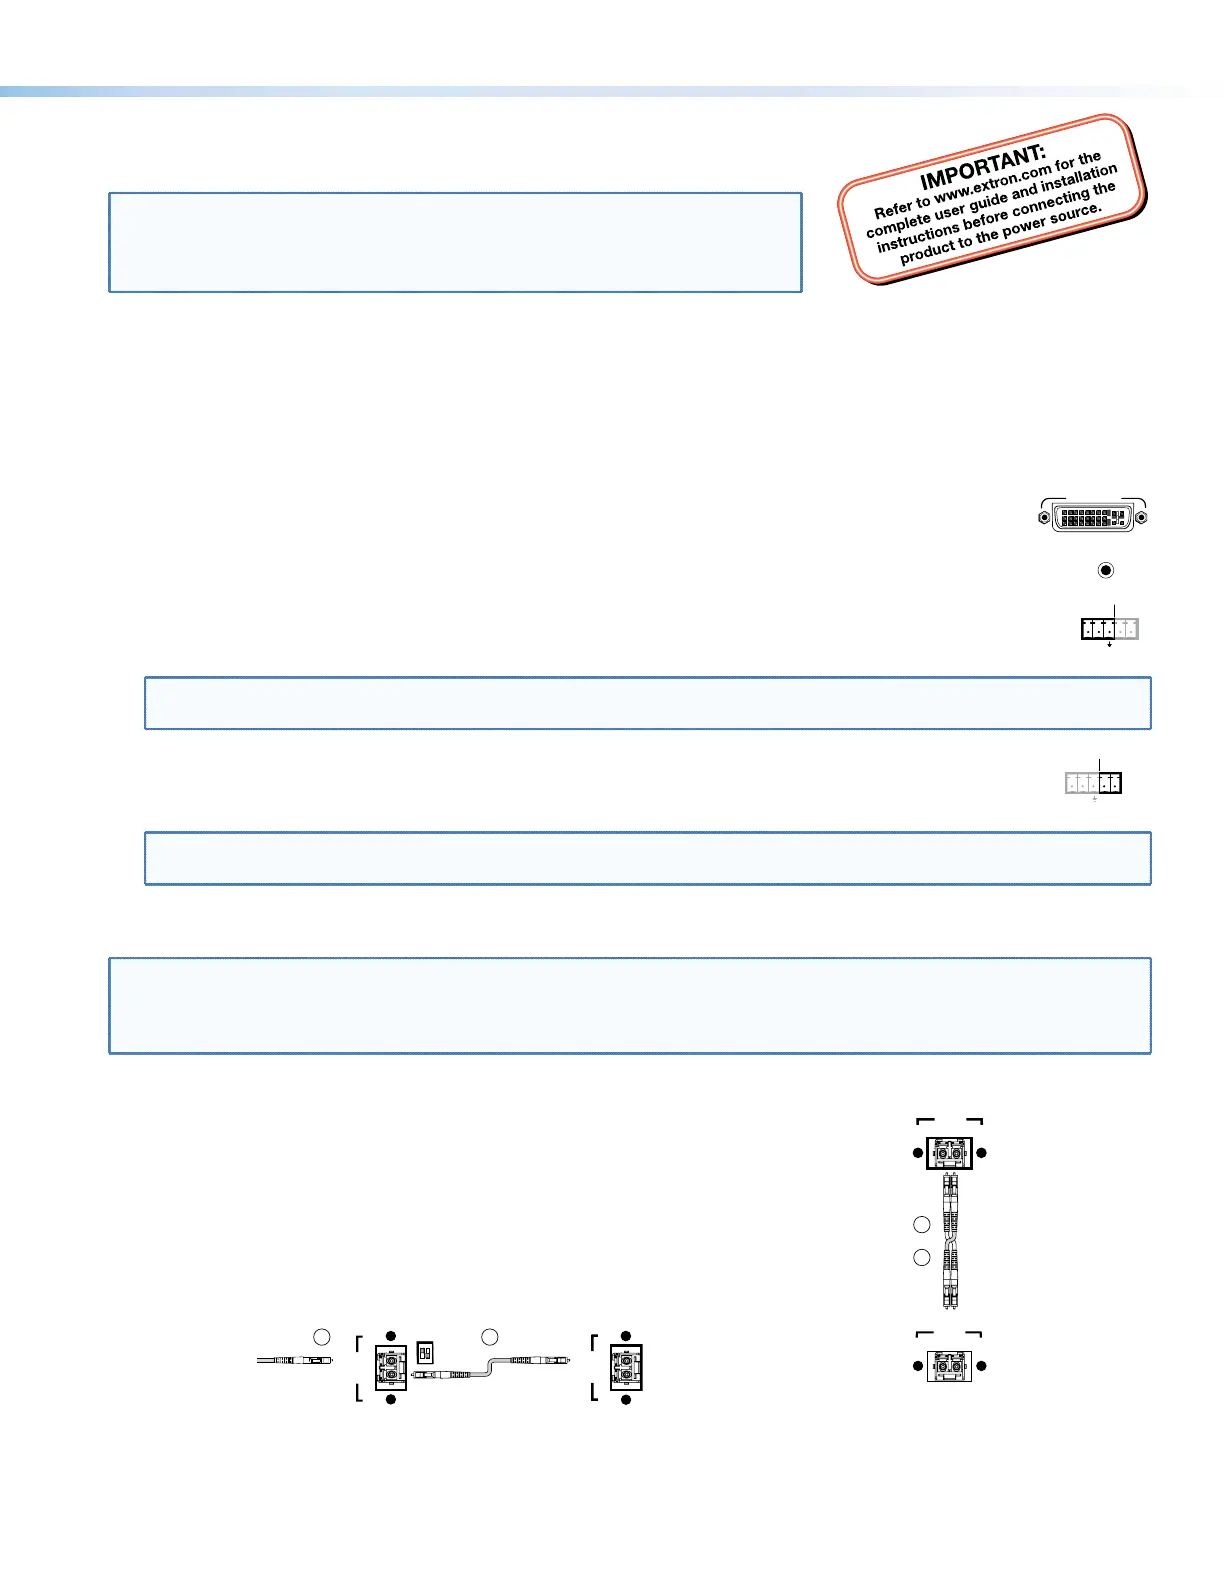
a. ConnectabercablebetweentheTxportonthetransmitterandtheRxporton
the receiver.
OPTICAL
TxRx
LINK
LINK
OPTICAL
TxRx
LINK
LINK
and
Transmitter
Receiver
3a
3b
b. Ifyouwantthereceivertosendreturnserialdata(suchasresponsesfroma
controlleddevice)tothetransmitter,connectabercablebetweentheTxport
onthereceiverandtheRxportonthetransmitter.
c. Ifyouwantareceivertodaisychaintheopticalsignaltoanotherreceiver(upto
10receiversinadaisychain):
zConnecttheTxportonthereceivertotheRxportonanotherreceiver.
zSettheModeDIPswitch1uponrstreceiver.
OPTICAL
TxRx
LINK
LINK
From Transmitter or
Daisy Chaining Receiver
MODE
12
Receiver
Receiver
3a3c
OPTICAL
LINK
LINK
TxRx
1
FOXBOXDVIPlus•SetupGuide
Termékspecifikációk
| Márka: | Extron |
| Kategória: | wifi ismétlő |
| Modell: | FOXBOX Tx DVI Plus MM |
Szüksége van segítségre?
Ha segítségre van szüksége Extron FOXBOX Tx DVI Plus MM, tegyen fel kérdést alább, és más felhasználók válaszolnak Önnek
Útmutatók wifi ismétlő Extron

3 Szeptember 2024
3 Szeptember 2024
3 Szeptember 2024
3 Szeptember 2024
3 Szeptember 2024
Útmutatók wifi ismétlő
Legújabb útmutatók wifi ismétlő
30 Március 2025
30 Március 2025
25 Március 2025
13 Január 2025
12 Január 2025
6 Január 2025
4 Január 2025
3 Január 2025
31 December 2025
31 December 2025