Használati útmutató Glemm PM 1
Glemm nincs kategorizálva PM 1
Olvassa el alább 📖 a magyar nyelvű használati útmutatót Glemm PM 1 (63 oldal) a nincs kategorizálva kategóriában. Ezt az útmutatót 19 ember találta hasznosnak és 8 felhasználó értékelte átlagosan 4.2 csillagra
Oldal 1/63
Manuale di istruzioni
Articolo:
PM 1
21.1
Il microfono multizona mod. PM 1 è stato progettato per operare in abbinamento agli amplicatori
mod. PAA 120MZ, PAA 240MZ, PAA 480MZ e PAA 1000MZ.
Non collegatelo ad altri amplicatore per evitare possibili danni al microfono o all’amplicatore
stesso.
Questo microfono non necessita di alimentatore esterno in quanto attinge l’energia necessaria
direttamente dall’amplicatore al quale è collegato.
Conservate questo manuale di istruzioni per utilizzi futuri. Ricordatevi che di vericare la presenza
di eventuali aggiornamenti nella scheda prodotto sul sito www.glemm.eu.
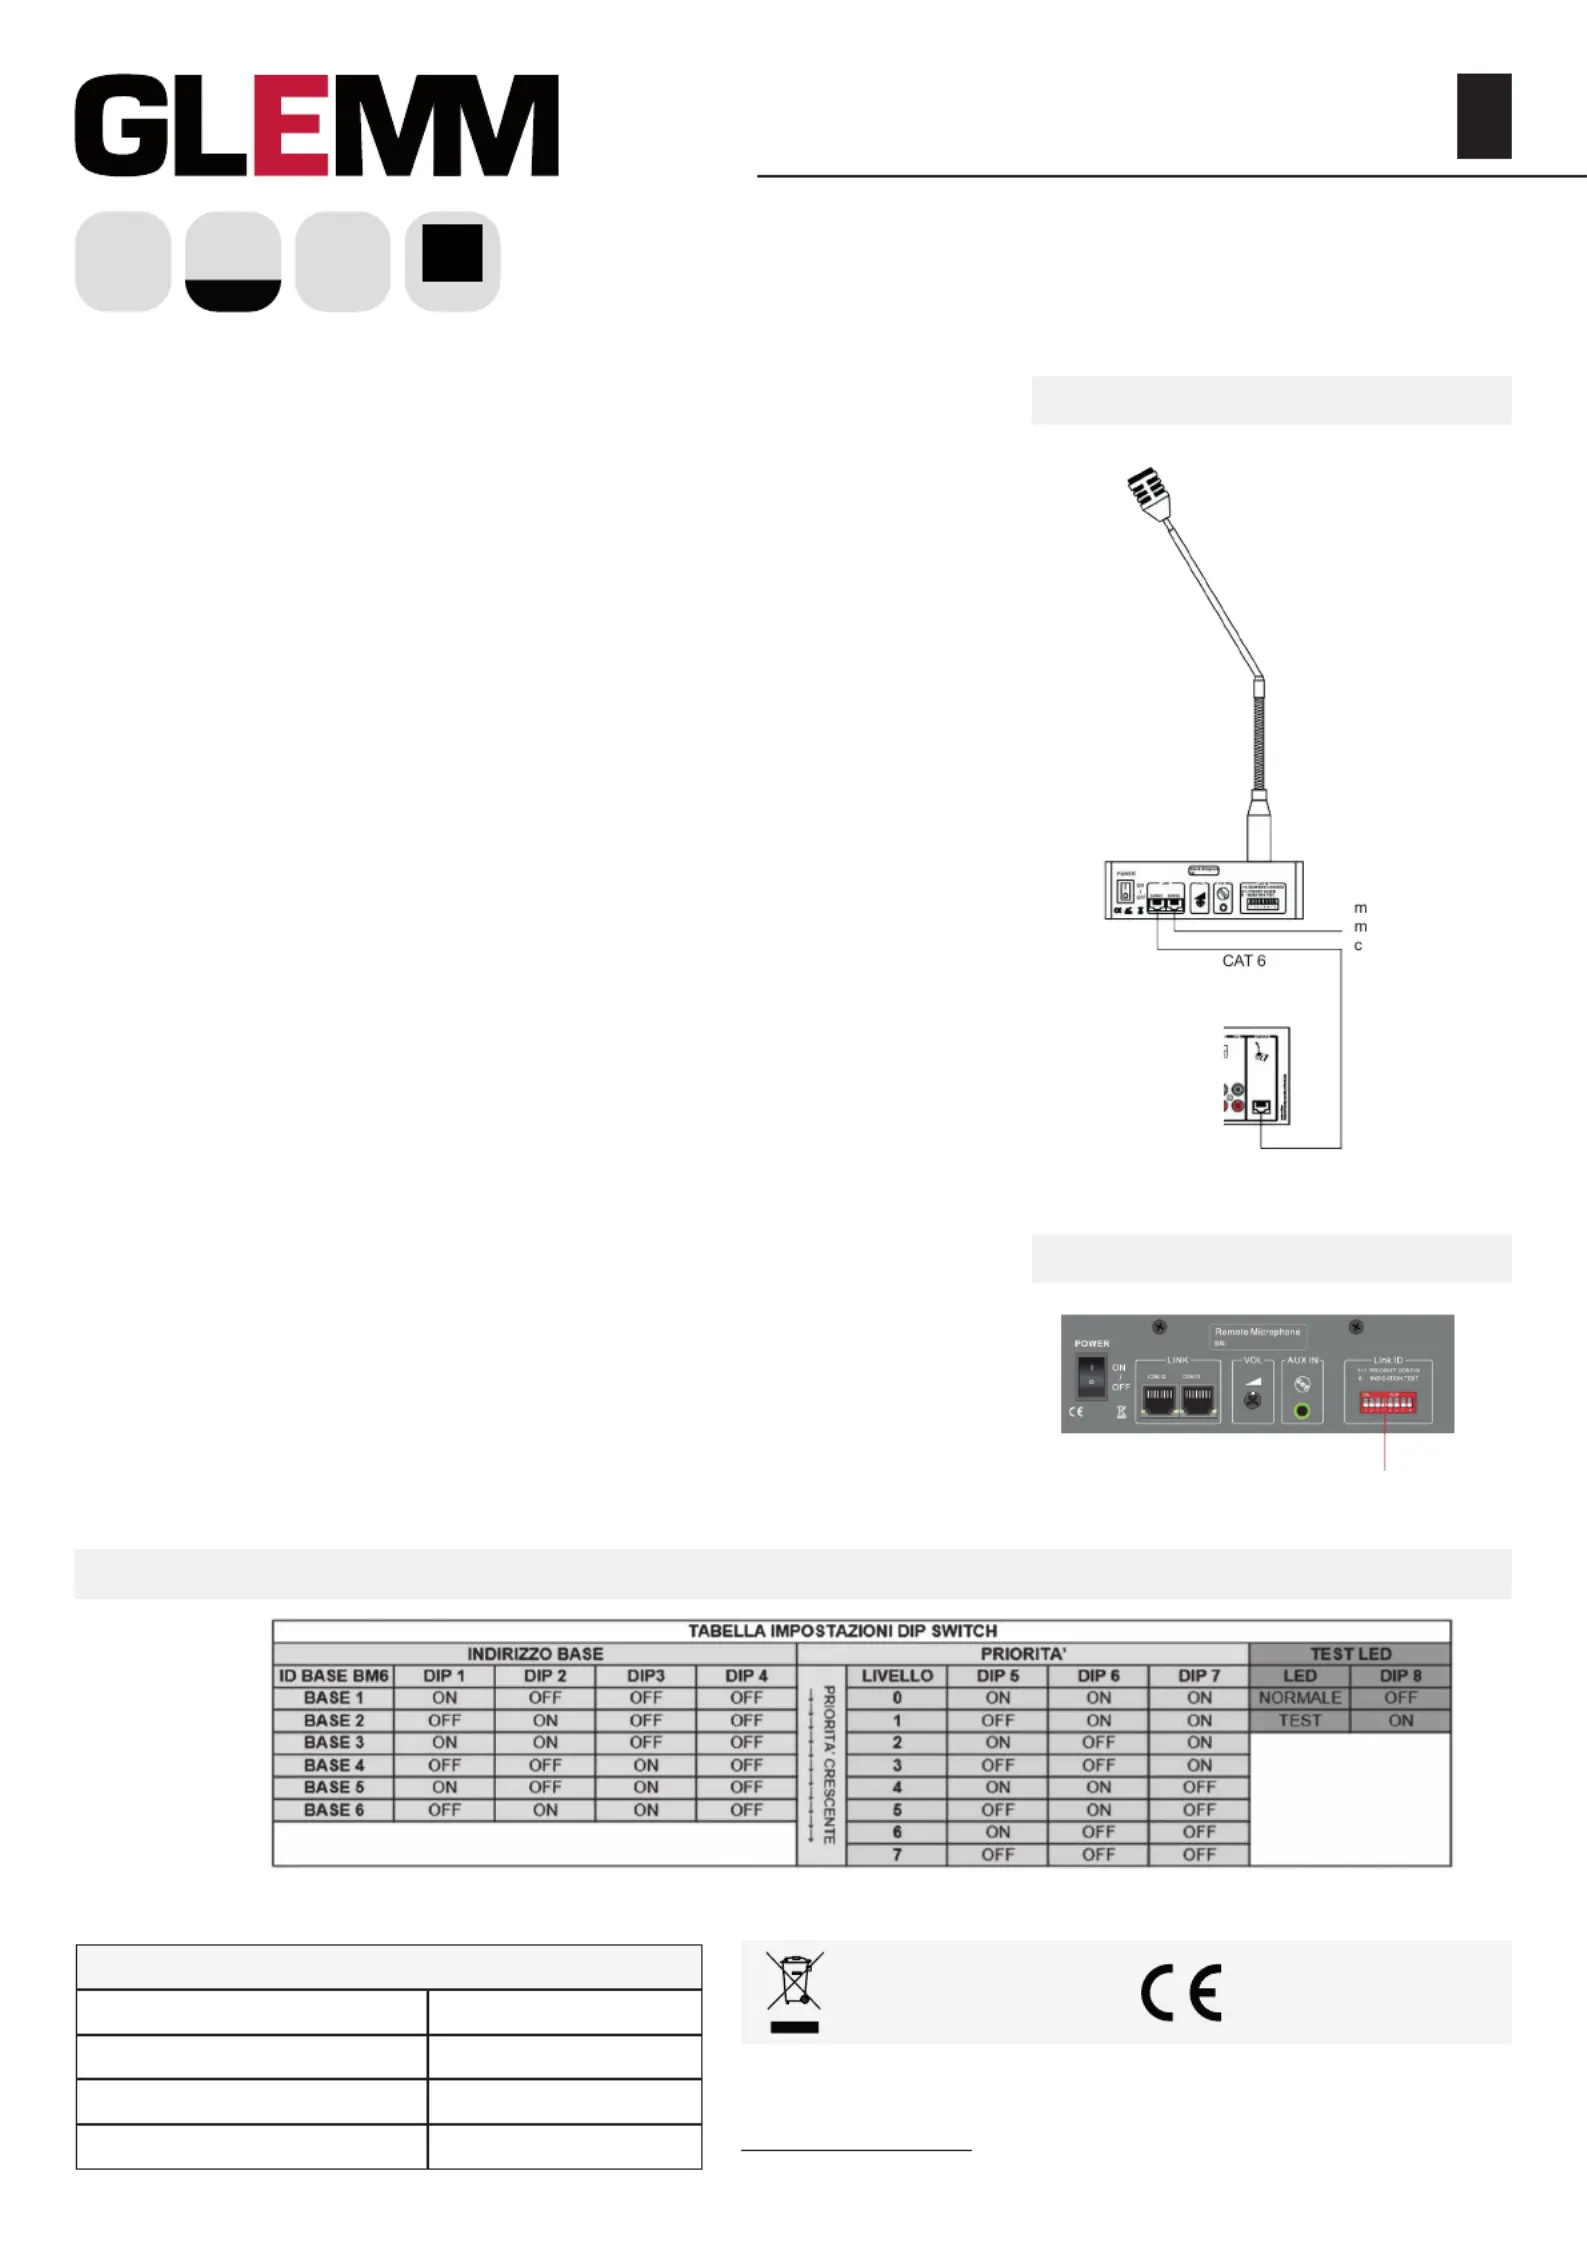
A. Collegamento
Attenzione: tutti i collegamenti e le impostazioni dei Dip switch vanno eettuate ad amplicatore
spento. Per collegare il microfono all’amplicatore è suciente utilizzare un cavo ethernet RJ 45
sfruttando la porta dedicata sull’amplicatore. E’ possibile collegare a cascata no a 6 microfoni
sfruttando le porte COM1 e COM2.
I microfoni possiedono degli interruttori DIP SWITCH per impostarne la priorità (riferitevi alla tabella
sottostante). Il microfono con priorità maggiore interrompe eventuali trasmissioni di microfoni con
priorità inferiore. A parità di priorità, l’ultimo messaggio copre il precedente. La distanza massima
tra amplicatore e microfono, utilizzando un cavo di tipo CAT6, non dovrà superare i 200mt.
Sul retro del microfono è presente una presa 3,5mm per segnale di tipo AUX. Ogni microfono avrà
la possibilità di inviare a una o più zone il proprio segnale AUX in alternativa alla voce. Dopo aver
installato la base microfonica per testarne il corretto funzionamento, settare il DIP SWITCH8 in
posizione On.
Se tutti i led lampeggiano la base funziona correttamente. Riportare quindi in posizione OFF ed
iniziare l’utilizzo.
B. Utilizzo
Accendete l’amplicatore e il microfono (utilizzando il tasto posteriore). Per inviare un messaggio,
cliccate sui tasti delle zone che volete coinvolgere, premete una volta il tasto CALL e dopo la nota
musicale potrete parlare. Terminato l’annuncio premete nuovamente il tasto CALL. Se desiderate
inviare il messaggio a tutte le zone, premete il tasto ALL prima del tasto CALL.
Durante la trasmissione di un messaggio da parte di qualsiasi micofono, il led “Busy” si illuminerà
ad indicare che la linea è occupata. Durante le fasi di test potrete agire sul regolatore di guadagno
posteriore per regolare il volume del microfono e la sensibilità della capsula.
C. Conformità, garanzia e assistenza
II marchio CE indica che il prodotto è conforme ai requisiti essenziali delle direttive europee e
relative norme ad esso applicabili.
Il prodotto è coperto da garanzia in base alle vigenti normative nazionali ed Europee.
Per le condizioni complete di garanzia e per eettuare richieste di assistenza visitate i siti internet
www.glemm.eu e www.karmaitaliana.it. Vi suggeriamo anche di procedere alla registrazione del
prodotto, loggandovi nell’area riservata del sito. Avrete così la possibilità di ricevere aggiornamenti
e informazioni sui nostri articoli.
Caratteristiche tecniche
Distanza max da amplicatore200mt con cavo RG45 CAT6
Lunghezza microfono41 cm
Dimensioni base170 x 50 x 152 mm (l x h x p)
Peso0,9 Kg
PRODOTTO DA / PRODUCED BY:KARMA ITALIANA Srl
Via Gozzano 38/bis 21052 Busto Arsizio (VA) - www.karmaitaliana.it
Lo smaltimento del prodotto deve
essere eettuato conferendolo
ad un apposito centro di raccolta
dierenziata (Dir. 2012/19/UE).
RJ45
METAL
Il fabbricante, allo scopo di migliorare i propri prodotti, si riserva il diritto di modicarne le caratteristiche siano
esse tecniche o estetiche, in qualsiasi momento e senza alcun preavviso.
BLACK
Retro del microfono
DIP SWITCH
Tabella Dip Switch
Schema di collegamento
ax altri 5
icrofoni a
ascata
200 m
max
Made in P.R.C.
www.glemm.eu
Termékspecifikációk
| Márka: | Glemm |
| Kategória: | nincs kategorizálva |
| Modell: | PM 1 |
Szüksége van segítségre?
Ha segítségre van szüksége Glemm PM 1, tegyen fel kérdést alább, és más felhasználók válaszolnak Önnek
Útmutatók nincs kategorizálva Glemm

4 Szeptember 2024
4 Szeptember 2024
4 Szeptember 2024
4 Szeptember 2024
4 Szeptember 2024
4 Szeptember 2024
4 Szeptember 2024
4 Szeptember 2024
4 Szeptember 2024
4 Szeptember 2024
Útmutatók nincs kategorizálva
Legújabb útmutatók nincs kategorizálva
10 Április 2025
10 Április 2025
10 Április 2025
9 Április 2025
9 Április 2025
9 Április 2025
9 Április 2025
9 Április 2025
9 Április 2025
9 Április 2025