Használati útmutató ICE Watch Cocorico
Olvassa el alább 📖 a magyar nyelvű használati útmutatót ICE Watch Cocorico (8 oldal) a óra kategóriában. Ezt az útmutatót 20 ember találta hasznosnak és 2 felhasználó értékelte átlagosan 4.4 csillagra
Oldal 1/8
ENGLISH
Getting started
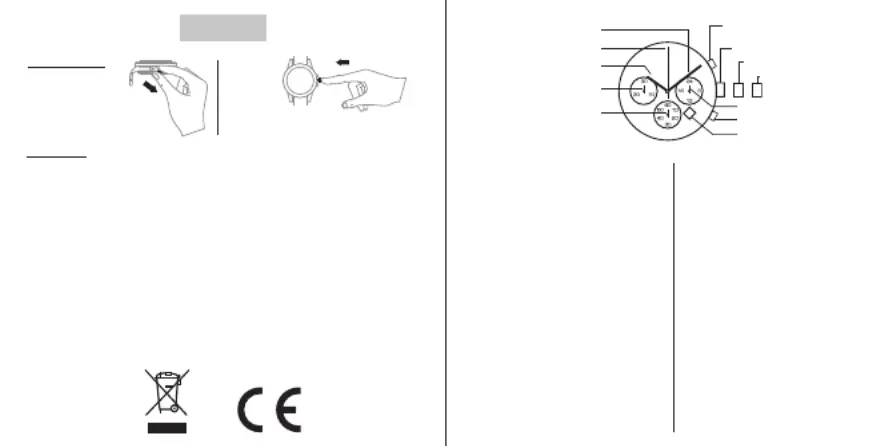
Press
the winder.
Remove the plastic
stopper (in the direction
of the arrow).
Instructions
The watch must be serviced regularly in order for it to work correctly. The length of time between
services will vary depending on the model, climate and the care you take of your watch. As a
general rule, we recommend the following steps so that you can keep your watch in tip-top
condition for as long as possible.
- Temperature: avoid temperatures below 0°C (30°F) or above 35°C (100°F).
- Avoid prolonged exposure to sun, steam, contact with alcohol, detergents, perfume or
cosmetic products to prevent distorsion, discoloration or any damaging reaction.
- Do not use any watch or chronograph buttons while under water to prevent water from
entering the mechanism.
The information contained in this document belongs to ICE Universal Ltd and may not be
reproduced without its authorisation.
A) SETTING THE DATE
1. Gently pull the winder out to the 1st
position.
2. Turn the winder anticlockwise to set the
date. If the date is set between around 9pm
and 1am, it is possible that it will not change
the next day.
3. Return the winder to its normal position.
B) SETTING THE TIME
1. Gently pull the winder out to the 2nd
position.
2. Turn the winder to set the hour and minute
hands to the correct positions.
3. The second hand starts again when
the winder is pushed back into its normal
position.
C) USING THE CHRONOGRAPH
1. Press button A to start and stop the
chronograph (stop watch).
2. Press button B to re-set the chronograph.
D) CHOOSING THE CHRONOGRAPH’S
START POSITION
1. Gently pull the winder out to the 2nd
position.
2. Press button A to set the chronograph
second hand to the desired start position.
Hold down button A if you want to move the
chronograph hand forward quickly.
3. Return the winder to its normal position.
You should also use this procedure if the
chronograph hand does not return to its start
position after you press button B, as well as
when you replace the battery.
Second hand
Chrono minute hand
Minute hand
Button A
Button B
Chrono second hand
24 Hour Hand
1st position
2nd position
Normal winder position
Hour hand
Date
Termékspecifikációk
| Márka: | ICE Watch |
| Kategória: | óra |
| Modell: | Cocorico |
Szüksége van segítségre?
Ha segítségre van szüksége ICE Watch Cocorico, tegyen fel kérdést alább, és más felhasználók válaszolnak Önnek
Útmutatók óra ICE Watch

14 Január 2025
1 Január 2025
1 Január 2025
1 Január 2025
15 December 2024
15 December 2024
15 December 2024
15 December 2024
15 December 2024
15 December 2024
Útmutatók óra
Legújabb útmutatók óra
10 Április 2025
10 Április 2025
3 Április 2025
3 Április 2025
30 Március 2025
26 Március 2025
26 Március 2025
23 Március 2025
23 Március 2025
23 Március 2025