Használati útmutató Philips Series 3000 HC3587
Philips Kaszálógép Series 3000 HC3587
Olvassa el alább 📖 a magyar nyelvű használati útmutatót Philips Series 3000 HC3587 (4 oldal) a Kaszálógép kategóriában. Ezt az útmutatót 22 ember találta hasznosnak és 9 felhasználó értékelte átlagosan 4.8 csillagra
Oldal 1/4
この印刷物は再生紙を使用しております。
取扱説明書
保証書付
保証書は、この取扱説明
書の表面の左側について
おりますので販売店で記
入を受けてください。
フィリップス
ヘアーカッター
HC3589/15,
HC3587/15
HairClipper
©2018 Philips Japan, Ltd.
4222.002..19054
(
05/18
)
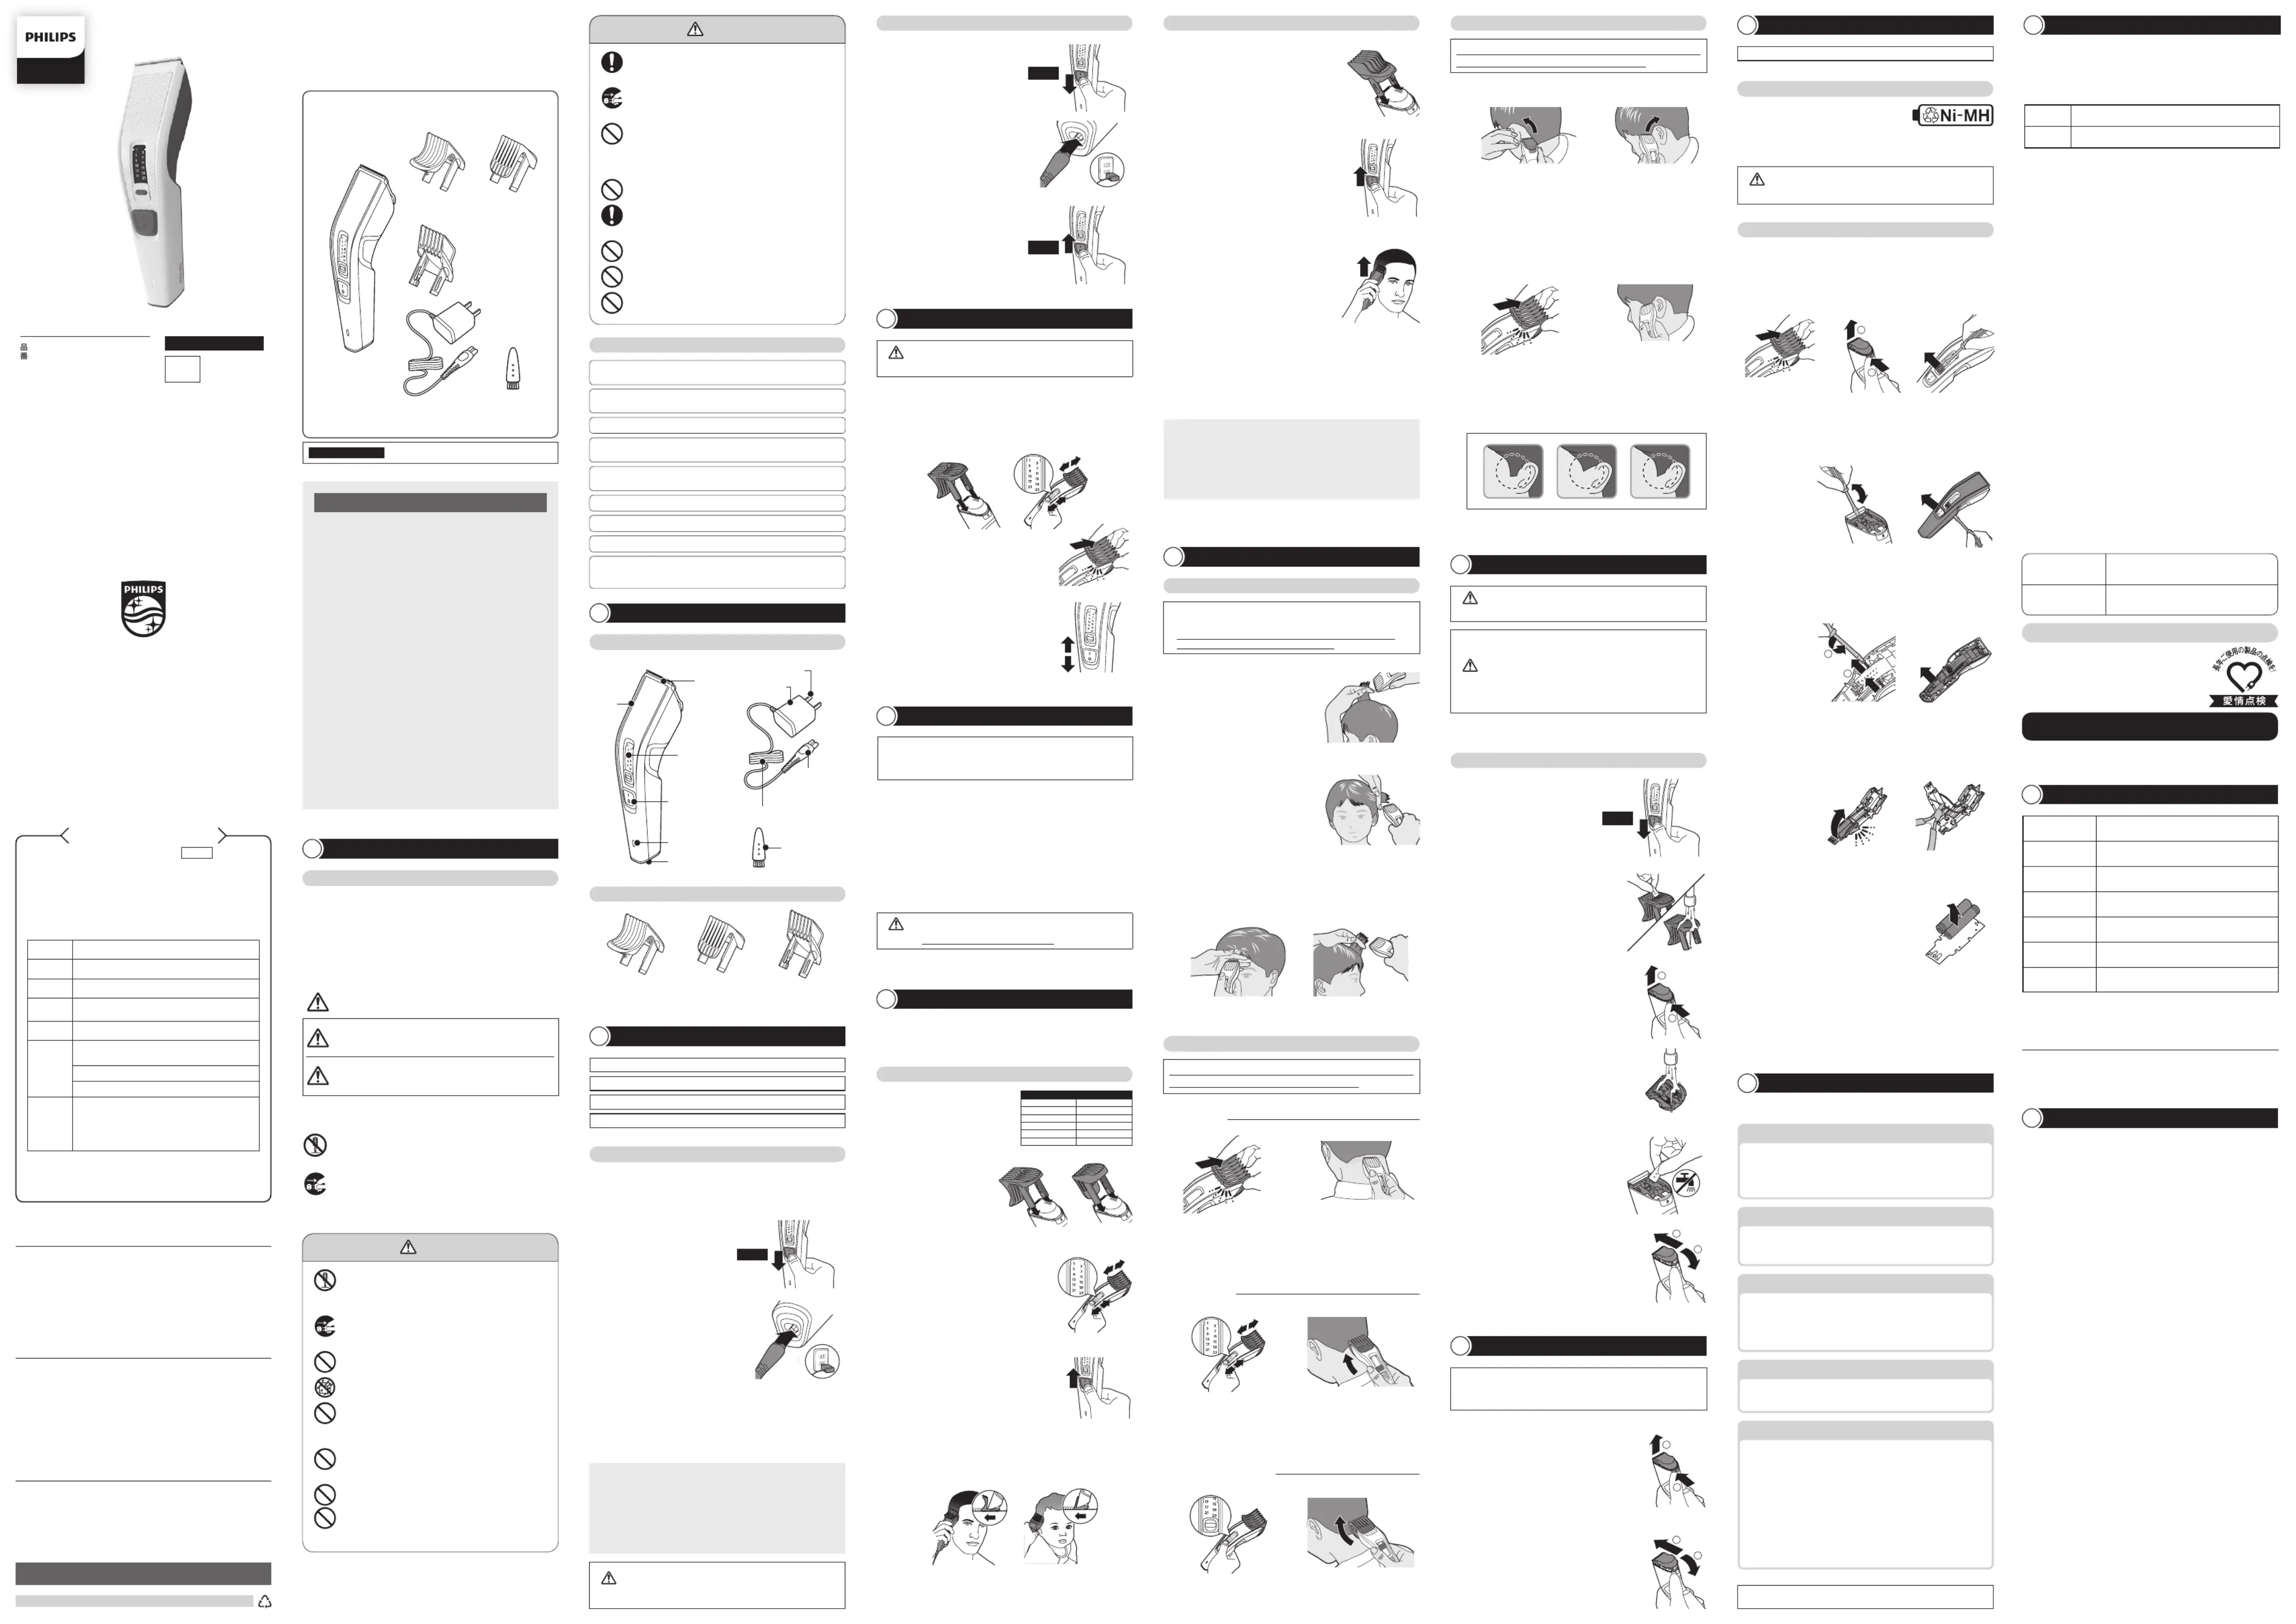
①必ずお守りください
②各部の名称
③充電の仕方
④基本的な使い方
⑤ヘアーカットの準備
⑥コームの使い方
⑦カットの仕方
⑧お手入れ方法
⑨刃の交換
⑩製品を廃棄するとき
⑪故障かな
?
と思ったら
⑫保証とアフターサービス
⑬仕様
⑭無料修理規定
Guidance in English
目 次
フィリップス
ヘアーカッターをお買い上げいただき、まことにあり
がとうございます。長い間ご愛用いただくために、ご使用前にこの取
扱説明書をよくお読みのうえ、正しくお使いください。また、お読み
になった後は、お使いになる方がいつでも見られるところに必ず保
管してください。
●商品のご確認
商品をご確認ください。
レギュラーコーム
(色:ブラック)
キッズコーム
(色:クリアブルー)
スキ刈りコーム
(色:ブラック)
必ずお守りください
1
●ここに示した注意事項は、安全に関する重要な内容ですので、必
ず守ってください。
●誤った取扱いをしたときに想定される内容を「警告」と「注意」とに
区分けしています。
安 全 上 の ご 注 意
○絵表示の例
記号は、してはいけない「禁止」を示します。図の中や近くに具体的
な禁止内容(左図の場合は分解禁止)を示します。
記号は、必ずしていただく「強制」を示します。図の中や近くに具
体的な強制内容(左図の場合は電源プラグをコンセントから抜く
こと)を示します。
○絵表示について
記号は、「警告、注意」を示します。
図の中や近くに具体的な注意内容を示します。
人が傷害を負う可能性及び物的損害の発生が想定され
る内容。
注意
人が死亡または重傷を負う可能性が想定される内容。
警告
注 意
●
充電アダプタの電源プラグを抜くときは、電源コード部を持
たずに必ず先端の充電アダプタ部を持って引き抜いてくださ
い。感電やショートして発火することがあります。
●
充電・交流使用時以外は、充電アダプタをコンセントから抜
いてください。ケガややけど、絶縁劣化による感電・漏電・
火災の原因となります。
●
充電アダプタは付属の専用アダプタを使用してください。ま
た付属の専用アダプタで他の商品を充電しないでください。
ショート、異常発熱による発火の原因になります。破損、故
障した場合は、事故を避けるために必ずフィリップス社製の
同型充電アダプタをお求めください。
●
刃は強く押さえないでください。破損して皮膚を傷つけるこ
とがあります。
●
刃やコームなどの部品が破損または故障した場合は、本製品
を使用しないでください。ケガの原因になります。交換の際
には必ずフィリップス社製の同型部品とお取り替えください。
●
電源コネクタ受部にピンやごみを付着させないでください。
感電・ショート・発火の原因になります。
●
本製品を浴室やシャワー中に使用しないでください。感電す
ることがあります。
●
本製品は、頭髪のカット専用です。それ以外の目的で使用し
ないでください。
警告
●浴室やシャワー中に使用しないでください(感電することがあります)。
●ヘアーカッター本体は水や液体の中に浸けないでください(故障の
原因となります)。
持込修理
CERTIFICATE OF PURCHASE
この保証書は、「無料修理規定」記載内容で無料修理を行うことをお約束するもの
です。お買い上げの日から下記期間中に故障が発生した場合は、製品と保証書をご
用意いただき、お買い上げの販売店または、小泉成器修理センターにご依頼くださ
い。お客様にご記入いただいた個人情報(保証書の控え)は、株式会社フィリップス・
ジャパンのホームページ
http://www.philips.co.jp/
に掲載されている「お客
様の個人情報の取り扱いについての当社の方針」に基づき適切に管理いたします。
★
保証書は再発行しませんので、大切に保管してください。
★
ご販売店様へ
この保証書はお客様へのアフターサービスの実施と責任を明
確にするものです。贈答品、記念品の場合も含めて必ず記入捺印してお客
様にお渡しください。
品名ヘアーカッター
品番
HC3589/15,HC3587/15
保証期間お買い上げ日より
2
年
対象部分
本体、充電アダプタ(レギュラーコーム、キッズコーム、スキ刈り
コーム、クリーニングブラシを除く)
お買い上げ日
年 月 日
お客様
ご住所
〒
ご芳名
電話番号
★販売店
販売店名・住所・電話番号
フィリップス
ヘアーカッター
保証書
製品に関するお問い合わせ
★
ナビダイヤルにかからない時は
TEL 06
(
6261
)
8230
FAX 06
(
6268
)
1432
日本販売代理店
小泉成器株式会社
〒
541-0051
大阪市中央区備後町
3-3-7
フィリップスお客様情報センターナビダイヤル(全国共通)
0570
(
07
)
6666
部品に関するお問い合わせ
★
ナビダイヤルにかからない時は
TEL 06
(
6613
)
3211
〒
559-0033
大阪市住之江区南港中
1
丁目
3
番
98
号
小泉成器部品センターナビダイヤル(全国共通)
0570
(
09
)
2222
修理に関するお問い合わせ
★
ナビダイヤルにかからない時は
小泉成器東日本修理センター
TEL 048
(
718
)
3340
〒
344-0127
埼玉県春日部市水角
1190
小泉成器西日本修理センター
TEL 06
(
6613
)
3145
〒
559-0033
大阪市住之江区南港中
1
丁目
3
番
98
号
小泉成器修理センターナビダイヤル(全国共通)
0570
(
09
)
8888
受付時間:平日
9
:
00
〜
17
:
30
(土・日・祝日・夏期休暇・年末年始を除く)
お買い上げのお客様へ
初めてご使用になる際は、ご使用前に充電してください。
交流式(充電アダプタをつなげたまま)で使う場合
基本的な使い方
4
※使用後は電源を
OFF
にし、ご使用のたびに掃除をしてください。
充電アダプタ
充電の仕方
3
初めてお使いになるときや、長い間ご使用にならなかったときは、ご使用前に
充電してください。海外(
100
〜
240V
)でのご使用も可能です。ただし、コン
セントの形状や電圧など現地で充分お確かめのうえご使用ください。
お客様による充電池の交換はできません。
浴室で充電をしないでください。
この商品は通常約
8
時間充電です。
満充電で約
75
分使用できます。
2
充電アダプタの電源コネクタ部を、本
体の電源コネクタ受部に差し込み、充
電アダプタの電源プラグ部をコンセン
トに差し込みます。
注意
●つぎ足し充電を行うと充電池の寿命が短くなります。
●専用の充電アダプタ以外での充電はしないでください。
●長期間使用しない場合は、充電池が過放電や液漏れして使えなくなる
ことがあります。
3
〜4カ月に一度は充電してください。
1
充電する際には、電源を必ず
OFF
にしてください。
1
電源を
OFF
にします。
2
充電アダプタの電源コネクタ部を本体
の電源コネクタ受部に差し込み、充電
アダプタの電源プラグ部をコンセント
に差し込みます。
1
コームの取り付け
本体の両側の溝に沿って、カチッと音がするまで装着させ(図①)、長
さ調整ノブを押しながら(図②)、お好みの位置までスライドさせます
(図③)。
3
電源を
ON
にします。
※
充電が完了しても充電アダプタの表示ランプは点灯したままです。表示ランプの
色は変わらず、点滅もしません。(充電完了表示はありません。)
※
充電は約
8
時間を目安に充電アダプタをはずしてください。
3
充電表示ランプが緑色に点灯し、充電中であることを示します。(満
充電で約
75
分間使用できます。)
ポイント
●充電中、テレビ等に雑音が入る場合、別のコンセントで充電してください。
●充電・ご使用中は本体・充電アダプタが多少熱くなりますが、異常ではあ
りません。
●充電池の寿命は使用・保管などの状態により異なります。
●
ニッケル水素電池の特性上、電池容量を使い切らずに充電を繰り返すと使
用可能時間が減少することがあります。これを避ける為、最後まで充電を使
いきってから、充電することをおすすめします。
充電式(コードレス)で使う場合
3
電源の
ON/OFF
電源スイッチを押し上げると
ON
、下げると
OFF
になります。
2
コームの取り外し
コームを本体から押し上げて取り外します。
※改良の為、仕様を予告なく変更することがあります。
クリーニング
ブラシ
9.
プラグ式消臭・芳香剤を使用しているコンセントあるいはその近くのコンセ
ントに充電アダプタを接続しないでください。充電アダプタを傷める原因と
なります。
4.
刃は、薄く仕上げてありますので、刃部を強く押さえたり、硬いものに当て
ないよう、ていねいに扱ってください。
5.
直射日光の当たる場所には保管しないでください。夏場、車の中に放置し
ないでください。
6.
乳幼児の手の届かないところに保管してください。
7.
本製品は、使用の都度、掃除をしてください。
8.
衛生上、他の人とは共有しないでください。
使 用 上 の ご 注 意
2.
本製品の使用、充電、保管は室温
5
℃〜
35
℃の環境下で行ってください
(尚、低温や高温で充電すると、充電池の寿命が短くなります)。
3.
刃の清掃やコームの着脱は必ず電源を
OFF
にしてから行ってください。
1.
本体は水洗いできません。水や液体の中に浸けないようご注意ください。
また水ですすがないでください。
OFF
OFF
コームの使い方
6
●
コームを使用し、カット後の仕上がりの長さを
12
種類から選べます。カット
後の仕上がりの長さは最短が
1mm
で、最長は
23mm
です。
●
コームを外してカットした時の仕上がりの長さは約
0.5mm
です。
ポイント
●使い始めは、最も長い設定である
23mm
でカットし、少しずつ仕上がりの
長さの設定を短くしていくことをおすすめします。
●カットの仕上がりを均一にするために、コームの平らな部分が頭皮と密着
するようにヘアーカッターを動かしてください。
●カットした部分と、次にカットする部分が重なるようにヘアーカッターを
動かすと、髪の刈り残しがなくなります。
無料修理規定
14
1.
取扱説明書、本体貼付ラベル等の注意書に従った正常な使用状態で
保証期間内に故障した場合には、無料修理します。
2.
保証期間内に故障して無料修理をお受けになる場合には、製品と保証
書をご用意いただき、お買い上げの販売店または、小泉成器修理セン
ターにご依頼ください。なお、製品を直接メーカーへ送付した場合の
送料等はお客様の負担となります。
3.
ご贈答、ご転居でお買い上げの販売店に修理を依頼できない場合は、
小泉成器修理センターにご依頼ください。
4.
保証期間内でも次の場合には有料修理になります。
○
1
使用上の誤り及び不当な修理や改造による故障及び損傷。
○
2
お買い上げ後の輸送、移動、落下等による故障及び損傷。
○
3
火災、地震、水害、落雷、その他の天災地変、公害や異常電圧による故障及び損傷。
○
4
一般家庭以外(例えば、業務用の長時間使用)に使用された場合の故障及び損傷。
○
5
保証書の提示がない場合。
○
6
保証書にお買い上げ年月日、お客様名、販売店名の記入のない場合、或は字句を書
き換えられた場合。
※保証書は、本書に明示した条件のもとにおいて無料修理をお約束す
るものです。従って保証書を発行している者(保証責任者)、及びそれ
以外の事業者に対するお客様の法律上の権利を制限するものではあ
りません。
保証期間経過後の修理についてご不明の場合は、お買い上げの販売
店または小泉成器修理センターにお問い合わせください。
※保証期間経過後の修理・補修用性能部品の保有期間について詳しく
は取扱説明書の保証とアフターサービスの項目をご覧ください。
※お客様にご記入いただいた個人情報(保証書の控え)は保証期間内
のサービス活動及びその後の安全点検活動のために利用させてい
ただく場合がございます。ご了承ください。また個人情報は、株式会社
フィリップス・ジャパンのホームページ
http://www.philips.co.jp/
に掲載されている「お客様の個人情報の取り扱いについての当社の
方針」に基づき適切に管理いたします。
〈無料修理規定〉
お買い上げ日
年 月 日
お買い上げ店名
TEL.
(
)
便利メモ
このような症状の時は、故障や事故防止のため、電源を
OFF
にし、充電アダプタを
コンセントから外して、必ず販売店または、小泉成器修理センターにご相談ください。
ご使用の時、このような症状はありませんか?
●
本体にさわると時々電気を感じる。
●こげくさい臭いがする。
●
電源コード部を動かすと通電したり、しなかったりする。
●
その他の異常、故障がある。
仕様
13
品 番
HC3589/15,HC3587/15
電 源 方 式充電・交流式(専用充電アダプタ使用)
充電アダプタ品番
HQ8505
消 費 電 力
9W
(
AC100V
充電時)
定 格 電 圧
AC100-240V
(
50/60Hz
)
本 体 質 量約
156g
(コーム含まず)
充 電 時 間約
8
時間
※改良の為、仕様を予告なく変更することがあります。
株式会社
フィリップス・ジャパン
〒
108-8507
東京都港区港南
2-13-37
フィリップスビル
保証とアフターサービス
12
保証書と修理サービスについて(必ずお読みください。)
保証期間お買い上げ日から
2
年間
対象部分
本体、充電アダプタ(レギュラーコーム、キッズコーム、スキ刈りコーム、
クリーニングブラシを除く)
【補修用性能部品の保有期間】
●
補修用性能部品の保有期間は製造打ち切り後
6
年です。
●
性能部品とは、その製品の機能を維持するために必要な部品です。
【ご不明な点や修理に関するご相談は】
●
修理に関するご相談ならびにご不明な点は、お買い上げの販売店または、
小泉成器修理センターにお問い合わせください。
【修理を依頼されるときは】
●
修理をご依頼される前に、この取扱説明書をよくお読みいただき、再度点検く
ださい。尚、異常のあるときはご使用を中止し、お買い上げの販売店または、
小泉成器修理センターへご依頼ください。
【保証期間中は】
●
製品と保証書をご用意いただき、お買い上げの販売店または、小泉成器修理
センターにご依頼ください。保証書の記載内容により無料修理いたします。
【保証期間が過ぎているときは】
●
修理によって商品の機能が維持できる場合は、補修用性能部品の保有期間内
であれば、ご希望により有料で修理させていただきます。
【
海外での本製品の保証及びアフターサービスについて
】
●
本製品の保証は海外においても有効です。(同シリーズ製品の取り扱いがある
国に限ります)
●
日本国以外のフィリップスサービス部門においても保証期間内及び保証期間
の経過後のアフターサービスを受けることができますが、この場合多少日数
を要することもあります。
●
海外にてアフターサービスを受けられる場合は、現地のフィリップスサービス
部門
にお問い合わせください。尚、お困りの点がございましたら下記までご連
絡ください。
Philips Consumer Lifestyle Service Department P.O.Box 20100 9200 CA DRACHTEN
The Netherlands Fax:+31 51 259 2785
【お客様の個人情報のお取り扱いについて】
●
お受けしましたお客様の個人情報は、株式会社フィリップス・ジャパンのホーム
ページ
http://www.philips.co.jp/
に掲載されている「お客様の個人情報
の取り扱いについての当社の方針」に基づき適切に管理いたします。
〈保証書・表面左側に付属〉
●
保証書は、必ず「お買い上げ日・販売店名」等の記入をお確かめのうえ、販売店か
ら受け取っていただき内容をよくお読みのあと大切に保管してください。
ON
❶
❷
❸
ヘアーカットの準備
5
1
室内でカットするときは、下に新聞紙かビニールクロスなどを敷き
ます。
2
髪をカットしてもらう人の頭部が、カットする人の胸の高さにくるよう
にします。
3
首から肩にタオルをかけて、ケープをとめます。
4
髪を毛の流れに沿ってとかします。
注意
●洗髪後、髪を乾かした状態で使用してください。髪がぬれた状態で
ヘアーカッターを使用しないでください。
●カット時は、整髪剤は使用しないでください。
本体
えり足の整え方
1
スソのカット
コームを装着せずにカットするときは、刃が触れた部分の髪がとても
短く(約
0.5mm
)カットされますのでご注意ください。
ヘアーカッターを下向きに動か
し、ゆっくりと滑らかに、毛の生
え際に沿ってカットします。
コームを外します。
2
刈り上げカット
コームの腹を地肌にすべら
せると、同じ長さでカットでき
ます。
コームを取り付けて、目盛を短め
(
1
〜
11mm
)に合わせます。
3
えり足を長めにカットする
コームの先端を持ち上げて
動かすと、髪を長くカットでき
ます。
コームを取り付けて、目盛を長め
(
13
〜
23mm
)に合わせます。
用意するもの
・
ヘアーカッター ・
くし
・
髪を留める大きめのピン
・
肩にかけるケープ
・
毛払いブラシ
・
コーム ・
髪切り専用のハサミ
・
首に巻くタオル
本体
/
充電アダプタ
/
クリーニングブラシ
コーム
各部の名称
2
電源プラグ部
電源
コネクタ部
充電アダプタ部
電源コード部
クリーニング
ブラシ
キッズコーム
(色:クリアブルー)
レギュラーコーム
(色:ブラック)
スキ刈りコーム
(色:ブラック)
刃
本体
電源スイッチ
電源コネクタ受部
長さ
調整ノブ
充電表示ランプ
以上の点検により、正常な状態に戻らない場合は、
お買い求めの販売店か小泉成器修理センターへお問い合わせ願います。
故障かな?と思ったら
11
故障かな?と思ったら、お調べください。
充電しても使用時間が極端に短い
▶刃の掃除はしていますか?
▶本製品が完全に止まるまで作動させてからもう一度約
8
時間充電
してください。
それでも改善されないときは、充電池の寿命です。
だんだん切れ味が悪くなった
▶刃が損傷または摩耗していませんか?
刃の寿命は
1
回約
30
分、月
2
回の使用で約
5
年が目安ですが使用時間・回数によ
り異なります。破損または摩耗しているときは、刃を交換してください。
異常な音がする
▶刃に傷が付いていませんか?
▶刃が正しくセットされていますか?
充電できない
▶充電アダプタの電源コードが断線していませんか?
新しい充電アダプタ(
HQ8505
)をお買い求めください。
▶充電アダプタの電源プラグ部はコンセントにきちんと差し込ま
れていますか?
充電アダプタの電源プラグ部をコンセントにきちんと差し込んでください。
▶本体の電源コネクタ受部に充電アダプタの電源コネクタ部が
きちんと差し込まれていますか?
本体の電源コネクタ受部に充電アダプタの電源コネクタ部をきちんと差し込
んでください。
▶電源が
ON
の状態で充電していませんか?
充電する際には電源を必ず
OFF
にしてから充電してください。
電源を入れても作動しない
▶刃の掃除はしていますか?
▶充電はされていますか?
約
8
時間、充電をしてください。
▶刃と本体が正しくセットされていますか?
●
本体ならびに充電アダプタは改造しないでください。また、
分解したり修理をしないでください。火災、感電、ケガの原
因となります。修理はお買い上げの販売店または小泉成器修
理センターにご相談ください。
●
お手入れの際は必ず充電アダプタの電源プラグ部をコンセン
トから抜いてください。また、濡れた手で抜き差ししないで
ください。感電やケガをすることがあります。
●
充電アダプタが傷んだり、コンセントの差込みが緩いときは
使用しないでください。感電・ショート・発火の原因になります。
●
本体・充電アダプタを水につけたり、水をかけたりしないで
ください。故障や、ショート・感電の原因になります。
●
充電アダプタを傷付けたり、電源コードを無理に曲げたり、
引っ張ったり、ねじったり、たばねたり、重い物を載せたり、
挟み込んだり、加工したりしないでください。電源コードが
破損し、火災・感電の原因となります。
●
充電アダプタには変圧器が内蔵されています。充電アダプ
タを切り離して別のプラグに接続するのは危険ですのでおや
めください。
●
乳幼児の手の届くところに本製品を置かないでください。
●
自分で意思表示ができない人(幼児を含む)に使用させない
でください。また、お体の不自由な人だけでは使用しないでく
ださい。
警 告
警告
お手入れの際は必ず充電アダプタの電源プラグをコンセントから抜いて
ください。また、濡れた手で抜き差ししないでください。感電やケガをする
ことがあります。
注意
●本製品に潤滑剤を使う必要はありません。
●圧縮空気、研磨パッド、研磨洗浄剤、ペトロールやアセトンなどの刺激性
の強い液体は絶対に使わないでください。
●充電アダプタは絶対に濡らさないでください。
●刃を傷める場合がありますので、タオルやティッシュペーパーなどで水
分を拭き取らないでください。
●本体は水洗いできません。必ず付属のクリーニングブラシでお手入れ
してください。
本体のお手入れ方法
※本製品はご使用のたびに掃除をしてください。
お手入れ方法
8
1
掃除をする前に、電源が
OFF
に
なっていること、また充電アダプタ
に接続されていないことを確かめ
てください。
3
コームを取り外して、付属のクリーニン
グブラシで掃除し、水ですすぎます。
4
リリースボタンを押して(図①)、刃を
取り外します(図②)。
7
掃除後、水気をよくきって、刃の両側に
ある爪を本体にひっかけて(図①)、刃
をカチッとロックされるまで押し込んで
ください(図②)。
2
乾いた布で本体をふきます。
OFF
6
クリーニングブラシで本体の内側を掃
除します。
※
絶対に本体を水につけたり、ゆすいだりし
ないでください。
1
2
1
2
部品の取り替え
刃やコームが破損・摩耗した場合は、必ずフィリップス社製の同型部品とお取
り替えください。
刃の交換
9
1
リリースボタンを押して(図①)、刃を取
り外します(図②)。
2
刃の両側にある爪を本体にひっかけて
(図①)、刃をカチッとロックされるまで
押し込んでください(図②)。
1
2
1
2
4
モーターユニットから充電池ホルダーを取り出し、繋がっているワイ
ヤーを切断します。
5
充電池ホルダーの基板と充電池の接続部分を
切り離して充電池を取り外します。
3
ドライバーを使い、長さ調整ノブの両脇にあるねじを外して、背面カ
バーからモーターユニットを取り外します。
1
2
製品を廃棄するとき
10
注意
●製品を廃棄するとき以外は、絶対に本体を分解しないでください。
●本体内部の金具は鋭いので、ご注意ください。
●分解する際、必ず充電アダプタを外してください。
ニッケル水素電池のリサイクルについて
※お客様による充電池の修理交換はできません。
本製品はニッケル水素電池を使用しています。
ニッケル水素電池はリサイクル可能な貴重な資
源です。ご使用済みの製品の廃棄に際しては、
ニッケル水素電池を取り出し、各自治体の処理方法に従い、リサイクル協
力店にお持ちください。
充電池の取り外し方
1
コームと刃を取り外し、⊖ドライバーで長さ調整ノブを取り外します。
●
充電アダプタが接続されていないことを確かめたうえ、電源を
ON
にし
て、完全に動作しなくなるまで充電池を放電させてから、行ってくださ
い。
2
刃を取り外した本体上部の前面に⊖ドライバーを差し込んですき間
を作り、前面カバーと背面カバーを引き離して取り外します。
1
2
1
コームを使用した場合の仕上がり
の長さは右の表の通りです。本体
に
mm
で仕上がりの長さが書かれ
ています。
2
コームを本体の両側の溝
に沿って、取り付けます。
3
コームをお好みの設定位置にするに
は、長さ調整ノブを押しながら(図①)、
コームをお好みの位置までスライドさ
せます(図②)。仕上がりの長さは本体
の矢印にコーム上の目盛を合わせて
設定します。
4
ヘアーカッターの電源を
ON
にします。
6
カットした髪の毛がコームにたまった場合は、ヘアーカッターから
コームを取り外し、髪を取り除いてください。
5
皮膚に強く押しつけず、コームをすべらすようにゆっくり動かして髪
をカットします。効率よく髪をカットするには毛の流れに逆らってヘ
アーカッターを動かしてください。
※
頭髪は部位によって毛の向きが異なります。毛の向きに合わせて、カットする方向
(上下・左右)を変えてみてください。
仕上がりの長さ(
mm
)
113
315
517
719
921
1123
レギュラーコーム
/
キッズコーム
[レギュラーコーム]
[キッズコーム]
❷
❶
2
ヘアーカッターの電源を
ON
にします。
3
コームを髪の根元から毛先に向けてすべ
らせるように動かし、レイヤーカットスタ
イルを作ります。
4
カットした髪の毛がコームにたまった場合は、ヘアーカッターから
コームを取り外し、髪を取り除いてください。
スキ刈りコーム
1
コームを本体の両側の溝に沿って、取り
付けます。
[レギュラーコーム][キッズコーム]
5
取り外した刃を付属のクリーニングブ
ラシで掃除するか、水ですすぎます。
※刃の裏側と本体内部の軸部には、出荷時に
白い潤滑剤(グリス)を塗布しています。お
手入れの際に潤滑剤がとれても、問題なく
お使いいただけます。
※充電池を取り外した後は、通電しないでください。
※ショートしないように充電池の端子をテープで覆ってください。
長めのカットの仕方
カットの仕方
7
1
頭頂部
髪を垂直に引き上げます。このとき
髪は一度にたくさんはさまないこ
と。指の上をすべらすように、刃を
水平に動かします。
2
サイド
髪を指の間にはさみ、毛が平行にな
るように持ち上げ少し引っ張ります。
指の上をすべらすように、刃を水平
に動かします。
3
前髪
刃を上から当てて、指の腹
を押さえるようにしてカット
します。
地肌に垂直に髪をはさんで、頭頂部
と長さを合わせてカットします。
23mm
以上の長さに切りたいときは、髪を指にはさんで切ります。
●コームは、外した方がカットしやすくなります。
●髪を指にはさまず、直接髪の根元に刃が触れた場合、髪がとても短く
(約
0.5mm
)カットされますのでご注意ください。
耳まわりの整え方
1
耳元のカット(コームを外して行います)
2
もみあげカット
コームを装着せずにカットするときは、刃が触れた部分の髪がとても
短く(約
0.5mm
)カットされますのでご注意ください。
前側からもカーブに合わせて動
かします。
イラストのように持ち替えて、後
ろ側から耳の形に合わせて動か
します。ヘアーカッターを傾け
て、刃の一端だけが触れるよう
にして毛先だけをカットすると、
きれいに仕上がります。
もみあげのデザインや長さを
決めてから下向きに動かしカッ
トします。
コームを外します。
《もみあげカットの参考例》
Termékspecifikációk
| Márka: | Philips |
| Kategória: | Kaszálógép |
| Modell: | Series 3000 HC3587 |
Szüksége van segítségre?
Ha segítségre van szüksége Philips Series 3000 HC3587, tegyen fel kérdést alább, és más felhasználók válaszolnak Önnek
Útmutatók Kaszálógép Philips

22 December 2024
22 December 2024
22 December 2024
22 December 2024
22 December 2024
22 December 2024
22 December 2024
22 December 2024
22 December 2024
22 December 2024
Útmutatók Kaszálógép
Legújabb útmutatók Kaszálógép
2 Április 2025
13 Január 2025
12 Január 2025
12 Január 2025
12 Január 2025
4 Január 2025
31 December 2025
28 December 2024
28 December 2024
27 December 2024