Használati útmutató Prologue K0391
Prologue nincs kategorizálva K0391
Olvassa el alább 📖 a magyar nyelvű használati útmutatót Prologue K0391 (5 oldal) a nincs kategorizálva kategóriában. Ezt az útmutatót 18 ember találta hasznosnak és 3 felhasználó értékelte átlagosan 4.6 csillagra
Oldal 1/5
Benämning
Art.no: XX-XXXX Model: XXXXX
Please read the entire instruction manual before use and save for future reference.
We apologise for any text or photo errors and any changes of technical data. If you have any
questions concerning technical problems please contact our Customer Service Department.
GREAT BRITAIN: For consumer contact, please visit www.clasohlson.co.uk and click on customer service.
Internet: www.clasohlson.co.uk
GREAT BRITAIN • CUSTOMER SERVICEtel: 0845 300 9799 e-mail: customerservice@clasohlson.co.uk internet: www.clasohlson.com/uk
1
2
3
4
5
6
7
8
9
1011
12
13
14
15
16
17
18
19
20
21
22
23
24
20140623
Wireless thermometer w/hygrometer
Art.no 36-4742 Model 91904 (K0391)
Please read theentire instruction manual before using and save it for future use. Weapologise
for any text or photo errors and any changes of technical data. Ifyou have any questions
concerning technical problems please contact our Customer Service Department.
Safety
• Do not expose thedevice to extreme temperatures or damp.
• Avoid contact with corrosive materials.
• Never expose thedevice to dust.
• Do not dismantle thedevice.
Product description
Wireless sensor. Cleardisplay showing indoor and outdoor temperature, humidity, time and
date. Thesensor can be placed up to 30 m (line-of-sight) away from thereceiver. Supportsup
to three sensors simultaneously.
Buttons and functions
Operation
Setting the year, time and date
1. Press and hold [ SET.ALM ] for 2 seconds, and then use [ ▲] or [ ▼] to set theyear.
2. Press [ SET.ALM ] again, themonth digits start to flash. Use[ ▲] or [ ▼] to set
themonths.
3. Press [ SET.ALM ] again, thedate digits start to flash. Use[ ▲] or [ ▼] to set thedate.
4. Press [ SET.ALM ] again, “0:00” appears and thehour digits start to flash. Use[ ▲] or [ ▼ ]
to set thehours.
5. Press [ SET.ALM ] again, “0:00” appears and theminute digits start to flash. Use[ ▲] or [ ▼ ]
to set theminutes.
6. Press [ SET.ALM ] to return to normal mode.
Setting the alarm
1. Press [ SET.ALM ], “AM 7:00 AL” appears on thedisplay.
2. Press and hold [ SET.ALM ] for 2 seconds, thehour digits will start to flash.
Use[ ▲] or [ ▼] to set thehours.
3. Press [ SET.ALM ] again, theminute digits start to flash. Use[ ▲] or [ ▼] to set
theminutes.
4. Press [ SET.ALM ] to return to normal mode.
Turning the alarm on/off
1. Press [ SET.ALM ] to display thealarm time. Whenthealarm time is displayed, press [ ▲ ]
once to turn thedaily alarm off.
2. When thealarm function is turned on, the
icon shows on thedisplay.
3. When thetime reaches theset alarm time, theclock will beep to wake you. The
icon
will flash.
4. To stop thealarm, press [ ▲].Thealarm will stop and the
icon stops flashing.
Selecting the 12/24 hour display format
Press [ 12/24 ] to select thedisplay format.
Selecting Celsius or Fahrenheit
Press [ °C/°F ] to switch between displaying temperature in degrees Celsius or Fahrenheit.
Reading the highest and lowest recorded temperature
and humidity readings
1. Press [ MAX/MIN ] to view thehighest and lowest indoor/outdoor temperature and
humidity readings respectively.
2. Press and hold [ MAX/MIN ] to clear therecorded value and start recording new data.
Synchronising with multiple outdoor sensors
This unit comes with one sensor. Asecond and athird sensor can be purchased and used
with thethermometer simultaneously.
1. Set thenumber of thechannel on theextra sensor to 2 (under thebattery cover).
2. Press [ CHANNEL ]. “CH2” and “_ _” appear on thelower half of thedisplay.
3. Press and hold [ ALM ON/OFF ] for about 2 seconds.
4. Sensor 2 is now synchronised with thethermometer and thetemperature
of thesecond sensor will appear on thedisplay.
5. Thesame procedure can be repeated for athird sensor.
Care and maintenance
Clean theproduct by wiping it with asoft, dry cloth.
Neveruse solvents or abrasive cleaning agents.
Troubleshooting guide
ProblemSolution
Wrongoutdoor temperature
displayed on thereceiver.
Wait 1–2 minutes to make sure that thesensor and
receiver are in sync. Ifnot, resynchronise them.
Thetemperature on thesensor
seems to be too high.
Make sure that thetransmitter is not placed in direct
sunlight or next to aheat source.
Thereceiver cannot receive
signals and display them.
• Synchronise theunits again.
• Thetemperature could be under -50 °C.
• Thesensor’s batteries might need replacing.
• Move thereceiver and thesensor closer to each other.
• Make sure that thesensor is placed away from
electrical interference.
Thefunctions are normal or certain
functions do not work at all.
Theunit needs to be reset. Dothis by removing or
replacing thebatteries in both thereceiver and sensor.
Disposal
Disposal of this product should be in accordance with local regulations.
Ifyou are unsure how to proceed, contact your local authority.
Specifications
Batteries 4×AAA/LR03 batteries (sold separately)
Size 145×72×25 mm
Update interval 1 minute
Humidity 20–95 %
Indoor temperature -10 to +50 °C
Outdoor temperature -50 to +70 °C
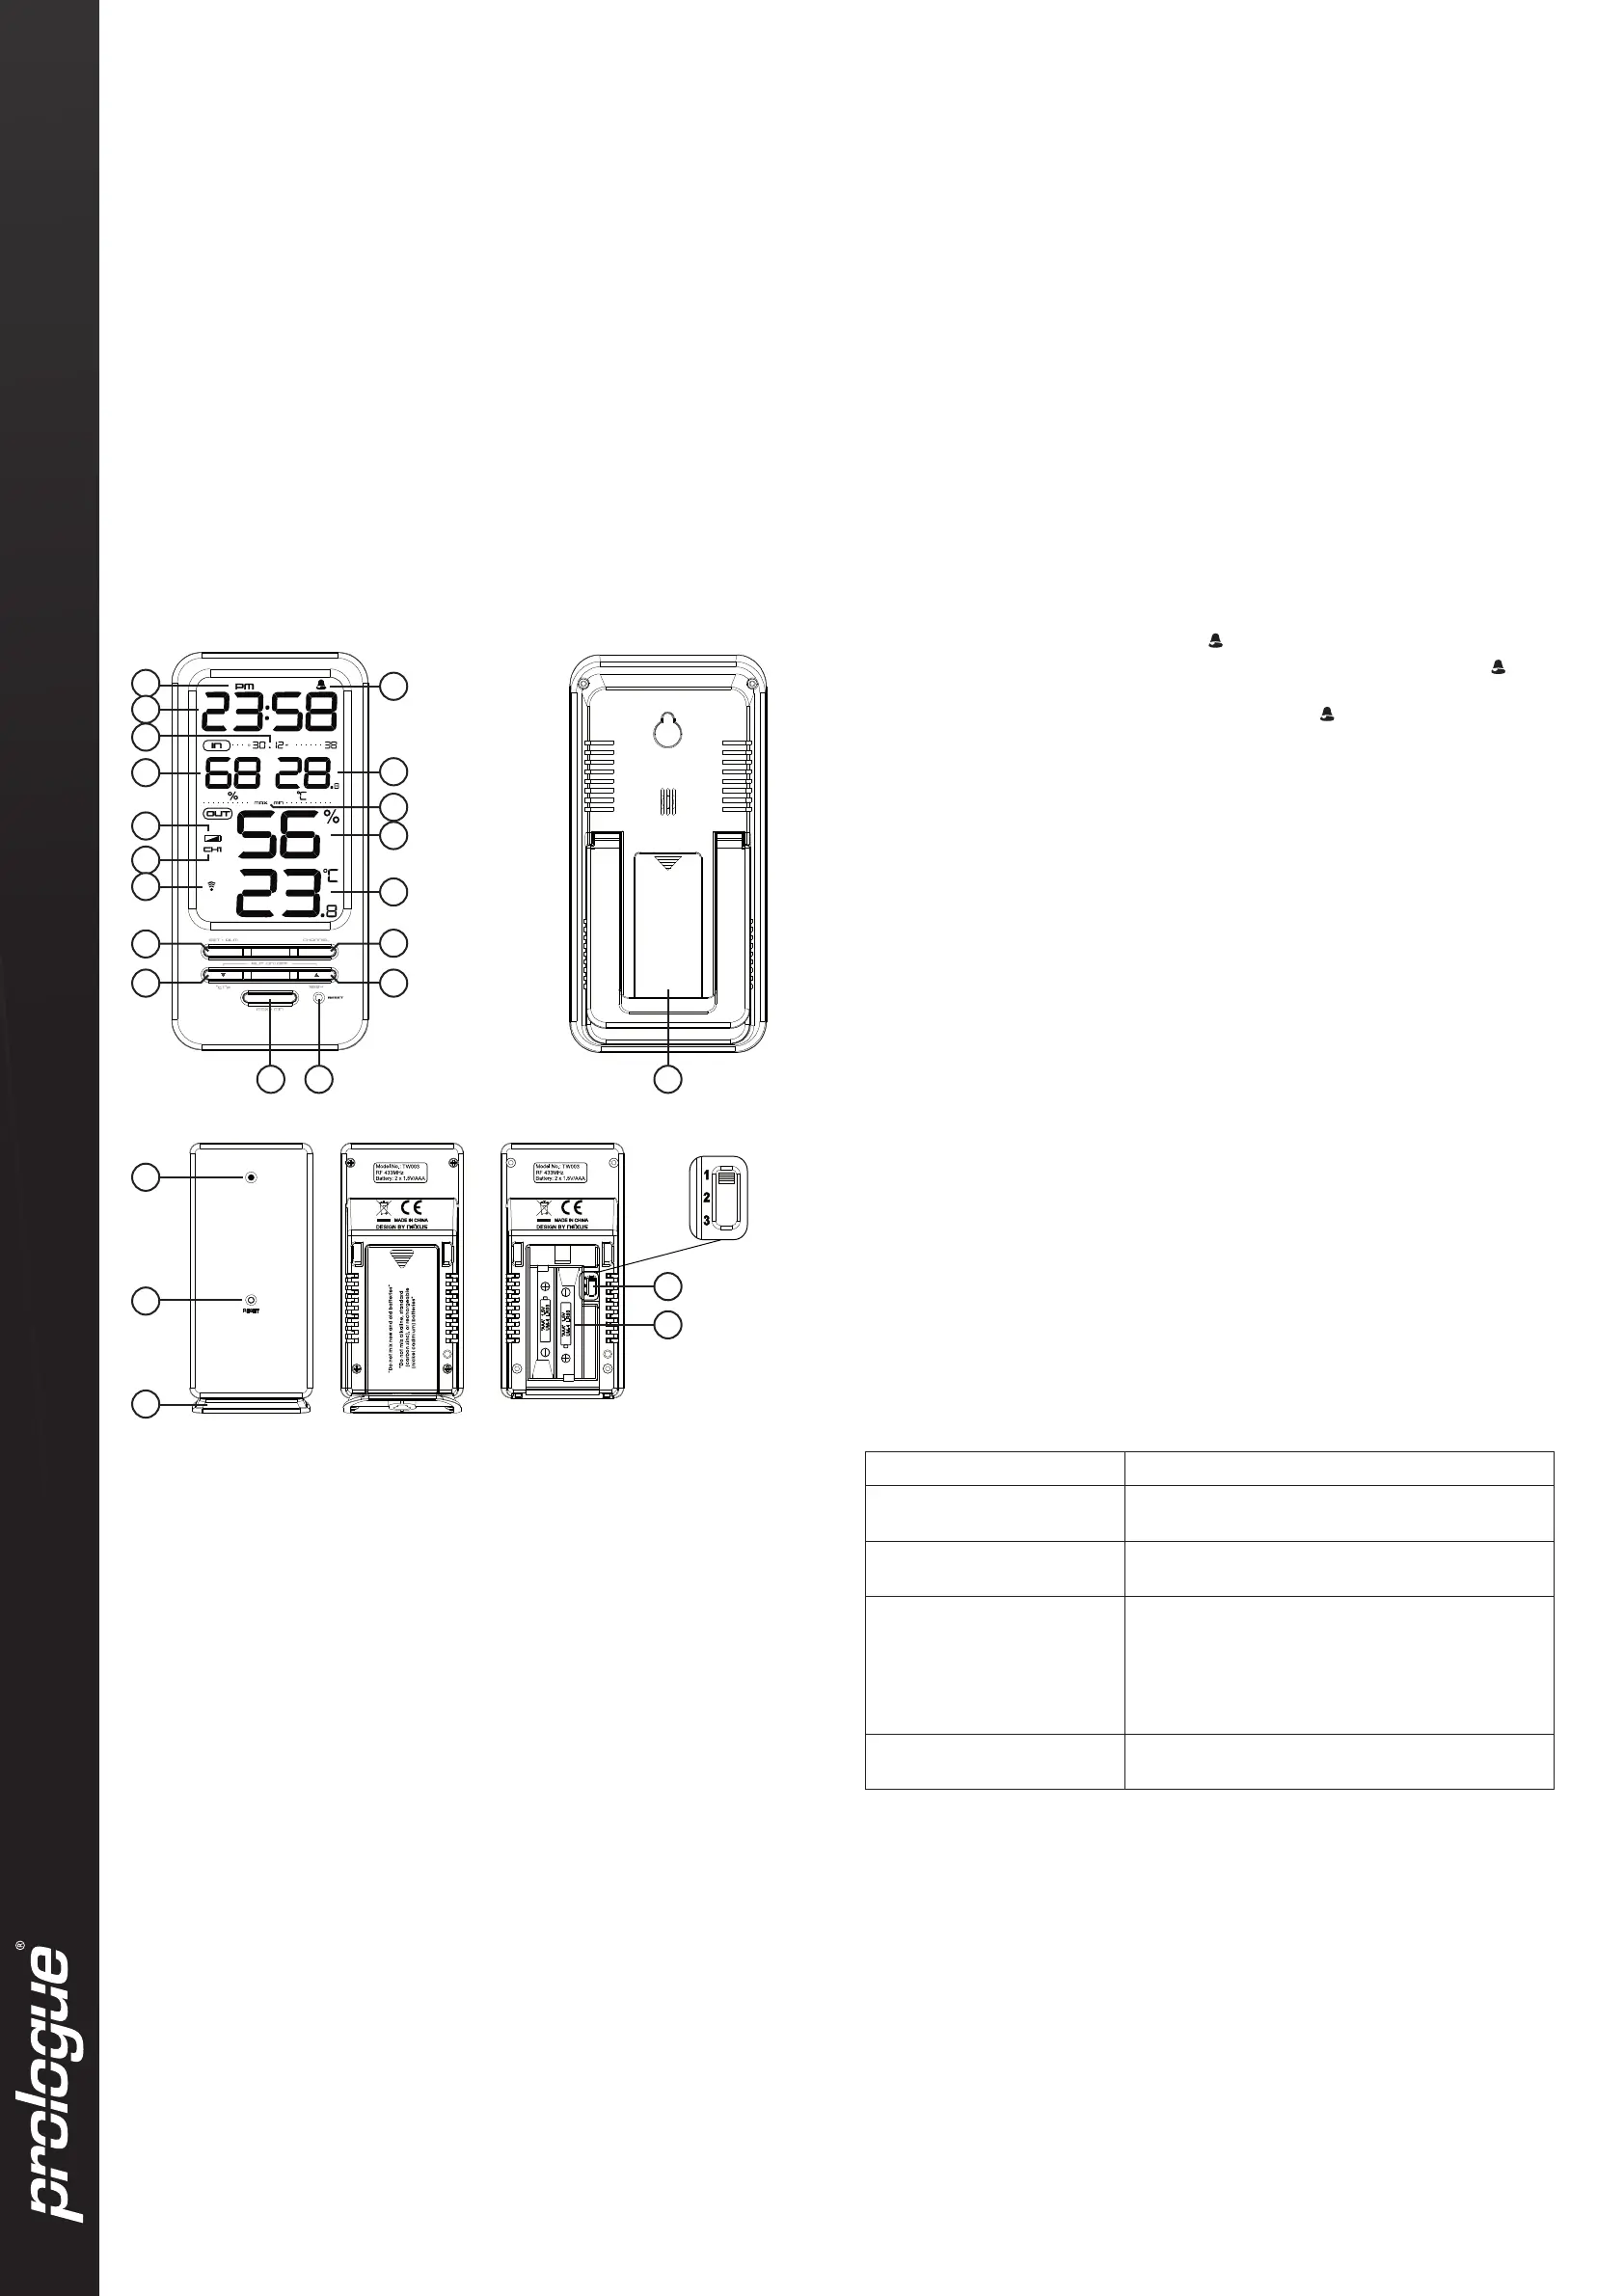
1. PM indicator
2. Time
3. Date/Month
4. Indoor humidity
5. Battery status indicator
6. RF sensor
7. Wireless transmission icon
8. [ SET.ALM ] Alarm/settings
9. [ ▼/°C/°F ] Celsius/Fahrenheit selector
10. [ MAX/MIN ] Highest/lowest
11. [ Reset ]
12. [ ▲/12/24 ] Alarm on/off;
Selectingthe12/24 hour display format
13. [ CHANNEL ]
14. Outdoor temperature
15. Outdoor humidity
16. Highest/Lowest icons
17. Indoor temperature
18. Alert ON
19. Battery compartment
20. LED
21. [ Reset ]
22. Base
23. Channel 1, 2 and 3
24. Battery compartment
Getting started
1. Remove thebattery cover on theback of thedisplay unit.
2. Insert 2 x AAA/LR03 batteries. Notethepolarity markings in thebattery compartment.
3. Refit thebattery cover. Thedisplay now shows thedefault time, calendar and present
indoor temperature and begins searching for anoutdoor temperature signal.
4. Insert 2 x AAA/LR03 batteries into theoutdoor sensor. Theoutdoor temperature and
“CH1” will now appear on thelower half of thedisplay. Thewireless thermometer display
unit is now synchronised with theoutdoor sensor on channel 1 and thetemperature from
that sensor is displayed.
Termékspecifikációk
| Márka: | Prologue |
| Kategória: | nincs kategorizálva |
| Modell: | K0391 |
Szüksége van segítségre?
Ha segítségre van szüksége Prologue K0391, tegyen fel kérdést alább, és más felhasználók válaszolnak Önnek
Útmutatók nincs kategorizálva Prologue

27 Augusztus 2024
27 Augusztus 2024
27 Augusztus 2024
26 Augusztus 2024
Útmutatók nincs kategorizálva
Legújabb útmutatók nincs kategorizálva
10 Április 2025
10 Április 2025
10 Április 2025
9 Április 2025
9 Április 2025
9 Április 2025
9 Április 2025
9 Április 2025
9 Április 2025
9 Április 2025