Használati útmutató Samsung UA32M4000AR
Samsung LED televíziók UA32M4000AR
Olvassa el alább 📖 a magyar nyelvű használati útmutatót Samsung UA32M4000AR (2 oldal) a LED televíziók kategóriában. Ezt az útmutatót 48 ember találta hasznosnak és 5 felhasználó értékelte átlagosan 4.8 csillagra
Oldal 1/2
For India Only
ATTENTION:
This product is qualified for the BEE Star rating in the ‘Home’ Mode. The Objectives of
Star Labeling Program is designed to promote energy efficient products and practices.
When the television is initially set up, it is designed to meet the BEE Star Labeling
requirements while maintaining optimum picture quality.
yChanges to certain functionalities of this television (TV Guide, Picture/sound etc)
may change the power consumption.
yDepending upon such changed setting (eg., Retail mode), the power consumption
may vary which possibly could exceed the stated energy consumption.
To reset the television to Star rating qualified settings, select ‘Home’ mode from
the initial set-up procedure in ‘factory settings’ under the ‘Set-up’ menu.
Figures and illustrations in this User Manual are provided for reference only and may differ from
actual product appearance. Product design and specifications may be changed without notice.
Still image warning
Avoid displaying still images (like jpeg picture files) or still image element (like TV
programme logo, panorama or 4:3 image format, stock or news bar at screen bottom
etc.) on the screen. Constant displaying of still picture can cause ghosting of LED
screen, which will affect image quality. To reduce risk of this effect, please follow below
recommendations:
yAvoid displaying the same TV channel for long periods.
yAlways try to display any image on full screen, use TV set picture format menu for
best possible match.
yReduce brightness and contrast values to minimum required to achieve desired
picture quality, exceeded values may speed up the burnout process.
yFrequently use all TV features designed to reduce image retention and screen
burnout, refer to proper user manual section for details.
For India Only
This product is RoHS compliant.
Correct Disposal of This Product
(Waste Electrical & Electronic Equipment)
This marking on the product & accessories literature indicates
that the product and its electronic accessories (e.g. charger,
headset, USB cable) should not be disposed of with other
household waste at the end of their working life. To prevent
possible harm to the environment or human health from
uncontrolled waste disposal, please separate these items from
other types of waste and recycle them responsibly to promote
the sustainable reuse of material resources House hold users
should contact either the retailer where they purchased this
product, or their local government office, for details of where and
how they can take these items for environmentally safe recycling.
Business user should contact their supplier and check the terms
and conditions of the purchase contract. This product and its
electronic accessories should not be mixed other commercial
wastes for disposal.
For more information on safe disposal and recycling visit our website www.
samsung.com/in or contact our helpline number - 18002668282, 180030008282
For personal and non-commercial use only.
Usage is subject to following the guidelines in the User Manual and may not be
available in all regions.
Contact SAMSUNG WORLD WIDE
If you have any questions or comments relating to Samsung
products, please contact the SAMSUNG customer care centre.
Country Customer Care Centre Web Site
VIETNAM1800 588 889
www.samsung.com/vn/support
THAILAND 0-2689-3232,
1800-29-3232
www.samsung.com/th/support
MYANMAR +95-1-2399-888
www.samsung.com/th/support
CAMBODIA +855-23-993232
LAOS +856-214-17333
MALAYSIA
1800-88-9999
603-77137477 (Overseas contact)www.samsung.com/my/support
PHILIPPINES
1-800-10-726-7864 [ PLDT Toll
Free ]
1-800-8-726-7864 [ Globe Landline
and Mobile ]
02- 422-2111 [ Standard Landline ]
www.samsung.com/ph/support
INDIA1800 40 SAMSUNG (1800
40 7267864) (Toll-Free)
www.samsung.com/in/support
NEPAL 18000910113
www.samsung.com/support
BANGLADESH 0961-2300300
0800-0300300 (Toll Free)
www.samsung.com/support
SRI LANKA0115900000
www.samsung.com/support
EGYPT 08000-7267864
16580
www.samsung.com/eg/support
ALGERIA3004 (Toll Free)www.samsung.com/n_
africa/support
IRAN021-8255 [CE]
www.samsung.com/iran/support
SAUDI ARABIA800 247 3457 (800 24/7
HELP)
www.samsung.com/sa/home
www.samsung.com/sa_en
PAKISTAN0800-Samsung (72678)
www.samsung.com/pk/support
TUNISIA80 1000 12www.samsung.com/n_
africa/support
U.A.E
800-SAMSUNG (800 - 726 7864)www.samsung.com/ae/support
(English)
www.samsung.com/ae_ar/
support (Arabic)
OMAN
800-SAMSUNG (800 - 726 7864)
KUWAIT183-CALL (183-2255)
BAHRAIN8000-GSAM (8000-4726)
QATAR800-CALL (800-2255)
JORDAN 0800-22273
06 5777444www.samsung.com/
levant/support
SYRIA962 5777444
LEBANON961 1484 999
1299
MOROCCO080 100 22 55www.samsung.com/n_
africa/support
SOUTH AFRICA
0860 SAMSUNG (726 7864)
www.samsung.com/
support
BOTSWANA 8007260000
NAMIBIA08 197 267 864
ZAMBIA0211 350370
MAURITIUS800 2550
REUNION0262 50 88 80
ANGOLA 940271635
MOZAMBIQUE847267864 / 827267864
NIGERIA 0800-726-7864www.samsung.com/
africa_en/support
GHANA 0800-100077
COTE D’ IVOIRE
8000 0077www.samsung.com/
africa_fr/support
SENEGAL 800-00-0077
CAMEROON 67095-0077
KENYA0800 545 545
www.samsung.com/
support
UGANDA0800 300 300
TANZANIA0800 780 089
RWANDA 9999
BURUNDI 200
DRC 499999
SUDAN 1969
•e s d s in e t Thslotanopeningthcabineand in e k or m are prthbacbottoovidefod r y . To re rnecessarventilationensueliable n of s , operatiothiapparatus
and to protect it from , e s overheatingthesslotand openings musnevet r be d or rblockecoveed.
- Do not covethr e s d s slotanopeningwith a h or r .clotothematerials
- Do not blocthk e s d s by g s slotanopeningplacinthiapparatus on a bedsofa, , g or r r .ruothesimilasurface
- Do not placthie s s in a , h as a apparatuspacesucbookcase or n built-icabinet, unless proper ventilation is provided.
•Do t noplace this apparatuneas r or r a r or t roveradiatoheaegister, or re it is d to rwheexposediect sunlight.
•Do t noplace a l g r s ) on s vessecontaininwate(vaseetc.thiapparatus, as s thican rt in a k of esulris or c .electrishock
•Do t e s s to n or e it r r r a , , n , or y , in a t , or r a noexposthiapparaturaiplacneawate(neabathtubwashbowlkitchesinklaundrtubwebasementnea
swimming pool etc.). If thiappratus s y s , g it d accidentallgetwetunpluancontact an authorized dealer immediately.
•e Maksure to l t e pulouthpower cord from e t re thoutlebefocleaning.
•s s e . In r , re t be rThiapparatuusbatteriesyoucommunitythemighegulationthaequis t rre u to e of e es pryodisposthesbatterioperly to protect e th
envi onmentr. e t r l Pleascontacyoulocaauthorities for disposal or rg .ecyclininformation
•Do t nooverload wall outletsextensio, n rcods, or s d adaptorbeyontheir capacity, sincthie s n rcaesult in or c .electrishock
•rPowe-supply rds d be rd so t y are t y to be d on or d by s d n or t . y ar coshouloutethathenolikelwalkepincheitemplaceupoagainsthemPaparticul
attention to rds at e cothplug endwhe, re d to , d at e connecteadaptorsanthpoint where y t from e theexithapparatus.
•To protecthit s s from a g , or n it is t d d d r g s of , g it from e l t d apparatulightninstormwhelefunattendeanunusefolonperiodtimeunpluthwaloutlean
disconnect the antenna or cablsysteme . s l prThiwilevent e to e damagthset due to lightning anpowed r e .linsurges
•Before ting e AC pr rd to e DC adacoecnnthowecothptutor olet, e re e te desmaksuthvol agignation of e thDC adaor rreos to e l ptcospndthloca
electrical supply. (depending on the model)
•r Neveinsert anythinmetallig c o e n intthopeparts of this apparatus. Doing so may cre a r of c .eatdangeelectrishock
•To avoielectrid c , r h e shocknevetoucthinside of this apparatus. Only a ten d chniciashoulopen thiapparatuss .
•e re to g e r rd in l it is Maksupluthpowecounti . l on e , t e rd, n rg e r rd from e . Do t insertedPulthplugnothcowheemovinthpowecothoutletno
touch thpowee r rd cowith wehandst .
•If s s s t thiappratudoenooperatnormalle y - in r, if re are y l s or s g from it - g it ay d t particulatheanunusuasoundsmellcominunpluimmeditelancontac
an d r or e authorizedealeserviccenter.
•Be re to l e r g supulthpowepluout of e t if thoutlethe TV is to remain unused or if u are to e e e for an d d of e y yoleavthhousextendeperiotim(especiall
when child enr, y or d e l be t e in e elderldisablepeoplwillefalonthhouse).
- Accumulatedusd t n e an cacauselectric shock, an c , or a electrileakage by g e causinthpower cord to e s generatsparkanheatd , or e e causth
insulation to .deteriorate
•Be re to t an d e r, n g r t in a lan with vy , hh or low tersucontacauthorizeserviccentewheinstallinyouseoctioheadustigmperatues, hh i, ighumdity
chemicasubstancel s or re it l e r 24 s a y h as in an , a n , . re to do so y e s e whewiloperatfohourdasucairporttraistationetcFailumacausserioudamag
to r youset.
•e Usonly a pry grd g d r. operloundepluaneceptacle
- An impoperr grd y e c ounmacauselectrishock or equipment damage. (Class l t )Equipmenonly.
•To rn off e s , u t l tuthapparatucompletelyyomuspulthpowee r g pluout of e l . , e r g d be rthwalsocketConsequentlythpoweplushouleadily e accessibl
at l altimes.
•Do t noallow children to hang onttho e pr.oduct
•re e s , ) in a Stothaccessorie(batteriesetc.location safely out of the reach of rchilden.
•Do t noinstall the product in an unstable location such as a y , a shakselfslanted or a n d to .locatioexposevibration
•Do t drop or t a k to e prnoimparshocthoduct. If the product is damaged, disconnect thpowee r rd coand contact a e r.serviccente
•To n e pr, g e r rd from e r t d e e prt g a , y . Do t e y s h cleathoductunpluthpowecothpoweoutleanwipthoducusinsoftdrclothnousanchemicalsuc
as , , , , , r frwaxbenzenealcoholthinnersinsecticideaieshener, t or . s y e e e or e e g on e lubricandetergentThimadamagthappearancerasthprintinth
product.
•Do t noexpose the apparatus to dripping or splashing.
•Do t nodispose of batteries in a
•Do t noshort ci cuitr, , or t e .disassembleoverheathbatteries
•t noshorcit rcuit, , or t e .disassembleoverheathbatteries
•re is a r of n if u rThedangeexplosioyoeplace the batteries witthh e wrg e of . e ontypbatteryReplaconly with thsame e or t .equivalentype
•WG - TO T E D OF , P ARNINPREVENTHSPREAFIREKEECANDLES OR OTHER N S AWAY M S T AT L OPEFLAMEFROTHIPRODUCALTIMES.
Warning! Important Safety Instructions
(Please read the safety instructions below before installing and using the product.)
CAUTION
CA: TO E E RISK OF ERIC K, DO T E UTIONREDUCTHELCTSHOCNOREMOV
COVE(OBACK)R R . E E NO R RE PARTS . RE-THERARUSESEVICEABLINSIDE
FER ALSEVICINL RG TO D .QUALIFIEPERSONNEL
RISK OF ELECTRIC SHOCK. DO NOT OPEN
Thisymboindictes l as at h e is prthhigvoltageseninsidet . It
is rdangeous to e y d of t h y rl makankincontacwitaninte na
part of s prthioduct.
Thsyboindtethis ml icas at important literare cerning tuonc
operatioanmain enancn d te s en d h is habeincludewitth
product
.
Make sure to rest the AC/DC Adapter flat on a table or the floor. If you place the AC/DC Adapter so that it is hanging with the AC cord input
facing upwards, water or other foreign substances could enter the Adapter and cause the Adapter to malfunction.
•
Important Safety InstructionsGetting Started
Accessories
yRemote Control & Batteries (AAA x 2)
yOwner’s Instructions
yWarranty Card (Not available in some locations) / Regulatory Guide
yPower Cord
yWall mount Adapter
(Depending on the Model)
yAdapter
Input Cables (Sold Separately)
yComposite (AV)
yComponent
yCoaxial (RF)
yHDMI
yHDMI-DVI
TV Controller (Panel Key)
: Turns the TV on or off.
/ : Changes channels.
/ : Adjusts the volume.
: Displays and selects the available video sources.
Control Menu
Remote control sensor/TV Controller
Turn on the TV using the
P button on the remote control or TV panel.
✎The product colour and shape may vary depending on the model.
✎The TV’s Controller, a small joystick-like button at the right bottom of the TV, lets you control the TV without the remote control.
✎With the TV's Controller, you cannot perform other operations except for turning the TV on or off, changing the channel, adjusting the volume, and switching the input source.
Plug & Play (Initial Setup)
When you turn the TV on for the first time, a sequence of screens and on-screen prompts will assist you in configuring the TV’s basic settings. Plug the
power cord into a wall outlet, and then press the button to turn on the TV. Set the initial setup following instructions that the TV guides.POWER
✎If you are not using a cable box or satellite box, make you sure have connected the TV to an Aerial or cable connection before you turn on the TV.
✎Connecting the power cord and antenna. (refer to ‘Connections’)
Connections
yFor better picture and audio quality, connect to a digital device using an
HDMI
cable.
yThe picture may not display normally (if at all) or the audio may not work if an
external device that uses an older version of HDMI mode is connected to the TV.
If such a problem occurs, ask the manufacturer of the external device about the
HDMI version and, if out of date, request an upgrade.
yBe sure to purchase a certified HDMI cable. Otherwise, the picture may not
display or a connection error may occur.
yPC / DVI AUDIO IN input is not supported.
yFor HDMI/DVI cable connection, you must use the port. HDMI INPUT 2 (DVI)
yConnecting through the cable may not be supported depending on the PC. HDMI
yIf an HDMI to DVI cable is connected to the port, the audio HDMI INPUT 2 (DVI)
does not work.
yFor Set-top box connection using HDMI cable, we highly recommend you to
connect the port.HDMI INPUT 1 (STB)
Changing the Input Source
Source List
Use to select TV or other external input sources such as DVD / Blu-ray
players / cable box / STB satellite receiver connected to the TV.
1. Press the SOURCE button.
2. Select a desired external input source.
■
TV / / / Component / HDMI1 / HDMI2/DVIAV1AV2
✎You can only choose external devices that are connected to the TV. In the
Source List, connected inputs will be highlighted.
How to use Edit Name
Edit Name lets you associate a device name to an input source. To
access , enter menu and select . Name Edit NameSupportEdit Name
the device connected to the input jacks to make your input source
selection easier.
✎When connecting a PC to the port with HDMI cable, you HDMI INPUT 2 (DVI)
should set the TV to PC mode under .Edit Name
✎When connecting a PC to the port with HDMI to DVI cable, HDMI INPUT 2 (DVI)
you should set the TV to DVI PC mode under .Edit Name
✎When connecting an AV devices to the port with HDMI to HDMI INPUT 2 (DVI)
DVI cable, you should set the TV to DVI mode under .Edit Name
Information
Press (INFO
I
), you can see detailed information about the selected
external device.
✎Information only available for the current connected source.
Remote Control
✎This remote control has Braille points on the Power, Channel, Volume and Enter buttons and can be used by visually impaired persons.
Channel Menu
Seeing Channels
Channel List
Select a channel in the screen by pressing the Channel List ▲/▼
buttons, and pressing the ENTER
E
button. Then you can watch the
selected channel.
✎Using the remote control buttons with the Channel List
Channel Status Display icons
Icons Operations
A channel deleted.
Retuning Channels
Area
You can change the desired area.
Auto Store
(Depending on the country)
Scan mode for Southwest Asia: Full/Turbo
Scans for a channel automatically and stores in the TV.
Manual Store
Scans for a channel manually and stores in the TV.
✎According to channel source, Manual Store may be supported.
✎ProgrammeColour SystemSound SystemChannelSearchStore, , , , , : If there
is abnormal sound or no sound, reselect the sound standard required.
Channel List Option Menu
Set each channel using the menu options ( / ). Channel ListAddDelete
Option menu items may differ depending on the channel status.
Set each channel using the menu options. Option menu Channel List
items may differ depending on the channel status.
■
Add / Delete: Delete or add a channel to display the channels you
want.
✎All deleted channels will be shown on the menu.All Channels
✎A “” beside the channel indicates the channel has been deleted.
✎The menu only appears for deleted channels.Add
Fine Tune
If the reception is clear, you do not have to fine tune the channel, as this
is done automatically during the search and store operation. If the signal
is weak or distorted, fine tune the channel manually.
✎Fine tuned channels that have been saved are marked with an asterisk “*” on the
right-hand side of the channel number in the channel banner.
✎This is available for analogue broadcasts only.
Picture Menu
Picture Mode
t
Select your preferred picture type.
■
Dynamic: Suitable for a bright room.
■
Standard: Suitable for a normal environment.
■
Movie: Suitable for watching movies in a dark room.
BacklightContrastBrightnessSharpness / / / /
Colour / Tint (G/R)
Your television has several setting options for picture quality control.
✎In analogue , modes of the PAL system, the function is not TVAVTint (G/R)
available.
✎When connecting a PC, you can only make changes to , , Backlight Contrast
Brightness Sharpness and .
✎Settings can be adjusted and stored for each external device connected to
the TV.
✎Lowering picture brightness reduces power consumption.
Picture Options
■
Colour Tone: Select the colour temperature.
✎Warm will be deactivated when the picture mode is .Dynamic
■
Size: Your cable box/satellite receiver may have its own set of screen
sizes as well. However, we highly recommend you use mode 16:9
most of the time.
16:9: Sets the picture to 16:9 wide mode.
4:3: Sets the picture to basic (4:3) mode.
Zoom1/Zoom2: Zoom out 16:9 wide mode vertically to fit the screen
size.
Screen Fit: Displays the full image without any cut-off when
HDMI(720p/1080i/1080p) signals are inputted.
Custom: Magnifies or shrinks 16:9 pictures vertically and/or
horizontally. A magnified or shrunk picture can be moved left, right,
up, and down.
✎Do not watch in 4:3 format for a long time. Traces of borders displayed on the
left, right and centre of the screen may cause image retention (screen burn)
which are not covered by the warranty.
✎NOTE
xDepending on the input source, the picture size options may vary.
xThe available items may differ depending on the selected mode.
xSettings can be adjusted and stored for each external device connected to an
input on the TV.
■
Digital Clean ViewAutoLowMediumHigh: ( / Off/ / / ) If the
broadcast signal received by your TV is weak, you can activate the
Digital Clean View feature to reduce any static and ghosting that may
appear on the screen.
✎When the signal is weak, try other options until the best picture is displayed.
■
HDMI Black Level: Selects the black level on the screen to adjust the
screen depth.
✎Available only in mode (RGB signals).HDMI
■
Film ModeAuto : (/ Off) Sets the TV to automatically sense and
process film signals from all sources and adjust the picture for
optimum quality.
✎Available in TV mode, AV, COMPONENT (480i / 1080i) and HDMI (480i /
1080i).
■
Motion Lighting: Reduce power consumption by brightness control
adapted motion.
✎Only available in mode.Standard
Picture Reset
Resets your current picture mode to its default settings.
Display Modes (HDMI/DVI Input)
Optimal resolution
4 series:1366 x 768@60Hz,1600 x 900@60Hz
ModeResolutionHorizontal Frequency (KHz)Vertical Frequency (Hz)Pixel Clock Frequency (MHz)Sync Polarity (H / V)1366 x 768
IBM 720 x 40031.469 70.087 28.322 -/+
c
MAC
640 x 48035.000 66.667 30.240 -/-
c
832 x 62449.726 74.551 57.284 -/-
c
1152 x 87068.68175.062100.000-/-
VESA DMT
640 x 48031.469 59.940 25.175 -/-
c
640 x 48037.861 72.809 31.500 -/-
c
640 x 48037.500 75.000 31.500 -/-
c
800 x 60037.879 60.317 40.000 +/+
c
800 x 60048.077 72.188 50.000 +/+
c
800 x 60046.875 75.000 49.500 +/+
c
1024 x 76848.363 60.004 65.000 -/-
c
1024 x 76856.476 70.069 75.000 -/-
c
1024 x 76860.023 75.029 78.750 +/+
c
1152 x 86467.50075.000108.000+/+
1280 x 720 45.000 60.000 74.250 +/+
c
1280 x 80049.70259.81083.500-/+
1280 x 102463.98160.020108.000+/+
1280 x 102479.97675.025135.000+/+
1366 x 76847.712 59.790 85.500 +/+
c
1440 x 90055.93559.887106.500-/+
1600 x 900RB60.00060.000108.000+/+
1680 x 105065.29059.954146.250-/+
1920 x 108067.50060.000148.500+/+
Installing batteries (Battery size: AAA)
✎NOTE
xUse the remote control within 7 m from TV.
xBright light may affect the performance of the remote control. Avoid using nearby special fluorescent light or neon signs.
xThe Colour and shape may vary depending on the model.
LED TV
user manual
Alternately select Teletext ON, Double, Mix or OFF. Returns to the previous channel.
Press to directly access to channels.
Turns the TV on and off.
Use these buttons in a specific feature.
E-MANUAL: Not available.
: Display the Family TV Mode
/ Joy Plus Feature
:Turns the on or off.Cricket Mode
Cuts off the sound temporarily.
Provides an optimal picture and sound for the
popular content in your geographical area.
Displays the channel list on the screen.
Displays information on the TV screen.
Quickly select frequently used functions.
Selects the on-screen menu items and changes the
values seen on the menu.
Exit the menu.
Returns to the previous menu.
Displays and selects the available video
sources.
Use these buttons according to the direction on
screen.
Changes channels.
Displays the main on-screen menu.
Views the .Media Play
Adjusts the volume.
Sound Menu
Sound Mode
t
■
Standard: Selects the normal sound mode.
■
Music: Emphasise music over voices.
■
Movie: Provides the best sound for movies.
■
Clear Voice: Emphasise voices over other sounds.
Equalizer
(standard sound mode only)
■
Balance: Adjusts the balance between the right and left speaker.
■
100Hz / 300Hz / 1kHz / 3kHz / 10kHz (Bandwidth Adjustment):
Adjusts the level of specific bandwidth frequencies.
■
Reset Equalizer: Resets the to its default settings.
DTS TruSurround HD
t
(standard sound mode only)
This function provides a virtual 5.1 channel surround sound experience
through a pair of speakers using HRTF (Head Related Transfer Function)
technology.
Auto Volume
Because each broadcasting station has its own signal conditions, the
volume may fluctuate each time channel is changed. This feature lets you
automatically adjust the volume of the desired channel by lowering the
sound output when the modulation signal is high or by raising the sound
output when the modulation signal is low.
Speaker Select
A sound echo may occur due to a difference in decoding speed between
the main speaker and the audio receiver. In this case, set the TV to
External Speaker.
✎When you set to , the TV’s speakers are Speaker SelectExternal Speaker
turned off. You will hear sound through the external speakers only. When you
set to , both the TV’s speakers and the external Speaker SelectTV Speaker
speakers are on. You will hear sound through both.
✎When is set to , the volume and Speaker SelectExternal SpeakerMUTE
buttons will not operate and the sound settings will be limited.
✎If there is no video signal, both speakers will be mute.
TV Installation Type
This is the feature that set sound filter to fit into the installation condition
of TV. Adjust TV Sound to suit either stand or Wall Mount Installation.
Sound Reset
Reset all sound settings to the factory defaults.
Selecting the Sound Mode
t
When you set to , the current sound mode is displayed on Dual I-Dual II
the screen.
Audio TypeDual I-IIDefault
A2 Stereo
MonoMono Automatic
change
Stereo Stereo↔Mono
DualDual I↔Dual IIDual I
NICAM
Stereo
MonoMono Automatic
change
Stereo Mono↔Stereo
Dual Mono
↔Dual I
Dual IIDual I
✎If the stereo signal is weak and an automatic switching, occurs, then switch to
the mono.
✎Only activated in stereo sound signal.
✎This function is available for all input sources.
Setup Menu
Language
Set the menu language.
✎Press or button to select menu language. (According to the different areas, ▲ ▼
some countries have only one language.)
Time
✎The current time will appear every time you press the button.INFO
■
Clock SetYearMonthDayHourMinute: Set the , , , , .
■
On Time/Off Time
✎Current time should be set first by .Clock Set
RepeatOnce Everyday Mon~Fri: Set the timer to repeat by , , ,
Mon~Sat Sat~Sun Sun, , .
Select to turn of .Off Repeat
Hour Minute/: Enter the hour and minute for the TV to turn on or off.
Contents: Select TV.
Channel: Select the channel to be played when the TV turns on
automatically.
Volume: Select the volume level when TV turns on automatically.
■
Sleep Timer
t
Automatically shuts off the TV after a preset period of time. (, Off30
min60 min90 min120 min150 min180 min, , , , and )
✎To cancel , select .Sleep TimerOff
Melody
Set so that a melody plays when the TV is turned , , OffLow Medium
and .High
✎The does not play.Melody
- When no sound is output from the TV because the volume has been reduced to
minimum with the button.VOL –
- When the TV is turned off by function.Sleep Timer
Auto Power Off
The TV will be automatically turned off when no user operation is
received for 4 hours.
✎If the option is set to , the TV will stay on even if no Auto Power OffOff
operations are performed on the TV.
Self Diagnosis
The Broadcast Signal Self Diagnosis menu provides Picture Test, Sound
Test, and Signal Information functions to evaluate TV problems and to
show the signal strength.
yPicture Test: Use to check for picture problems.
ySound Test: Use the built-in melody sound to check for sound
problems.
yReset: Reset all settings to the factory defaults except network
settings.
✎Choose to restore factory Settings, TV will automatically shut down, and then
restart.
Game Mode
Game ModeOn (Off / ):When you have connected a game console such
as PlayStation™ or Xbox™ to the TV, you can enjoy a more realistic
gaming experience if you set on.Game Mode
yPrecautions and limitations for Game Mode
- Before disconnecting a game console and connecting another external device,
set to .Game ModeOff
- If you display the TV menu in , the screen shakes slightly.Game Mode
- Game ModeTV is not available when you’ve set the input source to .
- Set to only after connecting a game console. If you turn Game Game ModeOn
Mode on before you have attached the game console, you may notice reduced
picture quality.
- If is : is set to and Game ModeOnPicture ModeGame ModeSound Mode
is set to .Game Mode
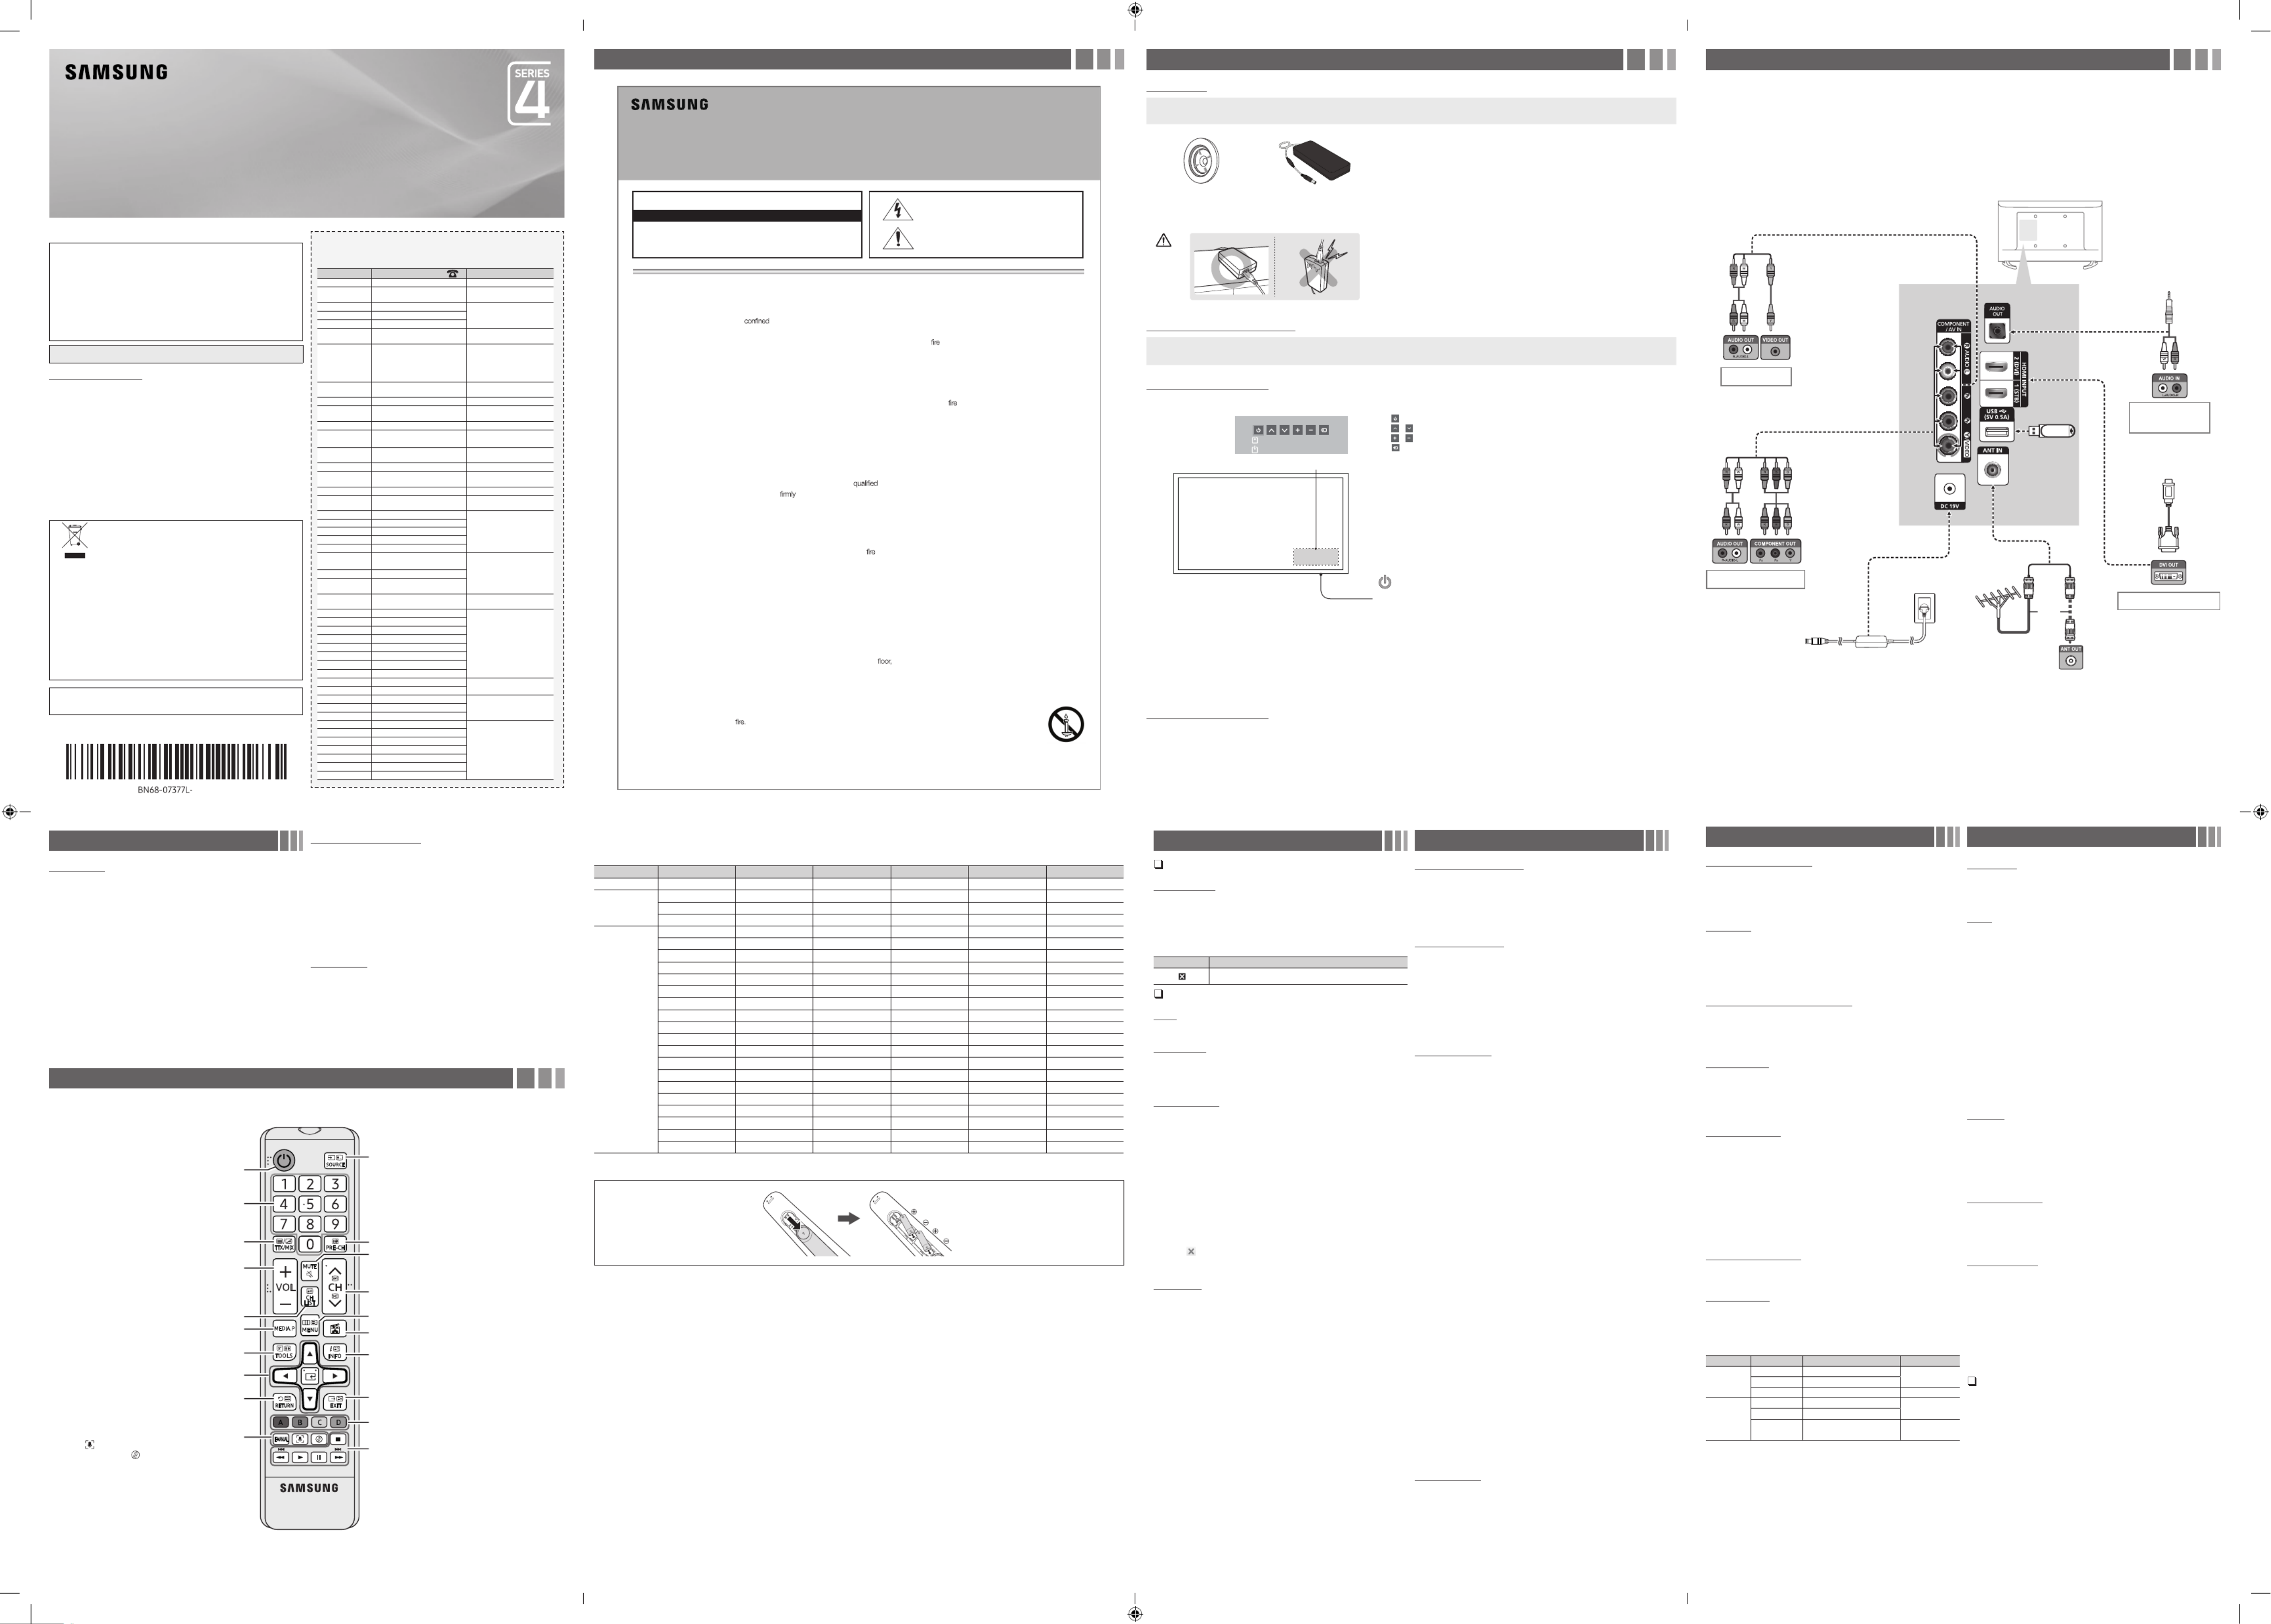
TV Rear Panel
USB
Audio connection
(Analog)
DVD / Home Theater
Component connection
Blu-ray player / DVD
AV connection
VCR
PC connection
PC
yThe rear panel may differ
depending on the model.
00
or
Cable
VHF/UHF Antenna
Press: Move
Press & Hold: Select
- 2 -- 1 -
- 6 -- 5 -
- 3 -
- 7 -
- 4 -
- 8 -
Termékspecifikációk
| Márka: | Samsung |
| Kategória: | LED televíziók |
| Modell: | UA32M4000AR |
Szüksége van segítségre?
Ha segítségre van szüksége Samsung UA32M4000AR, tegyen fel kérdést alább, és más felhasználók válaszolnak Önnek
Útmutatók LED televíziók Samsung

15 Január 2025
15 Január 2025
14 Január 2025
13 Január 2025
16 Október 2024
14 Október 2024
14 Október 2024
12 Október 2024
11 Október 2024
11 Október 2024
Útmutatók LED televíziók
Legújabb útmutatók LED televíziók
15 Január 2025
15 Január 2025
15 Január 2025
14 Január 2025
13 Január 2025
13 Január 2025
13 Január 2025
13 Január 2025
13 Január 2025
13 Január 2025