Használati útmutató Sussex DBSHS
Sussex Wekkerradio DBSHS
Olvassa el alább 📖 a magyar nyelvű használati útmutatót Sussex DBSHS (60 oldal) a Wekkerradio kategóriában. Ezt az útmutatót 22 ember találta hasznosnak és 2 felhasználó értékelte átlagosan 4.2 csillagra
Oldal 1/60
AS/NZS 3718:2005
LIC. 20081
WATER
RATING
LicenceNo.LicenceNo.0124
WaterConsumption
Themore
starsthemore
waterefficient
www.waterrating.gov.au
litresperminute
WhentestedinaccordancewithStardardAS/NZS6400
Formoreinformationandtocompare
products,referto:
5
Ajointgovernmentandindustryprogram
WATER
RATING
WaterConsumption
Themore
starsthemore
waterefficient
www.waterrating.gov.au
litresperminute
WhentestedinaccordancewithStandardAS/NZS6400
Formoreinformationandtocompare
products,
referto:
8.5
Ajointgovernmentandindustryprogram
LicenceNo.LicenceNo.0124
WATER
RATING
WaterConsumption
Themore
starsthemore
waterefficient
www.waterrating.gov.au
litresperminute
WhentestedinaccordancewithStandardAS/NZS6400
Formoreinformationandtocompare
products,referto:
7.5
Ajoint government andindustryprogram
LicenceNo.0124
POL Basin Set
POL Basin Mixer
POL Basin Mixer Extended
POL Sink Mixer
( Twin Handle )
WATER
RATING
LicenceNo.LicenceNo.0124
WaterConsumption
Themore
starsthemore
waterefficient
www.waterrating.gov.au
litresperminute
WhentestedinaccordancewithStardardAS/NZS6400
Formoreinformationandtocompare
products,referto:
5.5
Ajointgovernmentandindustryprogram
POL Sink Mixer
( Single Lever )
POL Shower Head
POL Hand Held Shower
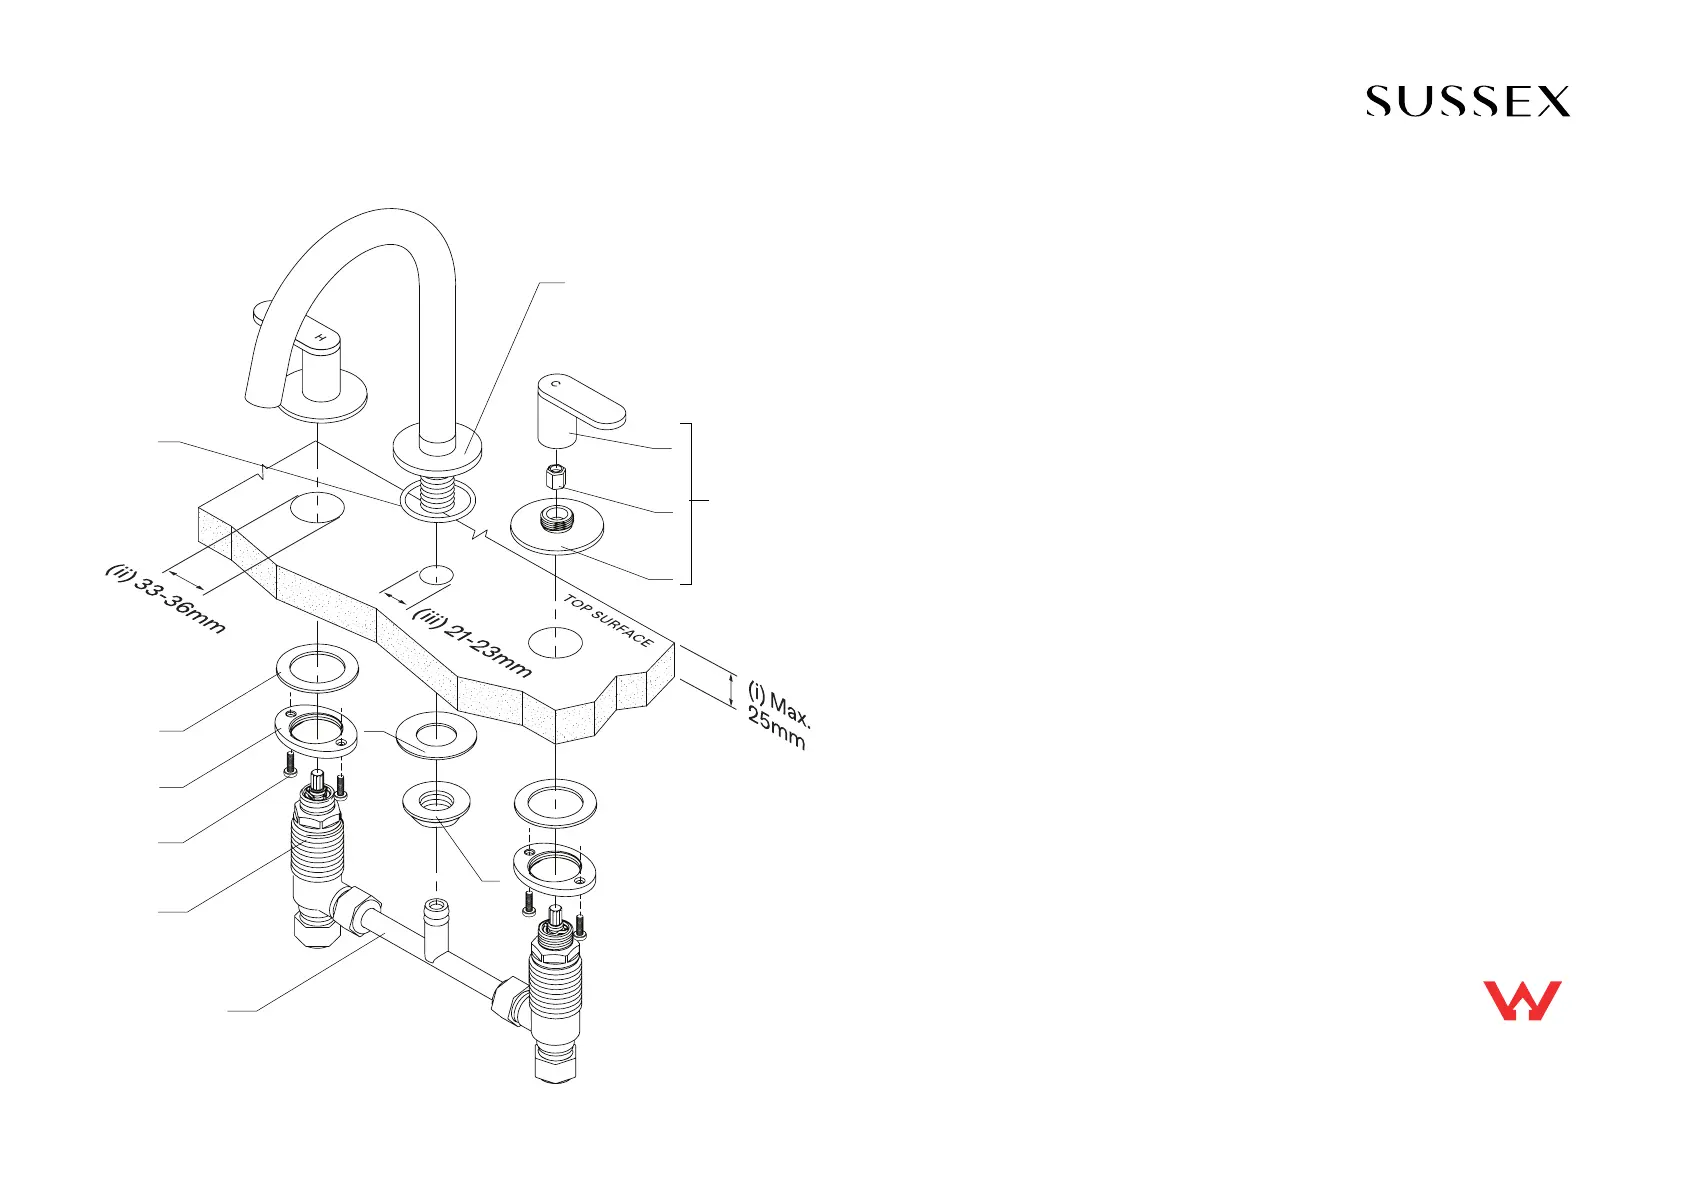
-Ensure Maximum bench thickness is (i) 25mm.
-Standard Spindles are supplied pre-installed into basin bodies and do not need to be seperated.
-Handle holes should be between (ii) 33mm and 36mm diameter to allow for spindle clearance.
-The clearance hole for the outlet should be between (iii) 21mm and 23mm.
-In order to install the basin bodies under the bench, temporarily unscrew the top set of the basin body locknuts
(E) and basin body clamping washers (D) and set aside.
-Seperate Handle Assembly (B) prior to install.
-Tapware is to be installed by a Licensed Plumber in accordance with AS/NZS 3500:2021
-Recommended working water pressure 300 - 500 Kpa. Maximum water temperature is 65°C
-After installation, ensure that tapware functions correctly without leaks.
-Please ensure a copy of the Installation Instructions are left with the end user for future reference.
DBS
DBSHS
Duet
Basin set
Product code
Rough-in:
Plumber note
D
-(A) Basin Outlet.
-(B) Handle Assembly (consisting of B1 - Handle, B2 - Spindle Adapter and B3 - Dress Ring).
-(C) Outlet O-Ring.
-(D) Basin Body Clamping washer.
-(E) Basin Body Locknut.
-(F) Phillips Head Screw.
-(G) Basin Body Assembly
-(H) Tee-piece.
-(I) Outlet Locknut
-(J) Outlet Clamping Washer
Product parts
H
I
J
E
F
G
B1
B
B3
B2
A
C
While we aim to ensure the specifications shown are correct at time of printing, Sussex Taps reserves the right to make modifications without prior notice.
Always use the physical product for accurate measurements. Dimensions are subject to change without notice. All measurements are shown in millimetres.
Copyright © Sussex Taps sussextaps.com.au
Termékspecifikációk
| Márka: | Sussex |
| Kategória: | Wekkerradio |
| Modell: | DBSHS |
Szüksége van segítségre?
Ha segítségre van szüksége Sussex DBSHS, tegyen fel kérdést alább, és más felhasználók válaszolnak Önnek
Útmutatók Wekkerradio Sussex

8 Április 2025
8 Április 2025
8 Április 2025
8 Április 2025
8 Április 2025
8 Április 2025
25 Szeptember 2024
25 Szeptember 2024
29 Augusztus 2024
29 Augusztus 2024
Útmutatók Wekkerradio
Legújabb útmutatók Wekkerradio
8 Április 2025
8 Április 2025
8 Április 2025
8 Április 2025
8 Április 2025
8 Április 2025
8 Április 2025
7 Április 2025
7 Április 2025
5 Április 2025