Használati útmutató TeachLogic Voicelink Plus
TeachLogic
nincs kategorizálva
Voicelink Plus
Olvassa el alább 📖 a magyar nyelvű használati útmutatót TeachLogic Voicelink Plus (2 oldal) a nincs kategorizálva kategóriában. Ezt az útmutatót 18 ember találta hasznosnak és 9.5 felhasználó értékelte átlagosan 5.0 csillagra
Oldal 1/2
Quick Start Guide
Getting to Kno our Sound System w Y
Make note of the location of the speakers and ceiling sensor in
your classroom. Ensure that you have unpacked and charged
your battery-powered microphones. Keep this guide handy
for future reference.
Please note that some amplifier/receiver controls will differ.
Refer to their markings, user manual, or our teachlogic.com
for more information on their function.
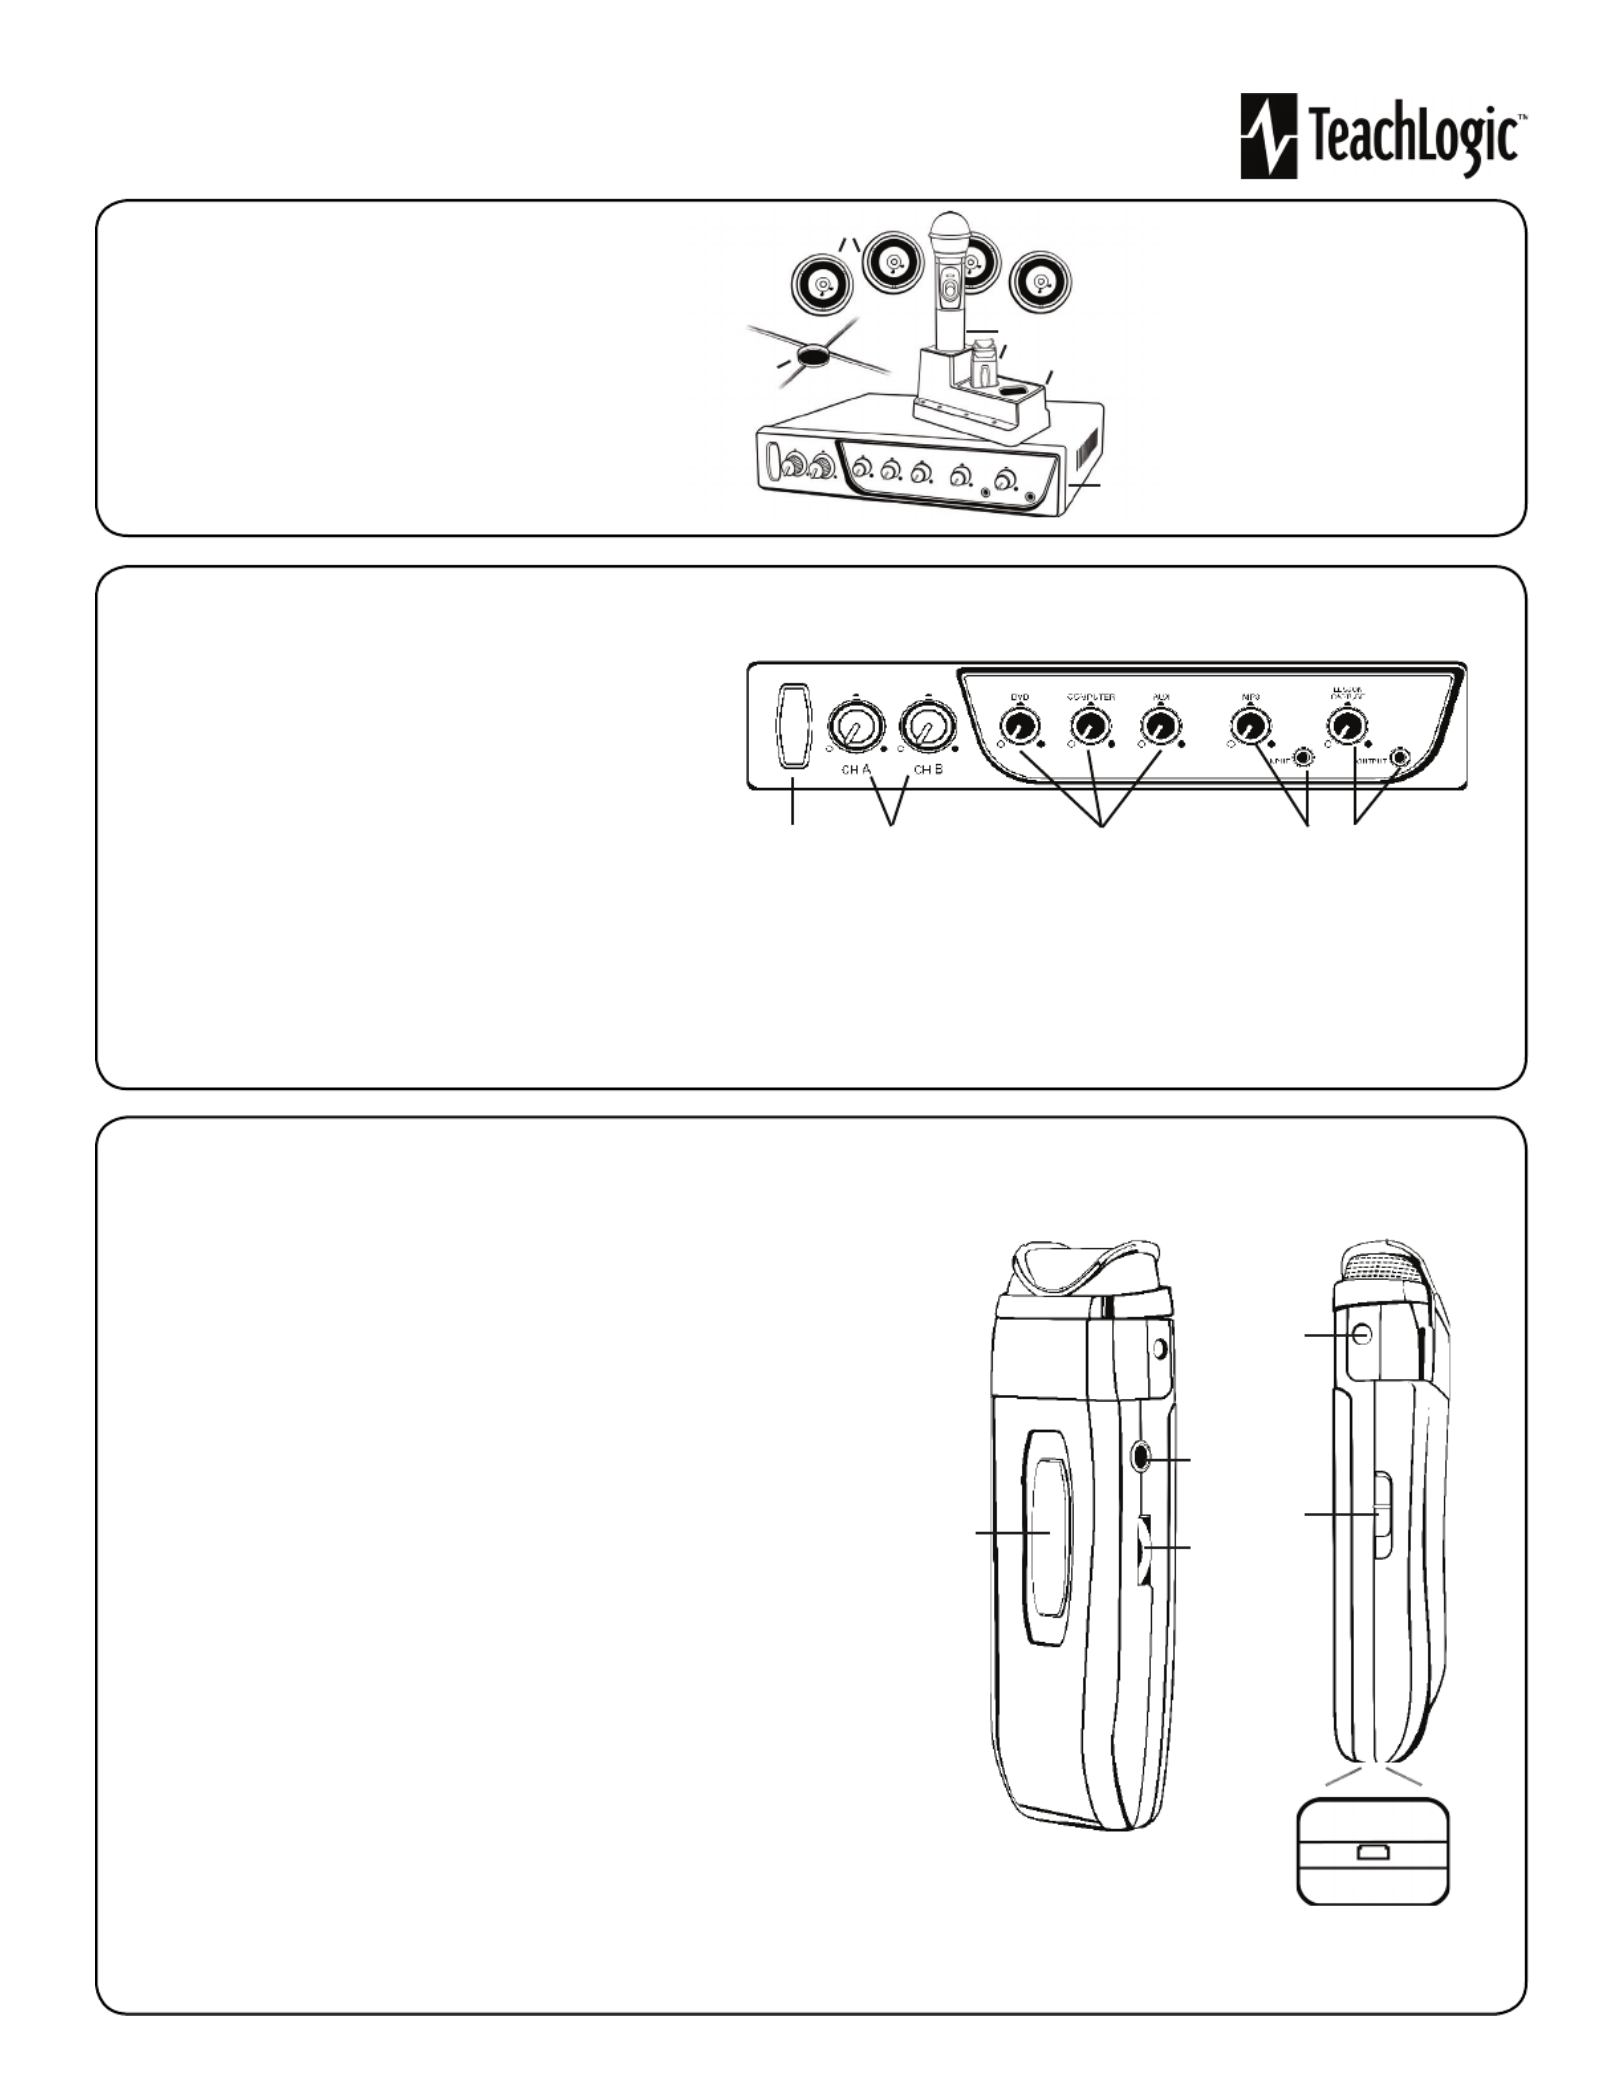
STEP 1. USING THE AMPLIFIER/RECEIVER
1. Speakers
2. Ceiling Sensor
3. Wireless Microphones
4. Microphone battery
charger
5. Receiver/Ampli er
1. Power & Status Indicator
• Red: OFF
• Blue: ON and activated
• Amber: STANDBY
2. Mic Channels/Volume Controls
• Green light: Microphone on and connected to
channel
• No light: Microphone is not on; and/or sensor is not plugged
in; and/or sensor is not receiving mic signal
3. Input Volume Controls
• Controls volume of connected external
devices
1 2 3 4 5
4. Input Jack and Volume Control
• Connects additional external devices to the system (ex. iPhone or mp3 player)
5. Output Volume Control and Output Jack
• Connects devices for recording lessons
(1)
1
2
3
4
5
STEP 2. USING THE SAPPHIRETM PENDANT MICROPHONE
1. Power button and status indicator
• Solid Red: OFF
• Solid Blue: ON
• Solid Purple: External devices quieted
2. Mute microphone: Brie y press power button once ( ashing blue).
Unmute microphone: Brie y press power button again (solid blue).
3. Aux Input: Connects devices (like music player) to microphone.
4. Priority Switch: Changes volume of devices plugged into amp inputs
• To increase/decrease volume level: Slide button up or down
• To immediately quiet volume level of external device: Push button once
• To resume volume level of external device: Push button again
5. Activate Security Alert Feature (when available)
• Hold Priority Switch down for 5 seconds. The power light on the amp will ash green,
then return to solid blue.
6. Gain Switch
• There are 3 levels to adjust your microphone volume.
• Set gain at “Normal”. You may reduce the volume by setting it to -3dB or -6bD if your
mic is too loud.
7. Lanyard attachments
• Microphone should rest where your collar bones meet.
8. USB Charge Port (found on the bottom of the mic)
1
2
3
4, 5
8
6
7
Termékspecifikációk
| Márka: | TeachLogic |
| Kategória: | nincs kategorizálva |
| Modell: | Voicelink Plus |
Szüksége van segítségre?
Ha segítségre van szüksége TeachLogic Voicelink Plus, tegyen fel kérdést alább, és más felhasználók válaszolnak Önnek
Útmutatók nincs kategorizálva TeachLogic

3 Augusztus 2024

29 Július 2024

28 Július 2024

25 Július 2024

21 Július 2024

19 Július 2024

10 Július 2024
Útmutatók nincs kategorizálva
- nincs kategorizálva Max
- nincs kategorizálva Götze & Jensen
- nincs kategorizálva RAVPower
- nincs kategorizálva TSC
- nincs kategorizálva Franken
- nincs kategorizálva Gewiss
- nincs kategorizálva Deltex
- nincs kategorizálva Silva
- nincs kategorizálva Therm-a-Rest
- nincs kategorizálva Thames & Kosmos
- nincs kategorizálva Crofton
- nincs kategorizálva Edsyn
- nincs kategorizálva Focus Electrics
- nincs kategorizálva Integra
- nincs kategorizálva Brennenstuhl
Legújabb útmutatók nincs kategorizálva

10 Április 2025

10 Április 2025

10 Április 2025

9 Április 2025

9 Április 2025

9 Április 2025

9 Április 2025

9 Április 2025

9 Április 2025

9 Április 2025