Használati útmutató Vimtag P1-S
Vimtag
Térfigyelő kamera
P1-S
Olvassa el alább 📖 a magyar nyelvű használati útmutatót Vimtag P1-S (2 oldal) a Térfigyelő kamera kategóriában. Ezt az útmutatót 16 ember találta hasznosnak és 8.5 felhasználó értékelte átlagosan 4.9 csillagra
Oldal 1/2
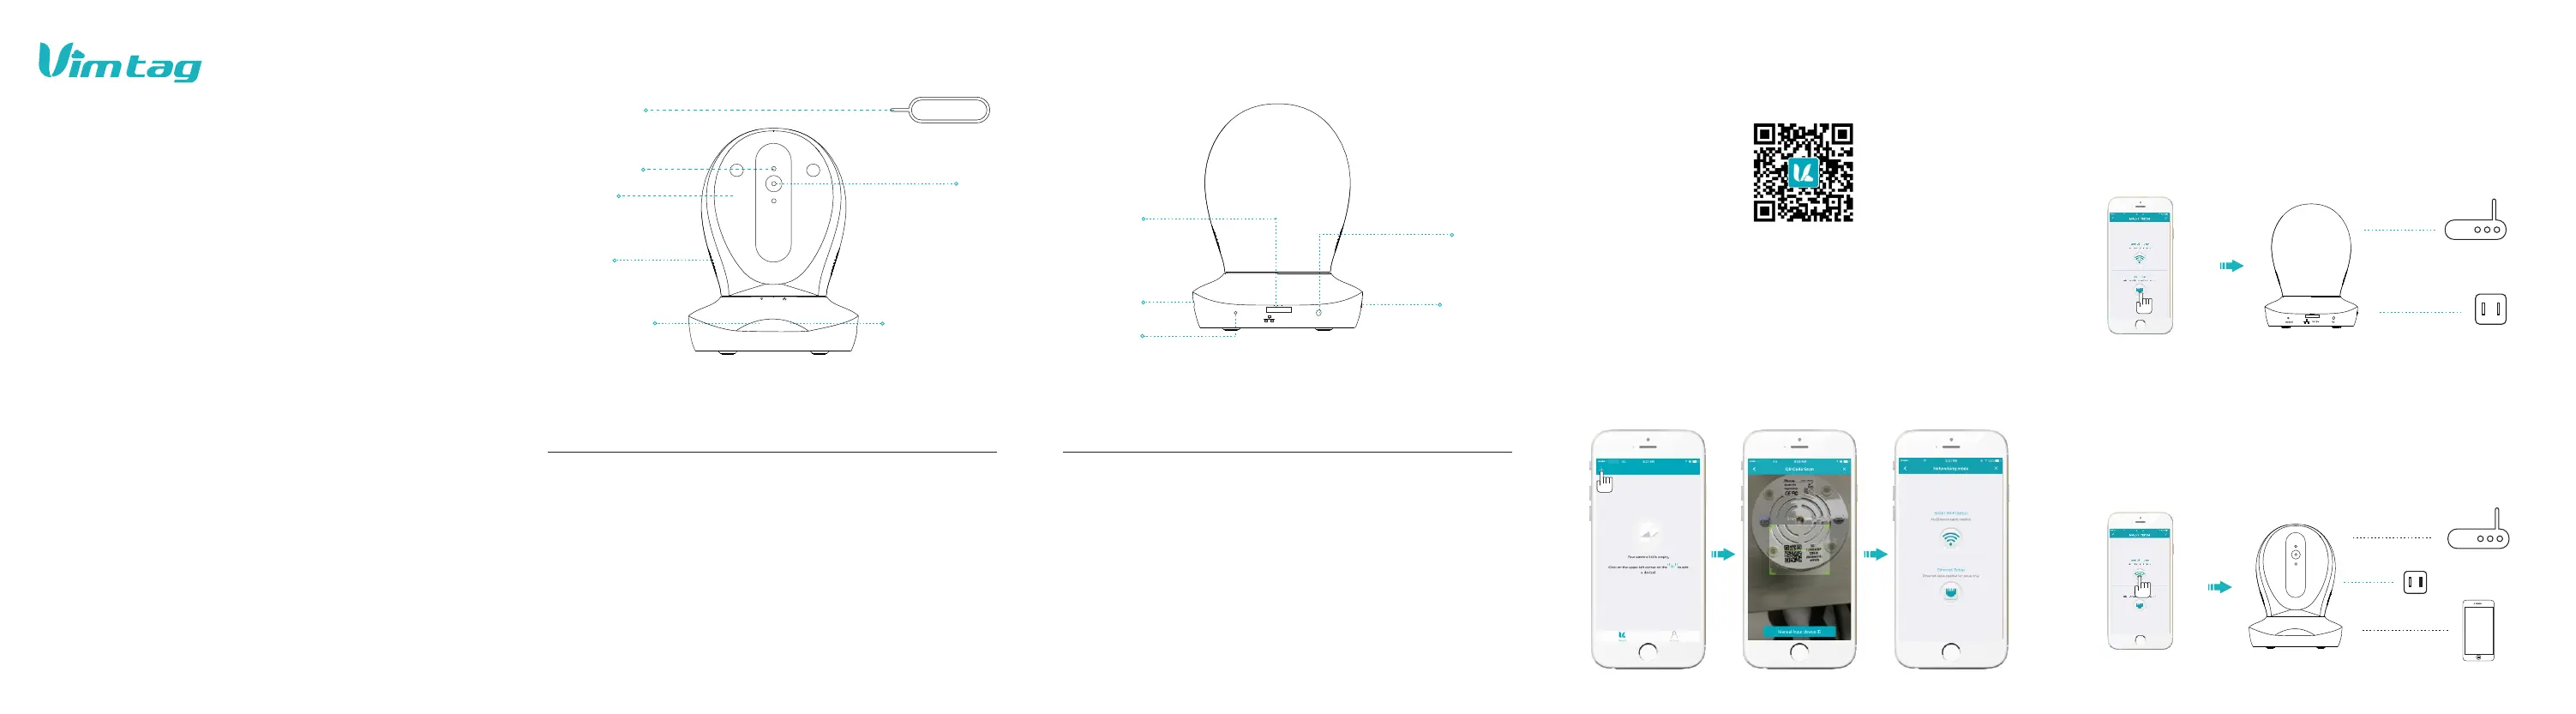
Lens
IR LEDS
IR LEDS
Light Sensor
Light Sensor
Speaker
Speaker
Microphone
Microphone
Adapter
Micro SD
Card Slot
Micro SD Card Slot
FN Button
FN Button
RESET
Infrared light adjustment.
Audio from the APP side.
Supply light under low-light condition
To connect Ethernet and Power.
Transfer the voice to vimtag APP.
Reserved function key.
Support Micro SD Card Storage ( up to 64G).
Long press RESET button when device is running
normal and after hear the hint tone, device will restore
factory settings and restart
Product Diagram
Adapter
RESET
RESRT
DC 5V
FN
Cloud IP Camera
P1 Series
Quick Installation Guide
Description Introduction Description Introduction
Thank you for using Vimtag Cloud IP Camera, Please
follow these steps.
Ethernet Indicator
Light
Wi-Fi Indicator
Light
Green light flashes 3 times that shows Ethernet
connection successfully.
Green light flashes 3 times that shows Wi-Fi
connection successfully.
Ethernet Indicator
Light
Wi-Fi Indicator
Light
Reset needle For clicking the reset hole
Reset needle
‘Vimtag’ APP Installation
A.Scan 'Vimtag' APP QR code.
B. Download 'Vimtag' APP from APP Store(iOS ) or Play Store(Android).
Note: PC users pls download it as:http://vimtag.com/download/
Add Camera to APP
Power
Router
Phone
Router
Power
1. Connect cable and click the Ethernet icon.
2. When Ethernet indicator light flashes three times in green every three seconds,
which means the camera is connected to network successfully.
Method 1: Ethernet connection
Method 2: Wi-Fi connection
Network Connection
V1.1
Click the Wi-Fi connection icon, operate it uder the APP instrutions.
Note: please press RESET button for 1 second before operate, then can enter
the Wi-Fi configuration mode.
1. Assemble the camera and connect to power, download the Vimtag APP, then
register an account and login in.
2. Enter 'Device List' and click '+' icon at the top of left corner. Then scan the QR
code (or enter the ID code in the lable directly) to finish the 'add devices'.
Termékspecifikációk
| Márka: | Vimtag |
| Kategória: | Térfigyelő kamera |
| Modell: | P1-S |
Szüksége van segítségre?
Ha segítségre van szüksége Vimtag P1-S, tegyen fel kérdést alább, és más felhasználók válaszolnak Önnek
Útmutatók Térfigyelő kamera Vimtag

27 Augusztus 2024

27 Augusztus 2024
Útmutatók Térfigyelő kamera
- Térfigyelő kamera Alula
- Térfigyelő kamera August
- Térfigyelő kamera Abus
- Térfigyelő kamera Philips
- Térfigyelő kamera Swann
- Térfigyelő kamera Ecobee
- Térfigyelő kamera Linear PRO Access
- Térfigyelő kamera LogiLink
- Térfigyelő kamera I3International
- Térfigyelő kamera REVO
- Térfigyelő kamera Nextech
- Térfigyelő kamera Schneider
- Térfigyelő kamera BirdDog
- Térfigyelő kamera INSTAR
- Térfigyelő kamera Tecno
Legújabb útmutatók Térfigyelő kamera

6 Április 2025

5 Április 2025

5 Április 2025

15 Január 2025

14 Január 2025

13 Január 2025

13 Január 2025

13 Január 2025

13 Január 2025

13 Január 2025