Használati útmutató AudioControl A800.1
AudioControl
Vevő
A800.1
Olvassa el alább 📖 a magyar nyelvű használati útmutatót AudioControl A800.1 (16 oldal) a Vevő kategóriában. Ezt az útmutatót 27 ember találta hasznosnak és 14 felhasználó értékelte átlagosan 4.0 csillagra
Oldal 1/16

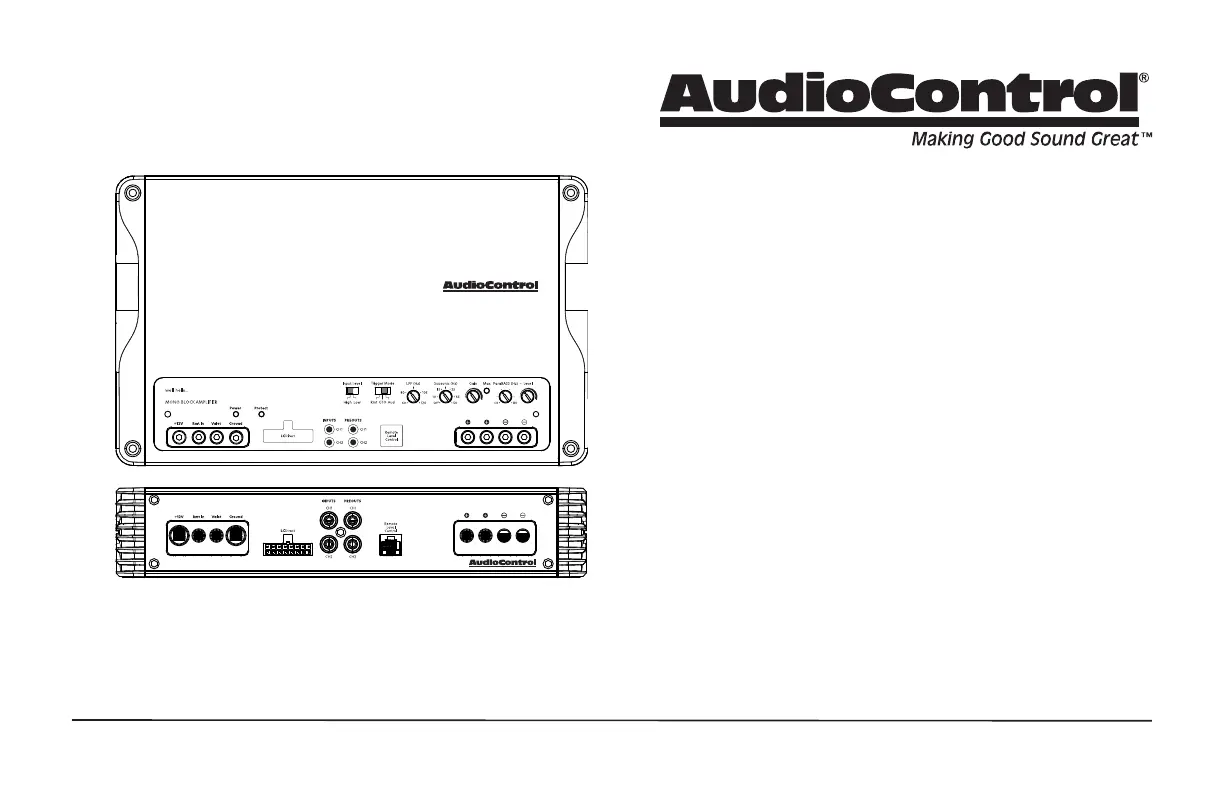
Mono-Block Amplifier
Quick Start Guide
Features
• 1 x 400 W @ 4Ω, 1 x 600 W @ 2Ω, 1 x 800+ W @ 1Ω
• High Current Design
• 2 RCA Line Outputs
• GTO
TM
and Audio Signal Sense
• Variable low pass filter (12 dB/oct Linkwitz-Riley)
• Variable subsonic filter (24 dB/oct Linkwitz-Riley)
• ParaBASS® Low Frequency Contouring
• Optional wired ACR-1 remote level control for Subwoofer
• Valet Mode Enabled
• LC Direct High Level Input
• Start/stop compliant
• EV compliant up to 17V
• Sleek Chassis Design
A800.1
A800.1
A800.1

2
Quick Start Guide
A800.1
Important Safety Instructions
1. Read these instructions.
2. Keep these instructions.
3. Heed all warnings.
4. Follow all instructions.
5. Do not use this apparatus near water.
6. Clean only with a dry cloth.
7. Do not block any ventilation openings. Install in accordance with the
vehicle manufacturer’s instructions.
8. Do not install near any heat sources such as mufflers, silencers, exhaust
pipes, or other apparatus (including amplifiers) that produce heat.
9. WARNING: Improper installation may lead to permanent injury or death.
Installation of the apparatus must be done with great care by qualified
personnel, to prevent damage to fuel lines, power, and other electrical
wiring, hydraulic brake lines, and other systems, that might compromise
vehicle safety.
10. Provide +12V and Ground quality insulated OFC wiring to ensure
adequate current to the amplifier. See page 15 for recommended wire
gauge.
11. Use rubber grommets to protect wiring whenever passing wires through
metal openings or bulkheads.
12. Only use attachments/accessories specified by the manufacturer.
13. Refer all servicing to qualified service personnel. Servicing is required
when the apparatus has been damaged in any way, such as the power in-
put terminals are damaged, liquid has been spilled or objects have fallen
into the apparatus, the apparatus has been exposed to rain or moisture,
does not operate normally, or has been dropped.
14. This apparatus shall not be exposed to dripping or splashing, and no
object filled with liquids, shall be placed on the apparatus.
15. Fuses inside the fuse holder at the battery shall be replaced only with the
correct type and fuse value, and only when the apparatus is powered off.
16. Exposure to high sound pressure levels may lead to permanent hearing
loss. Take every precaution to protect your hearing.
The lightning flash with arrowhead symbol within an equilateral
triangle is intended to alert the user to the presence of uninsulated
“dangerous voltage” within the product’s enclosure, that may be of
sufficient magnitude to constitute a risk of electric shock to persons.
The exclamation point within an equilateral triangle is intended to
alert the user of the presence of important operating and mainte-
nance (servicing) instructions in the literature accompanying the
appliance.
Caution: to reduce the risk of electric shock, do
not disassemble the apparatus, other than to
remove the top panel to access the controls.
There are no user-serviceable parts inside. Refer
servicing to qualified personnel.
Recycling notice: If the time comes and this apparatus has fulfilled
its destiny, do not throw it out into the trash. It has to be carefully
recycled for the good of mankind, by a facility specially equipped
for the safe recycling of electronic apparatii. Please contact your
local or state recycling leaders for assistance in locating a suitable
nearby recycling facility. Or, contact us and we might be able to
repair it for you.

3
A800.1
1. Power Input Terminal +12V – This screw terminal connects to
the +12V battery binding post of the vehicle. Use quality insulated
OFC wire (see page 15 for recommended wire gauge).
2. Remote Power Input Terminal – This screw terminal connects to
the 12V remote trigger output of some head units. When the head
unit is turned on, then the A800.1 will turn on.
3. Valet Mode Connection - This screw terminal connects to an op-
tional switch to lower the max volume to 25% when switched on.
4. Power Input Terminal Ground – This screw terminal connects to
a good ground connection on the vehicle. Use quality insulated
OFC wire (see page 15 for recommended wire gauge).
5. LC Direct – The speaker-level output (20V MAX) from factory in-
stalled radios can connect here. Do not use these inputs if you are
using the RCA line-level inputs. For factory amplified systems, use
an AudioControl active line output converter (like the LC2i PRO).
6. RCA Analog Line-Level Inputs – The line-level output from an
aftermarket head unit can connect here. Do not use these inputs
if you are using the speaker-level inputs (LC Direct).
7. RCA Analog Line-Level Outputs – The line-level output can
supply signal to additional amplifiers as needed.
8. Remote Level Control (optional) – This port connects to the
ACR-1 remote level control.
9. Speaker-Level Output Terminals – These screw terminals con-
nect with speaker wire to the subwoofer, or multiple subwoofers.
Connection Panel Features
1 2 3 4 5 6 7 8 9
Termékspecifikációk
Márka: | AudioControl |
Kategória: | Vevő |
Modell: | A800.1 |
Szüksége van segítségre?
Ha segítségre van szüksége AudioControl A800.1, tegyen fel kérdést alább, és más felhasználók válaszolnak Önnek
Útmutatók Vevő AudioControl
6 Január 2025
6 Január 2025
5 Január 2025
5 Január 2025
5 Január 2025
29 December 2024
29 December 2024
29 December 2024
29 December 2024
4 Szeptember 2024
Útmutatók Vevő
- Vevő Artsound
- Vevő MXL
- Vevő Blackstar
- Vevő Tangent
- Vevő Monoprice
- Vevő Onkyo
- Vevő DAP
- Vevő Audizio
- Vevő Shanling
- Vevő Hughes & Kettner
- Vevő McIntosh
- Vevő Arcam
- Vevő Hotone
- Vevő Intelix
- Vevő Audiolab
Legújabb útmutatók Vevő
9 Április 2025
9 Április 2025
5 Április 2025
5 Április 2025
2 Április 2025
2 Április 2025
2 Április 2025
31 Március 2025
31 Március 2025
30 Március 2025