Használati útmutató Elro AS80SR11B
Olvassa el alább 📖 a magyar nyelvű használati útmutatót Elro AS80SR11B (5 oldal) a Biztonság kategóriában. Ezt az útmutatót 4 ember találta hasznosnak és 2 felhasználó értékelte átlagosan 4.5 csillagra
Oldal 1/5

1
Strobe
light &
red LED
Control Box –
hidden under
water proof cover
(below)
e
Control
box
cover
r
AS80SR11B
Solar Siren
Installation Instructions
General Introduction
The AS80SR11B is an outdoor siren powered by solar energy and rechargeable
battery. By its visible presence, the external siren indicates that an alarm system is
installed and deters intruders. In case of intrusion, it alerts the neighborhood by its
powerful 110 decibels piercing sound and a flashing red light
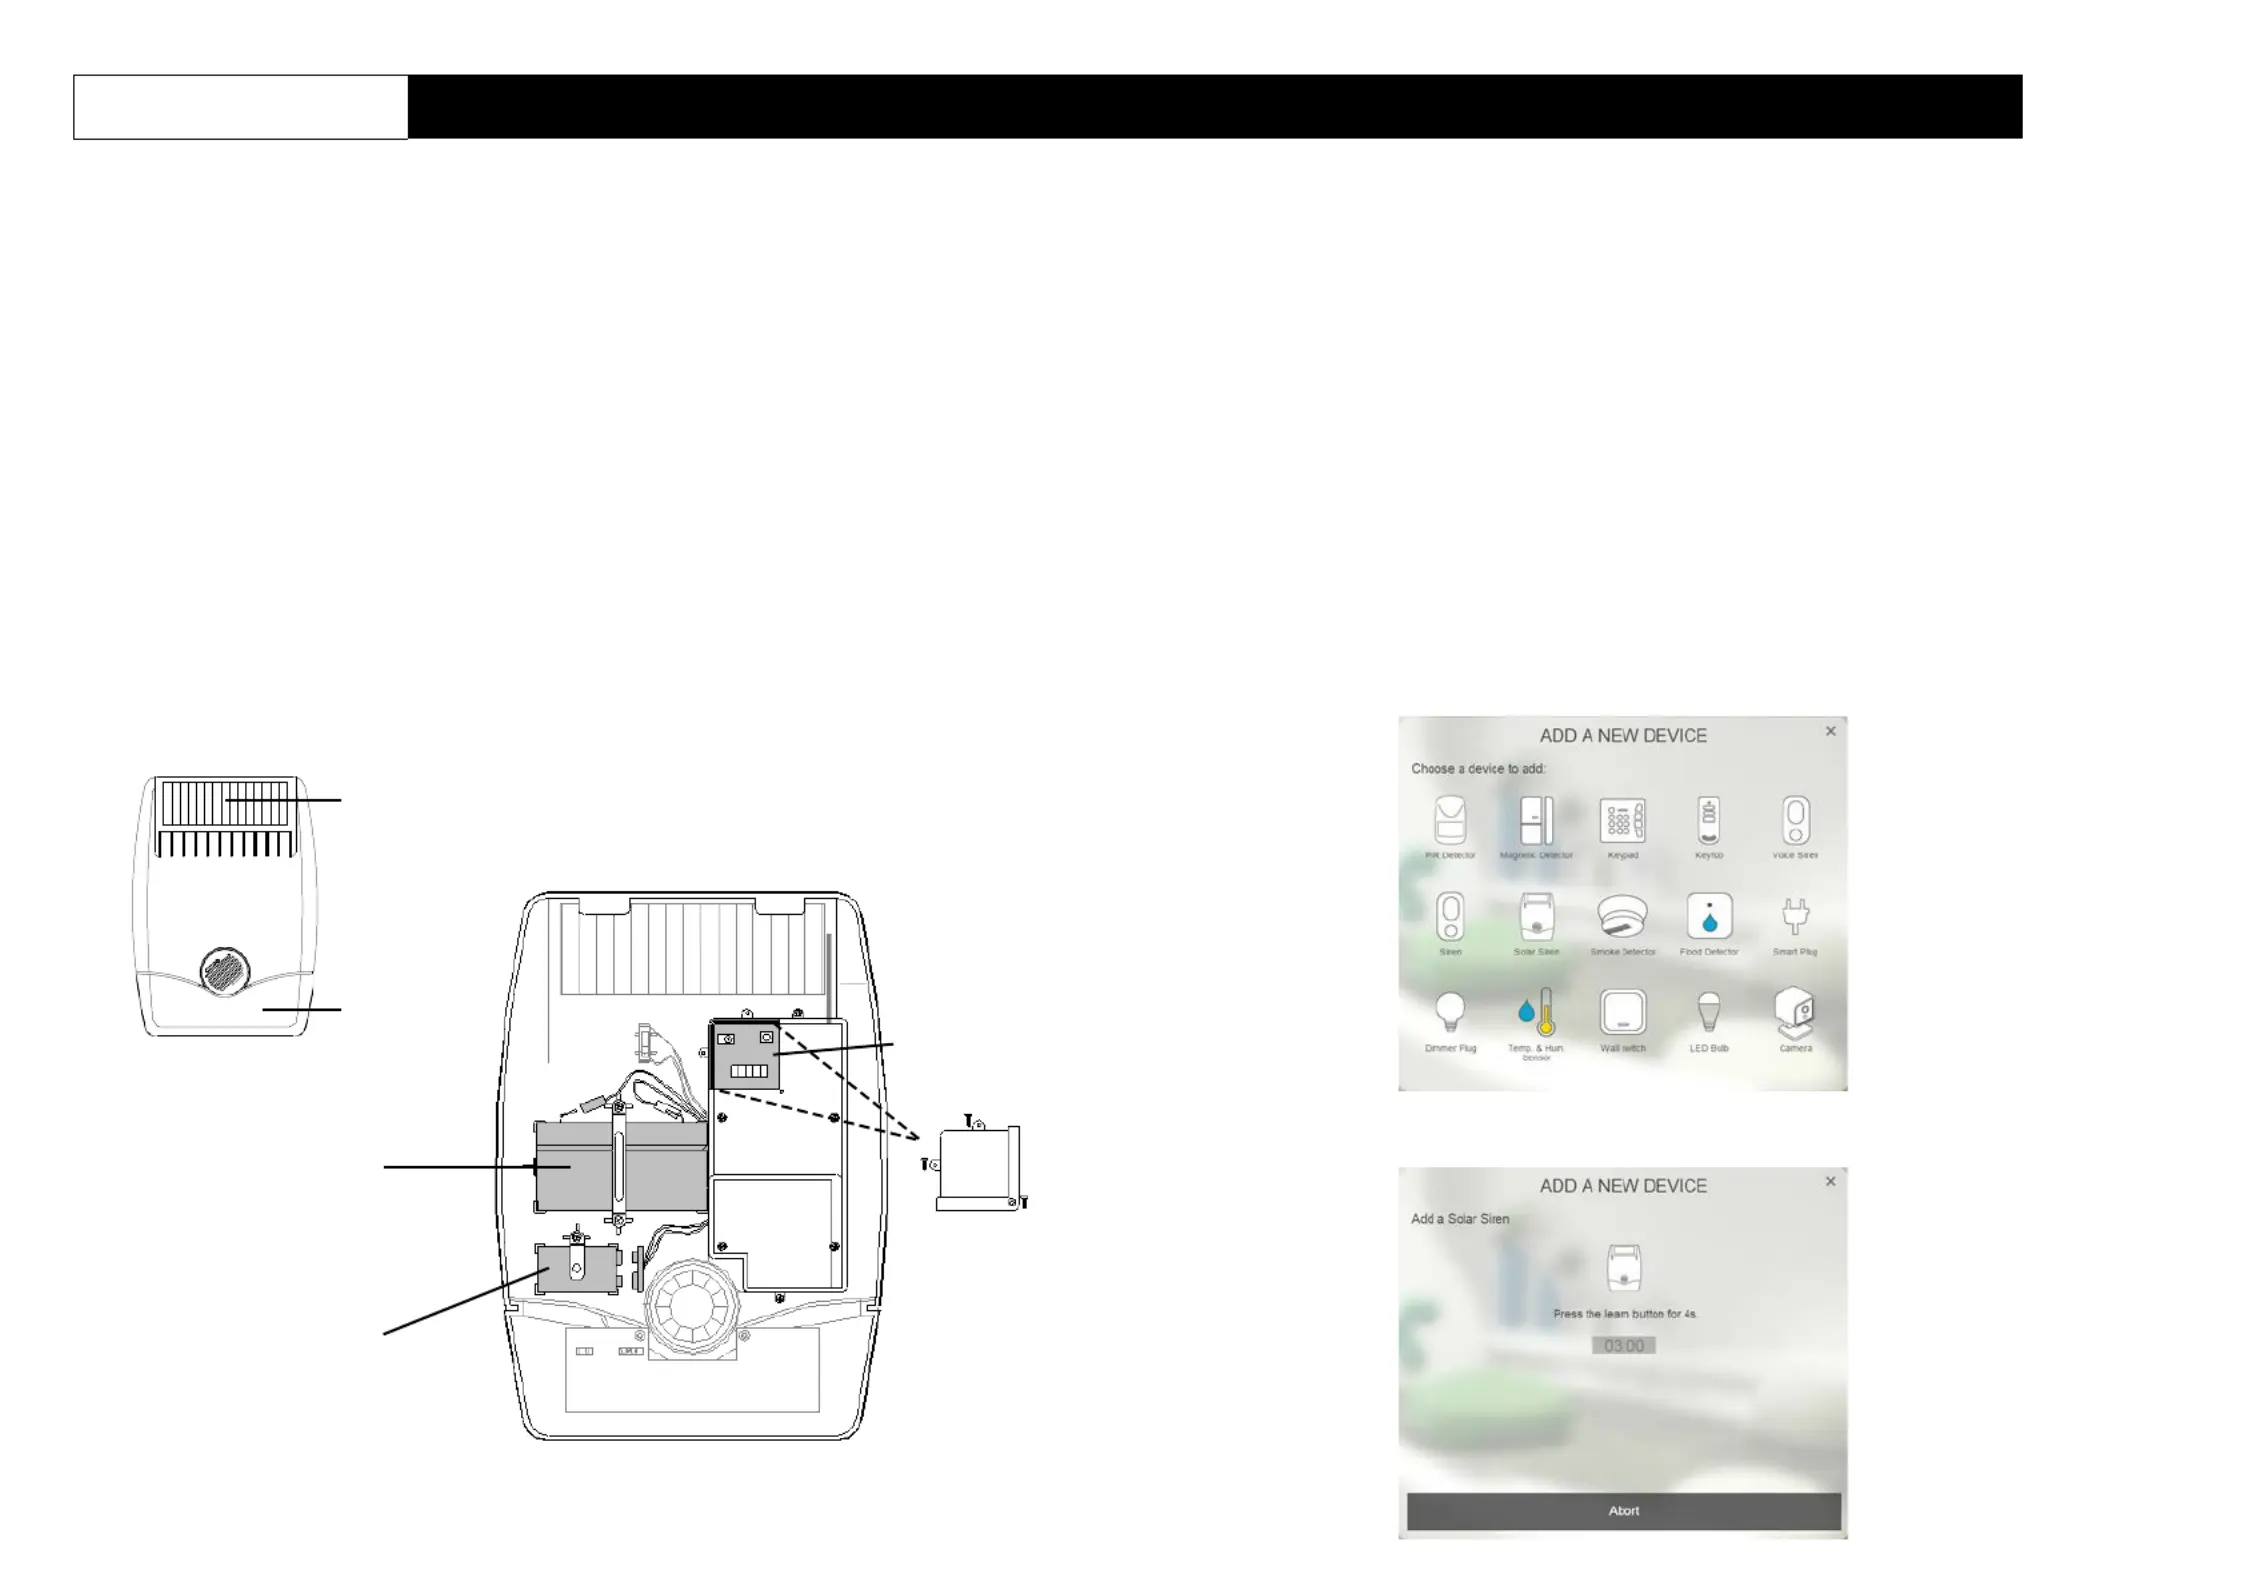
Product Overview
FRONT VIEW
Binding
1.
Open up the siren by removing the fixing screw from the bottom edge and carefully
peeling off the back cover. All electronic components are housed within the front
cover.
2.
A 9V Alkaline battery is supplied to boost the initial power to the unit when it is first
activated until the Solar Panel charges the main battery. Locate the battery clips of
this 9V battery but do not connect it up yet.
3.
Log into the ELRO Smart Home Alarm account from a web browser.
4.
Select “System”.
5.
Select “Add a New Device”, then “Solar Siren”.
Solar Panel
6V 1.2Ahr
rechargeabl
battery
9V initial powe
up battery
INSIDE VIEW OF SIREN MAIN BODY
(BACK COVER REMOVED)
6.
The following screen will appear. This means the gateway is entering binding mode.

2
7.
Connect the 9V battery to its battery clips to power up the siren.
8.
The screen below will appear in 10 seconds if the process is successful.
Note: Time-out will occur if the binding process was unsuccessful. Please refer to
the “Manual Binding” in the Troubleshooting section.
9.
Next connect the main rechargeable battery to the charging leads. Connect the
Red lead to the Red (+ve) terminal and the Black lead to the Black (-ve) terminals.
10.
The siren is now ready however do not refit the back cover just yet.
Operation & Testing
IMPORTANT: The loud sound level produced by this device will be deafening and
cause discomfort to the ear. Place the siren outdoors and do not stand in close
proximity to the siren.
Note: It is strongly advised to have the keyfob or keypad ready to quickly Disarm
the system to turn off the siren.
1.
Assemble the back cover back to the main body without screwing the fixing screw
at the bottom.
2.
Place the siren facing up on a flat surface so that the protruding tamper switch is
pressed.
3.
Set the system to Arm mode and trigger the alarm. The siren will emit a loud
piercing sound and the strobe light will flash brightly.
4.
Quickly disarm the system to stop the siren.
Mounting
The Siren should be mounted:
-
as high as possible in a prominent position so that it can be easily seen and heard.
-
on a flat surface so that the rear tamper switch is not easily activated. Ensure also
that the tamper switch does not fall into the recess between brick courses as this
could prevent the switch from closing and give a permanent tamper signal.
-
ideally on a south facing wall to receive optimum amount of sunlight, but an east or
west facing wall will also suffice. Avoid mounting on a north facing wall, and avoid
shadows cast by neighboring walls, trees, and roof overhangs.
-
at least 1 meter away from any external or internal metalwork which can affect its
radio transmission.
Installation
To install the siren on the wall, first affix its back cover on the wall and then followed by
mounting its main body onto the back cover.

3
1.
Remove the back cover again. Using the back cover itself as a template, position
the back cover on the wall and mark the positions of four mounting holes.
2.
Drill four 6mm holes and insert the wall plugs.
3.
Fit two 30mm fixing screws in the top holes leaving approximately 10mm of the
screw protruding.
4.
Place the top keyhole slots of the back cover over the screw heads. Adjust the
back cover position and adjust the screws until they form a neat fit with minimal
movement.
5.
Secure the back cover in position using the two 25mm fixing screws at the bottom.
Fit two 30mm fixing screws in
the top holes leaving
approximately 10mm of the
screw protruding
Secure back cover using
two 25mm fixing screws at
the bottom
6.
Before mounting the main body, ensure the waterproof cover of the Control box
has been secured back if it was removed earlier.
10.
To mount the main body, hinge the front cover tabs over the top edge of the back
cover and carefully push the base of the siren cover into place. Secure the main
body in place by refitting the fixing screw in the bottom edge of the cover. Do not
over tighten the screw as this could damage the thread.
IMPORTANT: Ensure that the rear tamper switch is closed when the main body is
fitted (i.e. listen for the switch to click). If the switch does not close, this will prevent
the Siren from operating correctly. If necessary, remove the main body again and
adjust the screw on the back cover tamper plunger to ensure the switch closes
when the siren is secured in position.
11.
Upon completion of mounting the main body on the wall, the Strobe LED will flash
about 3 seconds as an indication of normal operation.
Troubleshooting
The troubleshooting table lists some possible causes and solutions. Please contact
your original retailer or nearest service center if the below solutions cannot solve your
problem.
Symptom
Cause of Failure
Recommendation
LED cannot be
displayed
1.
Run out of battery
power.
2.
Check if reverse
battery polarity.
3.
Siren is out of order.
1.
Replace a new battery.
2.
Refit the battery with correct
polarity.
3.
Do not open the device and
send it for repairs.
The LED on the
siren is operating,
but it cannot be
operated
1.
Check if siren has
completed binding
with Homesys
Gateway
2.
The siren cannot
communicate with
the gateway.
Remove both the battery and
follow the steps for binding
with ELRO Smart Home Alarm
1.
Locate the siren closer to the
gateway.
Back
Cover
Termékspecifikációk
Márka: | Elro |
Kategória: | Biztonság |
Modell: | AS80SR11B |
Szüksége van segítségre?
Ha segítségre van szüksége Elro AS80SR11B, tegyen fel kérdést alább, és más felhasználók válaszolnak Önnek
Útmutatók Biztonság Elro

17 Szeptember 2024

17 Szeptember 2024

21 Augusztus 2024

21 Augusztus 2024

21 Augusztus 2024

17 Augusztus 2024

14 Augusztus 2024

11 Augusztus 2024

11 Augusztus 2024

8 Augusztus 2024
Útmutatók Biztonság
- Biztonság Nedis
- Biztonság Grundig
- Biztonság Bosch
- Biztonság Theben
- Biztonság Panasonic
- Biztonság Siemens
- Biztonság Medion
- Biztonság Geemarc
- Biztonság TRENDnet
- Biztonság EZVIZ
- Biztonság Technaxx
- Biztonság Eden
- Biztonság Hikvision
- Biztonság Netgear
- Biztonság Lamax
- Biztonság V-TAC
- Biztonság Doro
- Biztonság First Alert
- Biztonság Devolo
- Biztonság Powerfix
- Biztonság BaseTech
- Biztonság Edimax
- Biztonság Bavaria
- Biztonság Eufy
- Biztonság Overmax
- Biztonság Foscam
- Biztonság Alecto
- Biztonság Honeywell
- Biztonság Juwel
- Biztonság Velleman
- Biztonság Prestigio
- Biztonság Grandstream
- Biztonság Monacor
- Biztonság Blaupunkt
- Biztonság Easy Home
- Biztonság Abus
- Biztonság Trust
- Biztonság Marmitek
- Biztonság Fenton
- Biztonság Steinel
- Biztonság Trebs
- Biztonság Alphatronics
- Biztonság Velbus
- Biztonság Provision-ISR
- Biztonság Somfy
- Biztonság Axis
- Biztonság Optex
- Biztonság EasyMaxx
- Biztonság Smartwares
- Biztonság IGET
- Biztonság Kopp
- Biztonság Fysic
- Biztonság Ajax
- Biztonság AngelEye
- Biztonság Aritech
- Biztonság AceSee
- Biztonság Airbolt
- Biztonság Brennenstuhl
- Biztonság Alhua - Dahua
- Biztonság Yale
- Biztonság Tevion
- Biztonság Eminent
- Biztonság Axa
- Biztonság Maginon
- Biztonság Profile
- Biztonság Marquant
- Biztonság Jacob Jensen
- Biztonság Ednet
- Biztonság Perel
- Biztonság ME
- Biztonság Goliath
- Biztonság Audiovox
- Biztonság Nest
- Biztonság Grothe
- Biztonság LevelOne
- Biztonság Unitron
- Biztonság Netatmo
- Biztonság Goobay
- Biztonság Switel
- Biztonság Bticino
- Biztonság Topcraft
- Biztonság Secure Pro
- Biztonság Sygonix
- Biztonság Nemef
- Biztonság Dahua
- Biztonság BRK
- Biztonság Hagenuk
- Biztonság Waeco
- Biztonság Logicom
- Biztonság Jupiter Pro
- Biztonság Xavax
- Biztonság Elkron
- Biztonság Orbis
- Biztonság Niko
- Biztonság Gira
- Biztonság Jung
- Biztonság Interlogix
- Biztonság Dnt
- Biztonság Fito
- Biztonság Urmet
- Biztonság Ranex
- Biztonság Wanscam
- Biztonság Satel
- Biztonság Dymond
- Biztonság Notifier
- Biztonság Friedland
- Biztonság HomeWizard
- Biztonság Plustek
- Biztonság Golmar
- Biztonság Batavia
- Biztonság Storage Options
- Biztonság NetworX
- Biztonság Bitron Video
- Biztonság Zmodo
- Biztonság Elro-Flamingo
- Biztonság Electronics Line
- Biztonság One2track
- Biztonság HUMANTECHNIK
- Biztonság PIR Alarm
- Biztonság Heidemann
- Biztonság Directed Electronics
- Biztonság Oplink
- Biztonság BML
- Biztonság Unitec
- Biztonság Jablotron
- Biztonság Muller
- Biztonság Home8
- Biztonság AVTech - Velleman
- Biztonság Galaxy
- Biztonság Sonic Alert
- Biztonság I-onik
- Biztonság Smartalarm
- Biztonság GE Security
- Biztonság Microtech
- Biztonság Nor-tec
- Biztonság Entrya
- Biztonság Tegui
- Biztonság Stobo
- Biztonság Kompernass
- Biztonság Iiquu
- Biztonság Storex
- Biztonság Powermax
- Biztonság Woonveilig
- Biztonság Mikros
- Biztonság Bolyguard
- Biztonság Indexa
- Biztonság Skytronic
- Biztonság Paradox
- Biztonság Flamingo FA15RF
- Biztonság SecuFirst
- Biztonság BRK DICON
- Biztonság FBII
- Biztonság FlinQ
- Biztonság Dericam
- Biztonság Myfox
- Biztonság Kocom
- Biztonság RISCO Group
- Biztonság SmartHome
- Biztonság Bellman
- Biztonság Protector
- Biztonság I-Tel
- Biztonság Home Protector
- Biztonság Ksenia
- Biztonság Mr Safe
- Biztonság Epine
- Biztonság Inner Range
- Biztonság Dedicated Micros
- Biztonság Visonic
- Biztonság PROmax
- Biztonság Y-cam
- Biztonság Selvag
- Biztonság Voxx
- Biztonság Fracarro
- Biztonság Guardall
- Biztonság Xena
- Biztonság Smanos
- Biztonság One Concept
- Biztonság QuattSecure
- Biztonság NetBotz
- Biztonság Securitas
Legújabb útmutatók Biztonság

16 Január 2025

15 Január 2025

15 Január 2025

12 Január 2025

11 Január 2025

5 Október 2024

23 Szeptember 2024

23 Szeptember 2024

23 Szeptember 2024

22 Szeptember 2024