Használati útmutató StarTech.com PEX1S1P950
StarTech.com
nincs kategorizálva
PEX1S1P950
Olvassa el alább 📖 a magyar nyelvű használati útmutatót StarTech.com PEX1S1P950 (2 oldal) a nincs kategorizálva kategóriában. Ezt az útmutatót 13 ember találta hasznosnak és 7 felhasználó értékelte átlagosan 5.0 csillagra
Oldal 1/2
Quick-Start Guide
To view manuals, FAQs, videos, drivers, downloads, technical drawings, and more, visit www.startech.com/support.
Manual Revision: November 2, 2020
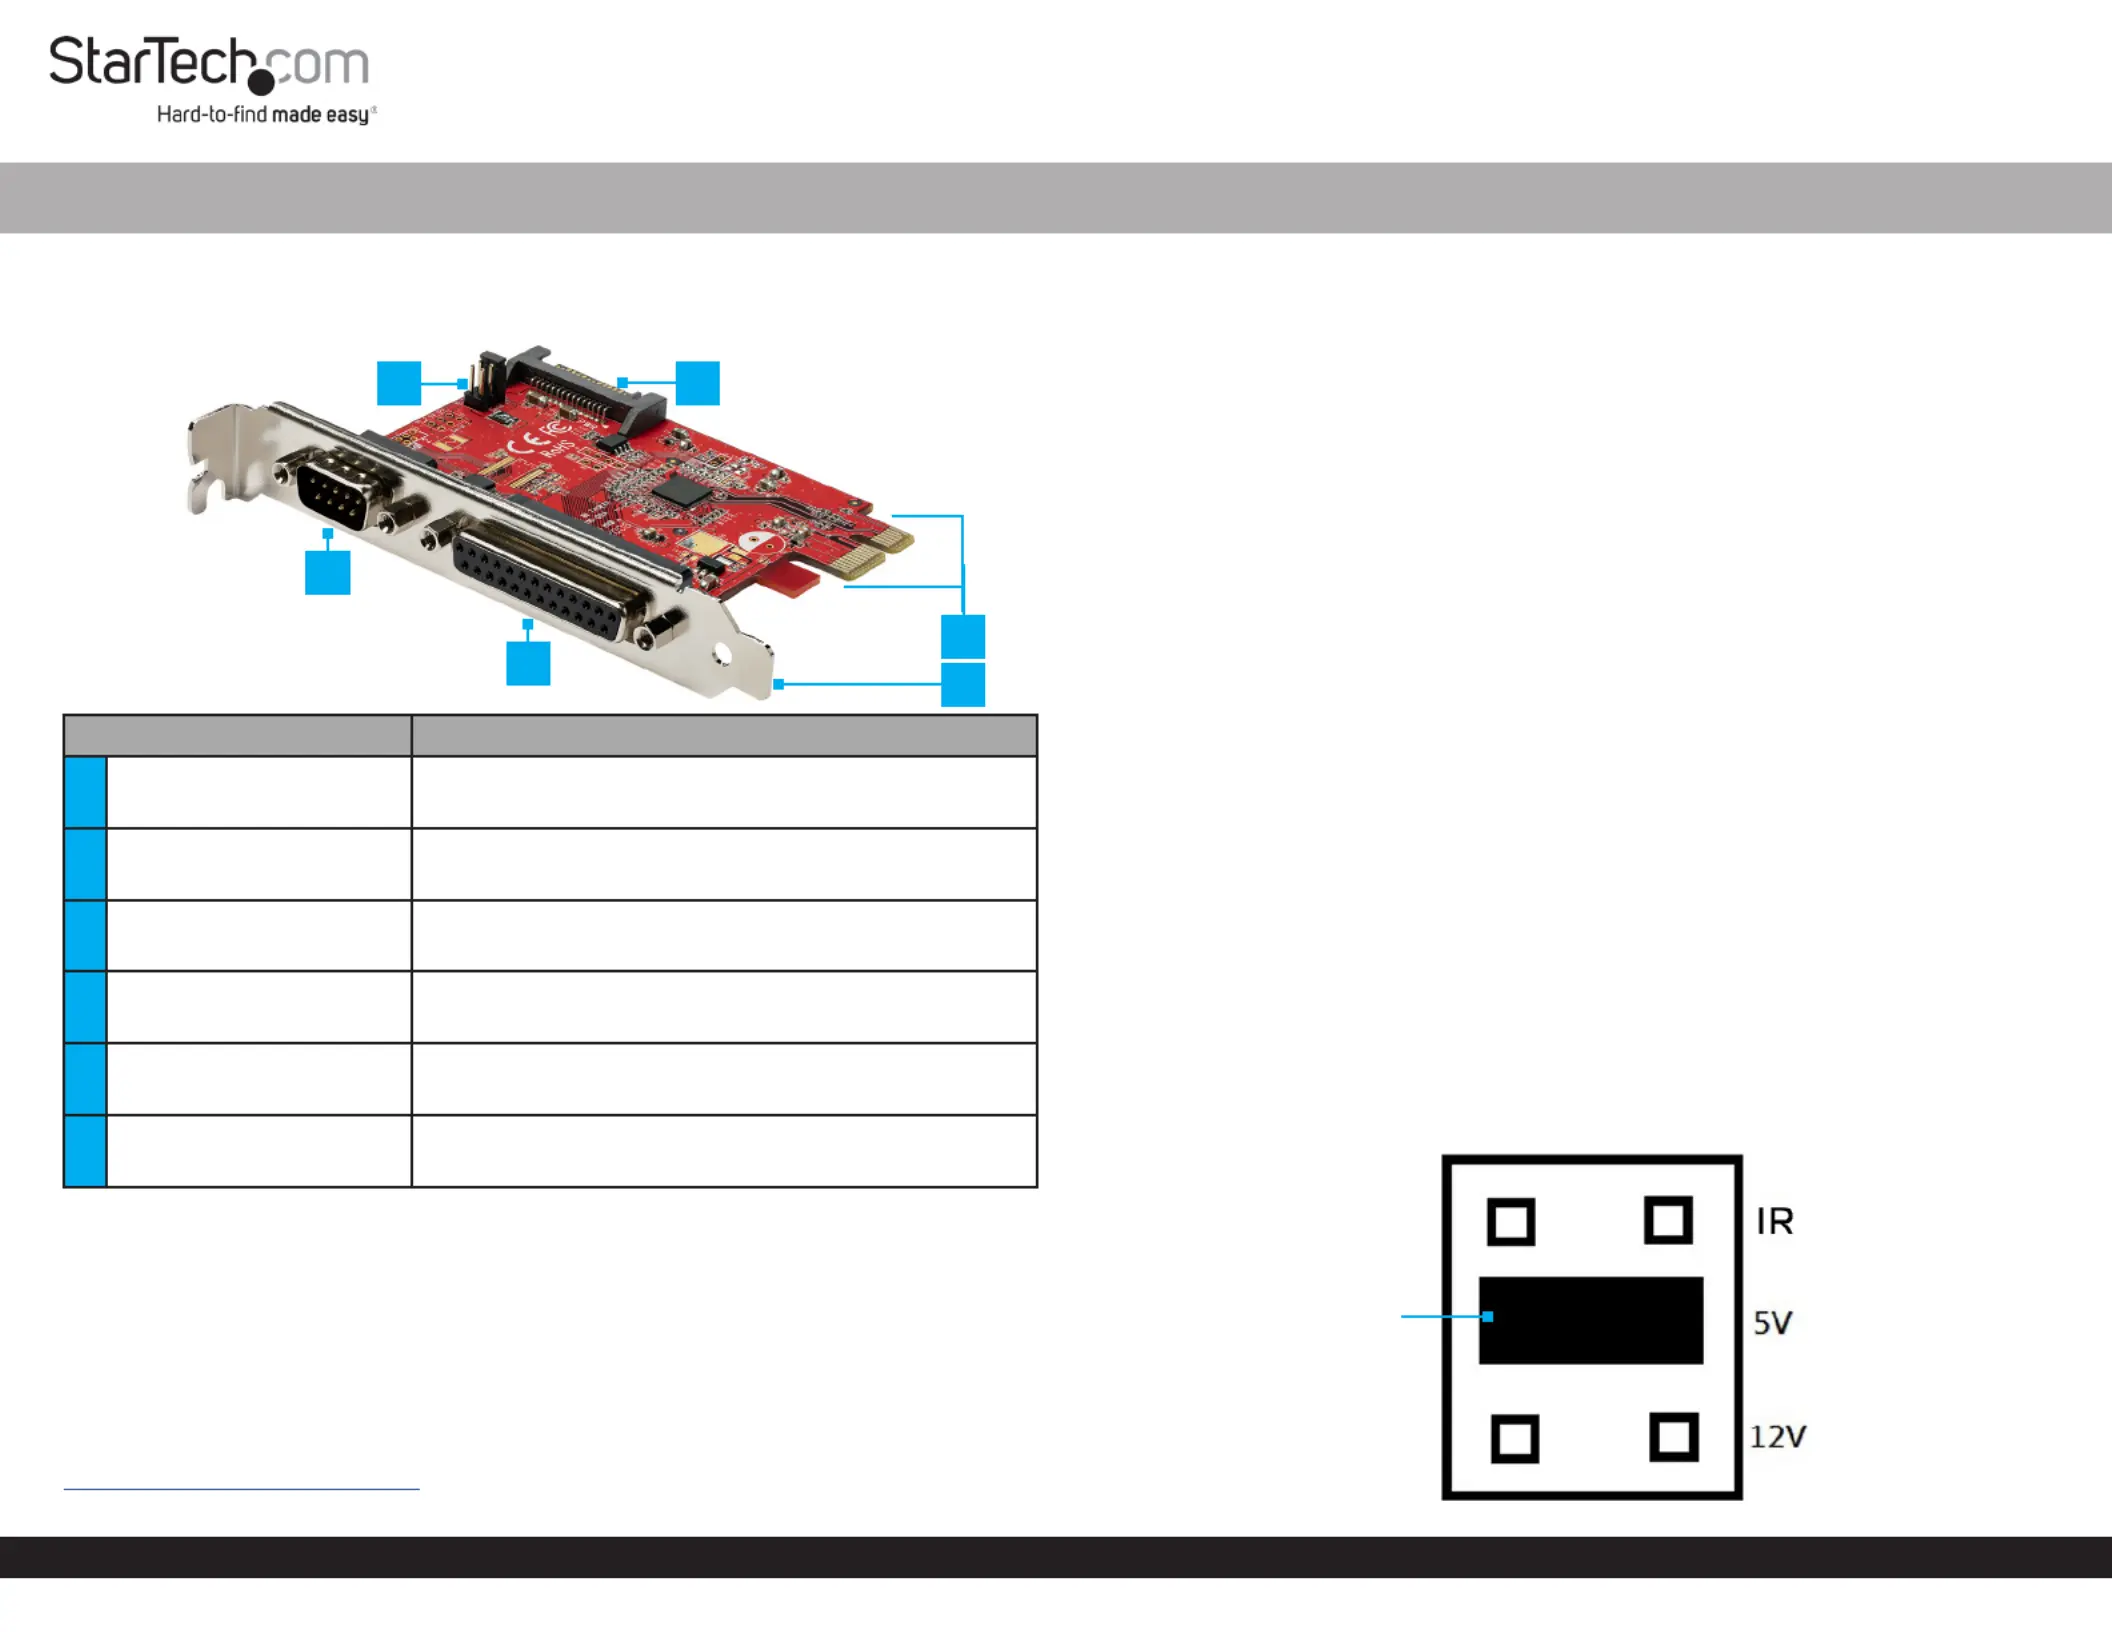
Product Diagram (PEX1S1P950)
Front Angle View
Port Function
1Serial Port
• Connect Serial Peripheral Devices
• DB-9 Parallel (Male)
2Jumper • Set the power output voltage for the Serial Port
3SATA Power Connector
• Connect to a SATA Power Source
• (Optional) Power the Serial Port
4Parallel Port
• Connect Parallel Peripheral Devices
• DB-25 Parallel (Female)
5PCIe Connector
• Connect the to the in PCIe Card PCI Express Slot
the Computer
6Bracket • For full prole installations
Package Contents
• Serial and Parallel PCI Express Card x 1
• Full Prole Bracket (Installed) x 1
• Quick-Start Guide x 1
Requirements
For the latest requirements, please visit:
www.startech.com/PEX1S1P950.
• Computer with an available PCI Express slot (x1)
1S1P Native PCI Express Serial Parallel Combo Card with 16C950 UART
Hardware Installation
Warning: PCIe Cards can be damaged by static electricity. Make sure that the
Installer Computer Case is properly grounded before they open the or touch the PCIe
Card. The should wear an when installing any computer Installer Anti-Static Strap
component. If an is not available, discharge any built-up static Anti-Static Strap
electricity by touching a large for several seconds. Only Grounded Metal Surface
handle the by its edges and do not touch the gold connectors.PCIe Card
Jumper Conguration
Note: This is specially designed to allow for power output from the ninth PCIe Card
pin of the for that support power over serial. Serial Port Serial Devices Jumper
conguration is a requirement when connecting that require power Serial Devices
through the .Serial Port
The can be moved into one of three dierent positions in order to set the Jumper
power output voltage for the . The default setting for the is , no Serial Port Jumpers RI
power. The must be connected after conguring the SATA Power Connector Jumper
to or of power. To congure the , complete the following:5V 12V Jumper
1. Ensure the isComputer Power O.
2. Locate and carefully remove the . Lift the straight up and o of the Jumper Jumper
PCIe Card.
Notes: The is located on the left-hand side, labeled as on the Jumper Serial 1
. Printed Circuit Board
Always hold the by the edges.Card
3. Determine the power setting that is required for the .Serial Port
4. Position the over the set of that correspond with the desired Jumper Pins Serial
Connector Power Setting Jumper. See to determine where the Figure 1 should be
positioned.
Figure 1
Jumper
5
1
3
4
6
2
Termékspecifikációk
| Márka: | StarTech.com |
| Kategória: | nincs kategorizálva |
| Modell: | PEX1S1P950 |
Szüksége van segítségre?
Ha segítségre van szüksége StarTech.com PEX1S1P950, tegyen fel kérdést alább, és más felhasználók válaszolnak Önnek
Útmutatók nincs kategorizálva StarTech.com

18 Március 2025

18 Március 2025

10 Január 2025

10 Január 2025

10 Január 2025

10 Január 2025

10 Január 2025

10 Január 2025

10 Január 2025

10 Január 2025
Útmutatók nincs kategorizálva
- nincs kategorizálva Steiner
- nincs kategorizálva Razorri
- nincs kategorizálva Schleich
- nincs kategorizálva SurgeX
- nincs kategorizálva Dostmann Electronic
- nincs kategorizálva Iogear
- nincs kategorizálva Ave Six
- nincs kategorizálva Loewe
- nincs kategorizálva Canyon
- nincs kategorizálva Altrad
- nincs kategorizálva Kwantum
- nincs kategorizálva V-Zug
- nincs kategorizálva Swift
- nincs kategorizálva Maxxter
- nincs kategorizálva Helios Preisser
Legújabb útmutatók nincs kategorizálva

10 Április 2025

10 Április 2025

10 Április 2025

9 Április 2025

9 Április 2025

9 Április 2025

9 Április 2025

9 Április 2025

9 Április 2025

9 Április 2025