Használati útmutató BlendMount BCB-2032
BlendMount
nincs kategorizálva
BCB-2032
Olvassa el alább 📖 a magyar nyelvű használati útmutatót BlendMount BCB-2032 (2 oldal) a nincs kategorizálva kategóriában. Ezt az útmutatót 13 ember találta hasznosnak és 7 felhasználó értékelte átlagosan 4.9 csillagra
Oldal 1/2
PART# BCB-2032
Blan
11111111111111111111111111
Innovative
Mounting
Solutions
!,cobra
7
28028
46395
8
LEFT HAND DRIVE VEHICLE
INSTALLATION INSTRUCTIONS FOR
THE
COBRA
DSP-9200BT, SPX-7800BTn700, SPX-6700, AND iRAD 900 RADAR DETECTOR
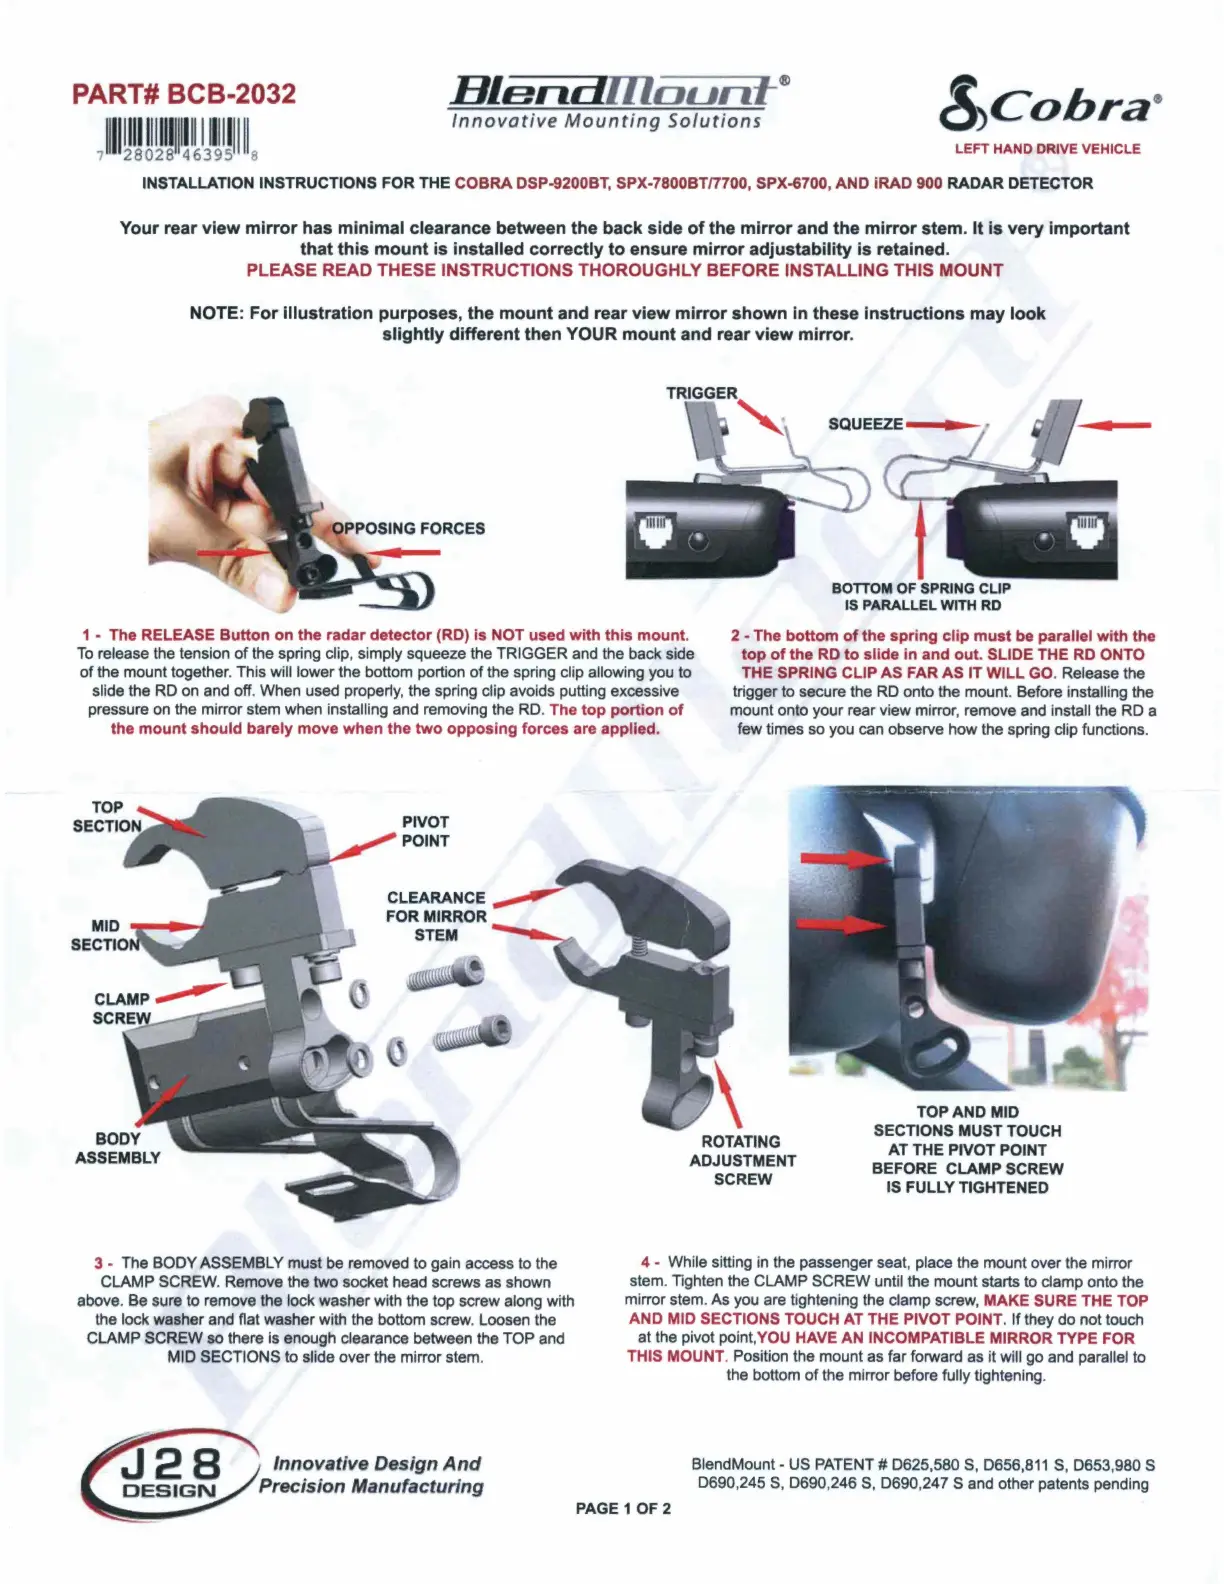
Your rear view
mirror
has minimal clearance between the back side
of
the
mirror
and the
mirror
stem.
It
is
very important
that
this
mount
is installed correctly
to
ensure
mirror
adjustability
is
retained.
PLEASE READ THESE INSTRUCTIONS THOROUGHLY BEFORE INSTALLING THIS MOUNT
NOTE: For illustration purposes, the mount and rear view mirror shown
in
these instructions may look
slightly different then YOUR mount and rear view mirror.
SQUEEZE
---
--
BOTTOM
OF
SPRING CLIP
IS PARALLEL WITH
RD
•
1 -
The
RELEASE Button on the radar detector (RD) is NOT used with this mount.
2 - The bottom
of
the spring clip must be parallel with the
top
of
the RD
to
slide in and out. SLIDE THE RD ONTO
THE SPRING CLIP AS FAR AS
IT
WILL
GO
.
Release
the
trigger
to
secure the
RD
onto the
mount.
Before installing
the
mount onto your rear view mirror,
remove
and
install
the
RD
a
few times
so
you
can
observe
how
the
spring clip functions.
To
release
the
tension of
the
spring clip, simply squeeze the
TRIGGER
and
the
back
side
of
the
mount
together.
This
will
lower the
bottom
portion of
the
spring clip allowing
you
to
slide
the
RD
on
and
off.
When
used
properly,
the
spring
clip
avoids putting excessive
pressure
on
the
mirror
stem
when
installing
and
removing
the
RO
. The top portion
of
the mount should barely move when the two opposing forces are applied.
CLEARANCE
FOR
MIRROR
STEM
3 -
The
BODY
ASSEMBLY
must
be
removed to gain
access
to
the
CLAMP
SCREW.
Remove
the two socket
head
screws
as
shown
above.
Be
sure
to
remove
the lock washer
with
the top screw
along
with
the lock washer
and
flat washer
with
the
bottom screw.
Loosen
the
CLAMP
SCREW
so
there
Is
enough clearance between
the
TOP
and
MID
SECTIONS to slide over the mirror
stem.
Innovative D lgn
And
Precision Manufacturing
ROTATING
ADJUSTMENT
SCREW
TOP AND MID
SECTIONS
MUST
TOUCH
AT THE PIVOT POINT
BEFORE CLAMP SCREW
IS FULLY TIGHTENED
4 - While sitting
in
the
passenger seat,
place
the
mount over the mirror
stem
.
Tighten
the
CLAMP
SCREW
until the mount starts to clamp onto the
mirror
stem
.
As
you
are
tightening
the
clamp
screw,
MAKE SURE
THE
TOP
AND MID SECTIONS TOUCH AT
THE
PIVOT POINT. If they do not touch
at
the
pivot point.
YOU
HAVE AN INCOMPATIBLE MIRROR TYPE FOR
THIS
MOUNT
. Position the mount
as
far forward
as
it will
go
and
parallel
to
the
bottom of the mirror before fully tightening.
PAGE 1 OF 2
BlendMount •
US
PATENT# 0625,580 S,
0656,811
S,
D653
,
980
S
0690,
245
S,
D690
,
246
S,
0690,24 7 S
and
other patents
pending
Termékspecifikációk
| Márka: | BlendMount |
| Kategória: | nincs kategorizálva |
| Modell: | BCB-2032 |
Szüksége van segítségre?
Ha segítségre van szüksége BlendMount BCB-2032, tegyen fel kérdést alább, és más felhasználók válaszolnak Önnek
Útmutatók nincs kategorizálva BlendMount

27 Augusztus 2024

27 Augusztus 2024

27 Augusztus 2024

27 Augusztus 2024

27 Augusztus 2024

27 Augusztus 2024

27 Augusztus 2024

27 Augusztus 2024

27 Augusztus 2024

27 Augusztus 2024
Útmutatók nincs kategorizálva
- nincs kategorizálva Prism Sound
- nincs kategorizálva Pure
- nincs kategorizálva SunPower
- nincs kategorizálva Gree
- nincs kategorizálva Hanwha
- nincs kategorizálva Audiovox
- nincs kategorizálva Crystal Quest
- nincs kategorizálva DB Technologies
- nincs kategorizálva Lascar Electronics
- nincs kategorizálva Aquatic AV
- nincs kategorizálva Infinity
- nincs kategorizálva Cresta
- nincs kategorizálva Homedics
- nincs kategorizálva Plugwise
- nincs kategorizálva Alphatronics
Legújabb útmutatók nincs kategorizálva

10 Április 2025

10 Április 2025

10 Április 2025

9 Április 2025

9 Április 2025

9 Április 2025

9 Április 2025

9 Április 2025

9 Április 2025

9 Április 2025