Használati útmutató BlendMount BRD-2000R
BlendMount nincs kategorizálva BRD-2000R
Olvassa el alább 📖 a magyar nyelvű használati útmutatót BlendMount BRD-2000R (2 oldal) a nincs kategorizálva kategóriában. Ezt az útmutatót 23 ember találta hasznosnak és 12 felhasználó értékelte átlagosan 4.6 csillagra
Oldal 1/2
PART# BRD-2000R
Blend.
mount-®
Er
d:
Innovative
Mounting
Solut
ions
1111111111111,1
,
11
,
11,1
11111
_
u,._v
--:.i.
b
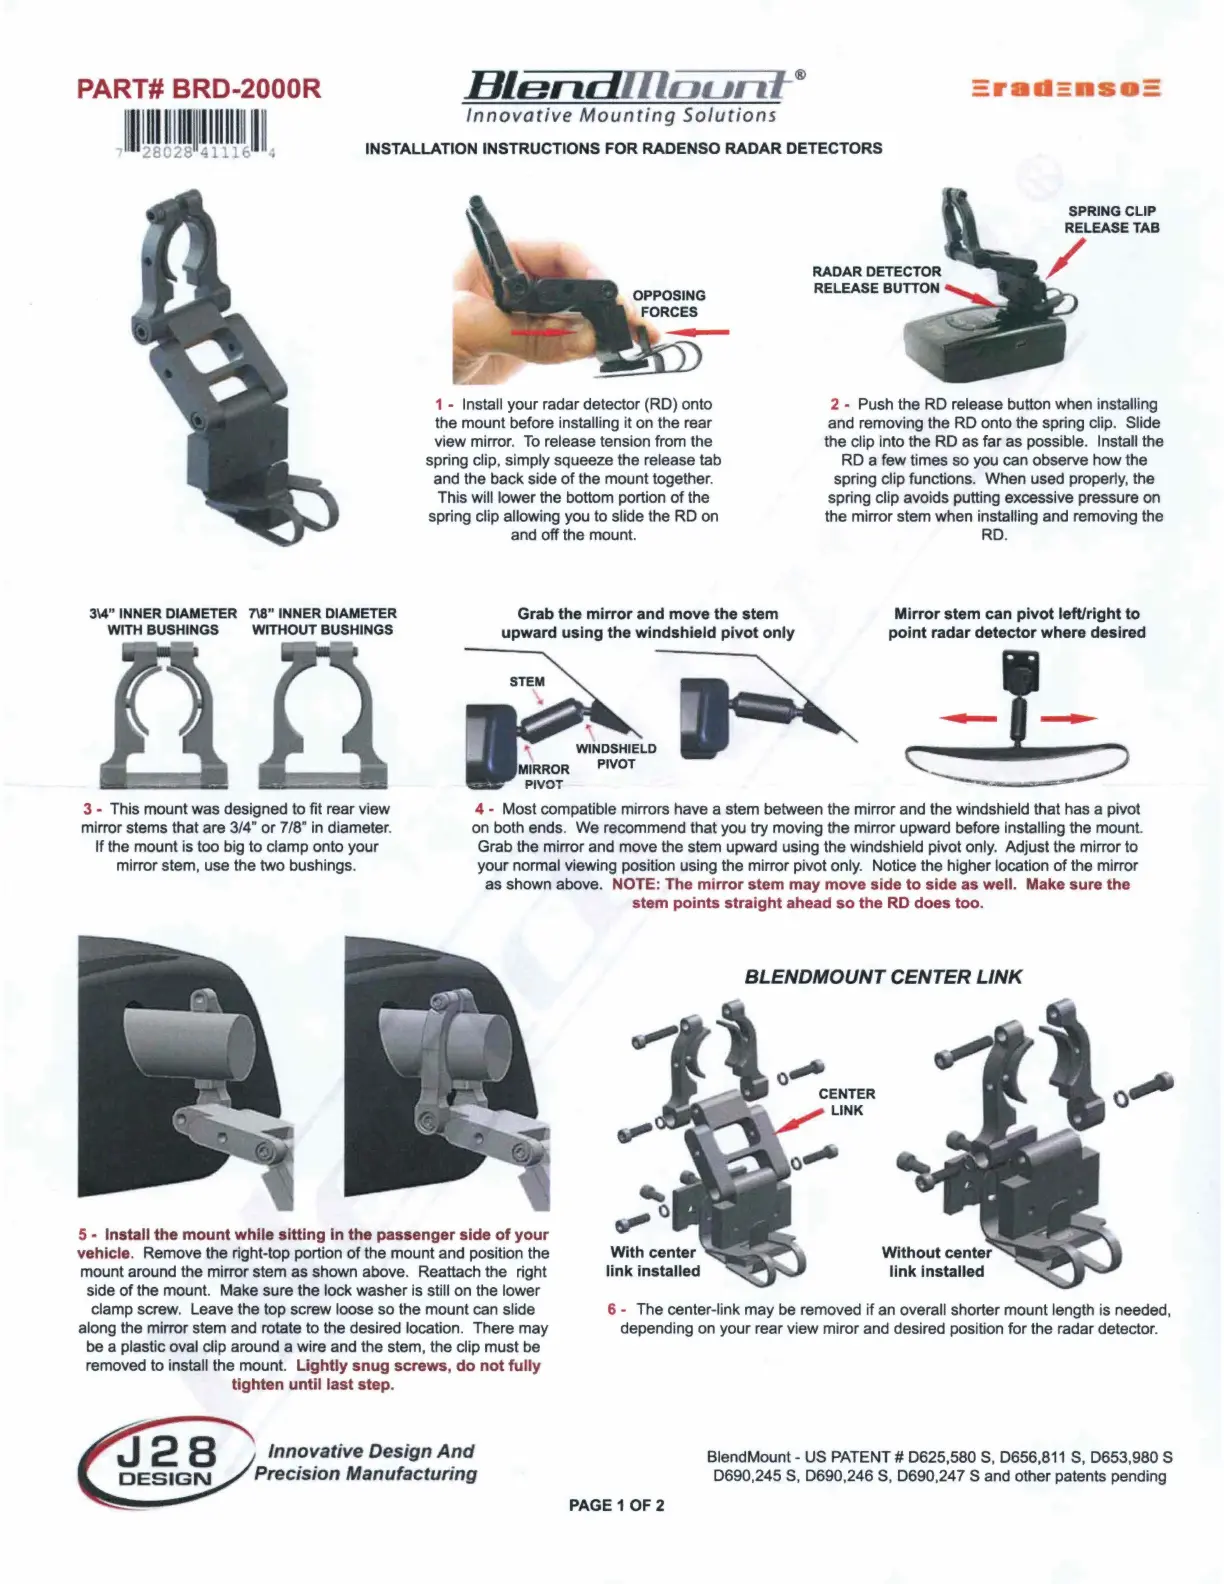
INSTALLATION INSTRUCTIONS FOR RADENSO RADAR DETECTORS
3\4" INNER DIAMETER 7\8" INNER DIAMETER
WITH BUSHINGS WITHOUT BUSHINGS
_I_
1 -Install your radar detector (RD) onto
the mount before installing it on the rear
view mirror.
To
release tension from the
spring clip, simply squeeze the release tab
and the back side
of
the mount together.
This will lower the bottom portion
of
the
spring clip allowing you to slide the RD on
and off the mount.
Grab the mirror and move the stem
upward using the windshield pivot only
SPRING CLIP
RELEASE
TAB
/
2 • Push the RD release button when installing
and removing the RD onto the spring clip. Slide
the clip into the RD as far as possible. Install the
RD a few times so you can observe how the
spring clip functions. When used properly, the
spring clip avoids putting excessive pressure on
the mirror stem when installing and removing the
RD.
Mirror stem can pivot left/right to
point radar detector where desired
3 -This mount was designed to fit rear view
mirror stems that are 3/4"
or
7/8" in diameter.
4 -Most compatible mirrors have a stem between the mirror and the windshield that has a pivot
on both ends. We recommend that you try moving the mirror upward before installing the mount.
If
the mount is too big to clamp onto your
mirror stem, use the two bushings.
Grab the mirror and move the stem upward using the windshield pivot only. Adjust the mirror to
your normal viewing position using the mirror pivot only. Notice the higher location
of
the mirror
as shown above. NOTE: The mirror stem may move side to side as well. Make sure the
stem points straight ahead
so
the RD does too.
5 -Install the mount while sitting In the passenger side
of
your
vehicle. Remove the right-top portion
of
the mount and position the
mount around the mirror stem as shown above. Reattach the right
side
of
the mount. Make sure the lock washer is still on the lower
clamp screw. Leave the top screw loose so the mount can slide
along the mirror stem and rotate to the desired location. There may
be a plastic oval clip around a wire and the stem, the clip must be
removed to install the mount. Lightly snug screws,
do
not fully
tighten until last step.
Innovative Design And
Precision Manufacturing
BLENDMOUNT CENTER LINK
6 -The center-link may be removed if an overall shorter mount length is needed,
depending on your rear view miror and desired position for the radar detector.
PAGE 1 OF 2
BlendMount -US PATENT# 0625,580 S, 0656,811 S, D653,980 S
D690,245 S, 0690,246 S, 0690,247
Sand
other patents pending
Termékspecifikációk
| Márka: | BlendMount |
| Kategória: | nincs kategorizálva |
| Modell: | BRD-2000R |
Szüksége van segítségre?
Ha segítségre van szüksége BlendMount BRD-2000R, tegyen fel kérdést alább, és más felhasználók válaszolnak Önnek
Útmutatók nincs kategorizálva BlendMount

27 Augusztus 2024
27 Augusztus 2024
27 Augusztus 2024
27 Augusztus 2024
27 Augusztus 2024
27 Augusztus 2024
27 Augusztus 2024
27 Augusztus 2024
27 Augusztus 2024
27 Augusztus 2024
Útmutatók nincs kategorizálva
Legújabb útmutatók nincs kategorizálva
10 Április 2025
10 Április 2025
10 Április 2025
9 Április 2025
9 Április 2025
9 Április 2025
9 Április 2025
9 Április 2025
9 Április 2025
9 Április 2025